Help Center - LINE Ads
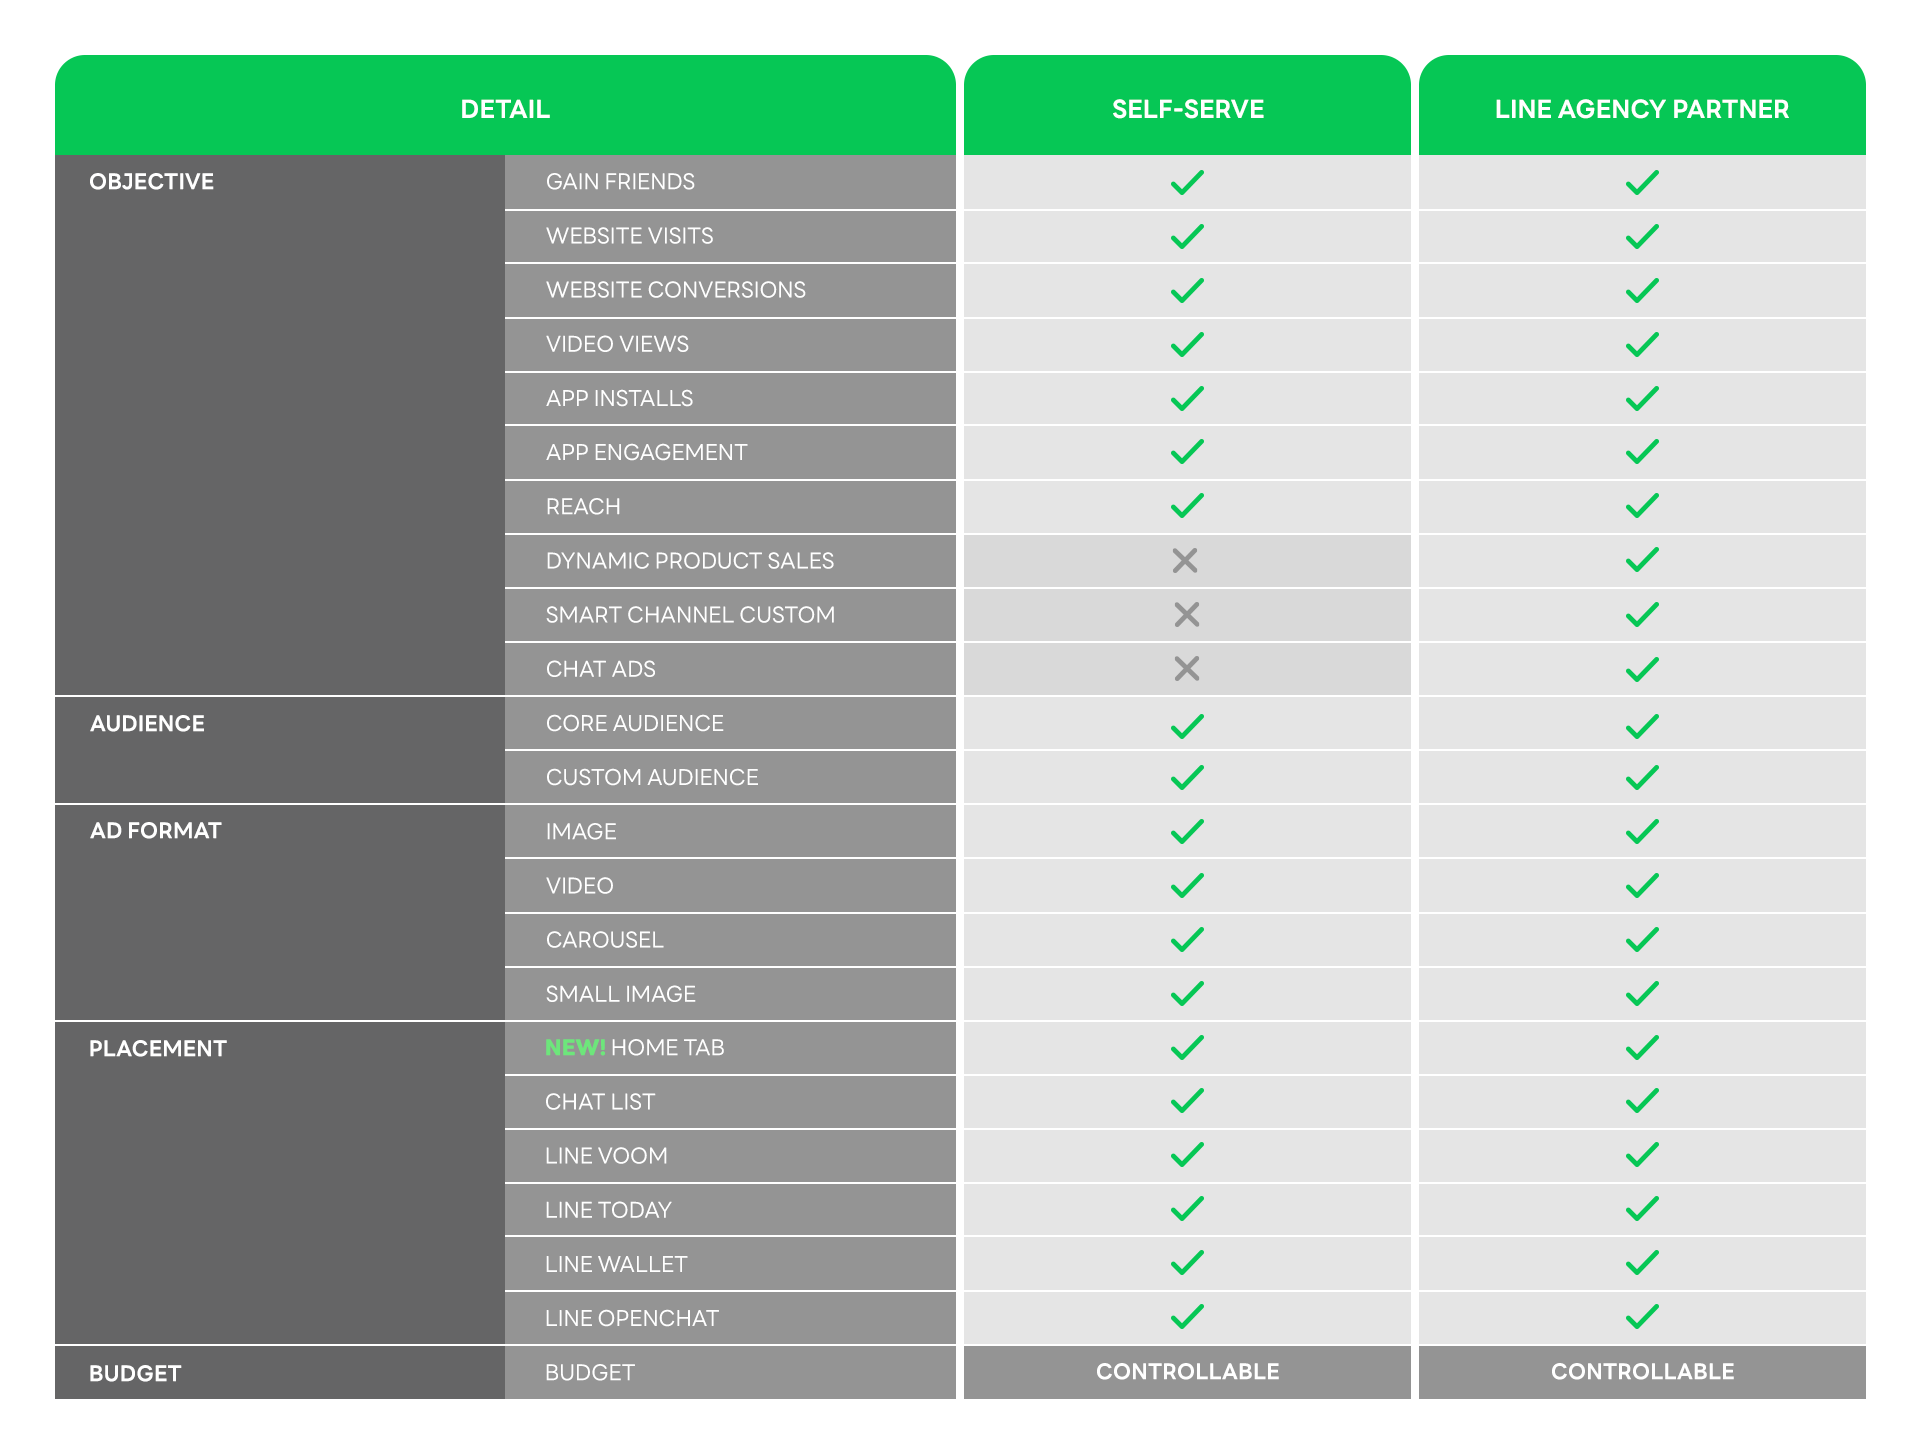
There are 2 types of LINE Ads accounts: Self-Serve and LINE Agency Partner.
Self-Serve
Users who use this type of account set up their own LINE Ads account online and make payments using a credit card.
LINE Agency Partner
This type of account is for users who neither set up their own LINE Ads account nor process credit card payments through LINE directly. Rather, they choose to contact an agency to set up and run the account for them.
Self-Serve and LINE Agency Partner accounts may have certain functions and operational processes that differ from one another.
To use the Help page, please ensure that you select the page associated with your account type.
LINE Ads Self-Serve l LINE Agency Partner
(Last updated: June 8, 2022)
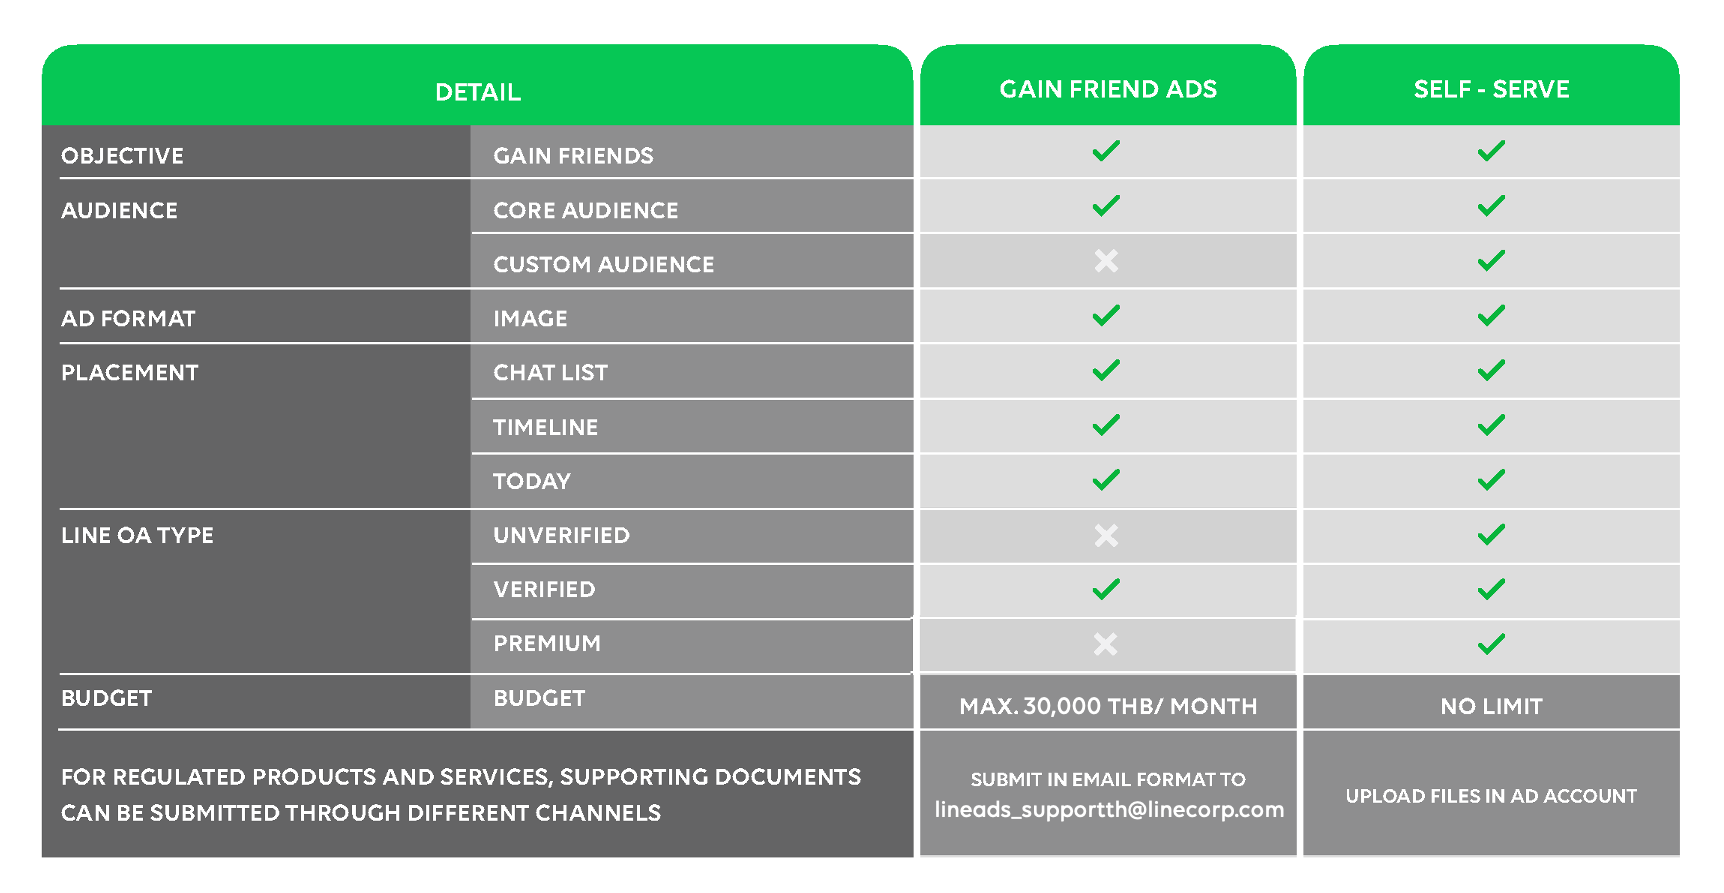
If you use Gain Friend Ads, you can submit supporting documents by following the steps below:
1. Send an email to [email protected]
2. Specify the email subject line as follows: Supporting Documents/Ad Account ID/Product or Service Name
3. Please enter the following details:
- Contact Person:
- Contact Number:
- Ad Account Name:
- Product or Service Name:
*** Please also add supporting documents as attachments.
To purchase a LINE Ads Self-Serve, you can directly upload the documents under your Ad Account by following the steps below:
1. Create your Ad Account via admanager.line.biz.
2. Upload the supporting documents under the ‘Product Information’ menu.
.png)
Gain Friend Ads l Purchase LINE Ads Self-Serve l Controlled Products and Services
(Last updated: June 1, 2022)
You can check the number of successful Gain Friends in the “Clicks” column, and for cost per friend, in the “CPC” column.
.png)
(Last updated: March 1, 2021)
You can connect LINE Official Account to LINE Ads by following the steps below:
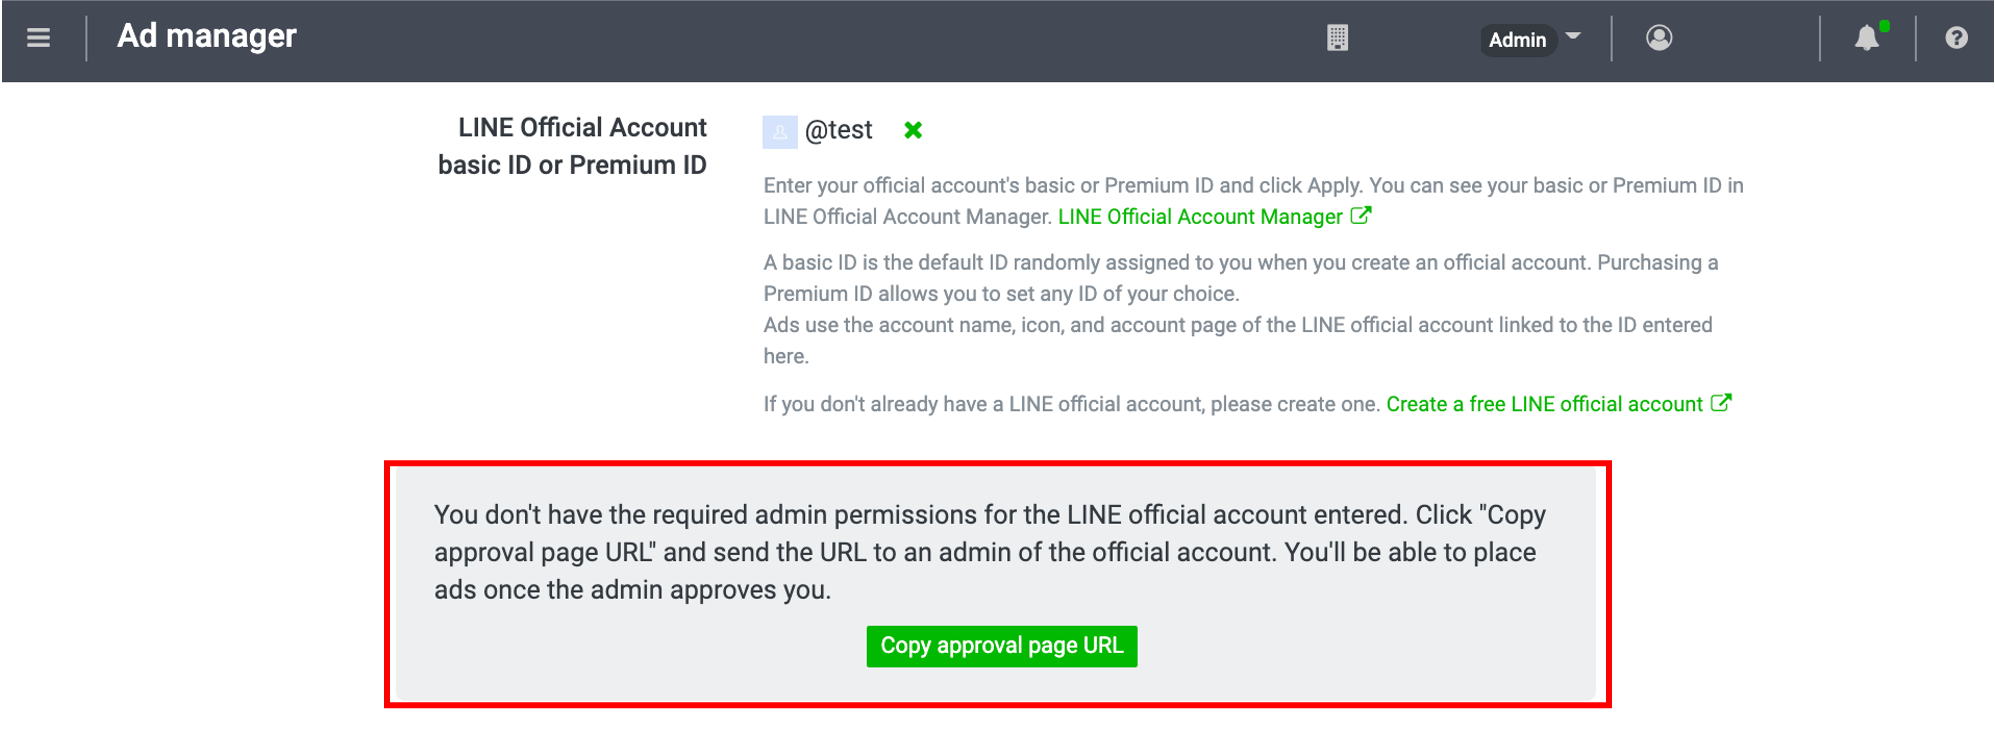
Method 1: Copy approval URL when creating ad account
- Open the group in which you want to create an ad account. > Click on the “Ad accounts” tab. > Click “+ New ad account.”
- Under “Product information”, fill out and review your “LINE Official Account basic ID or Premium ID” information
- Click “Copy approval page URL”
- Fill out every required field and then click “Create”
- Send the copied link to an admin of LINE official account you registered
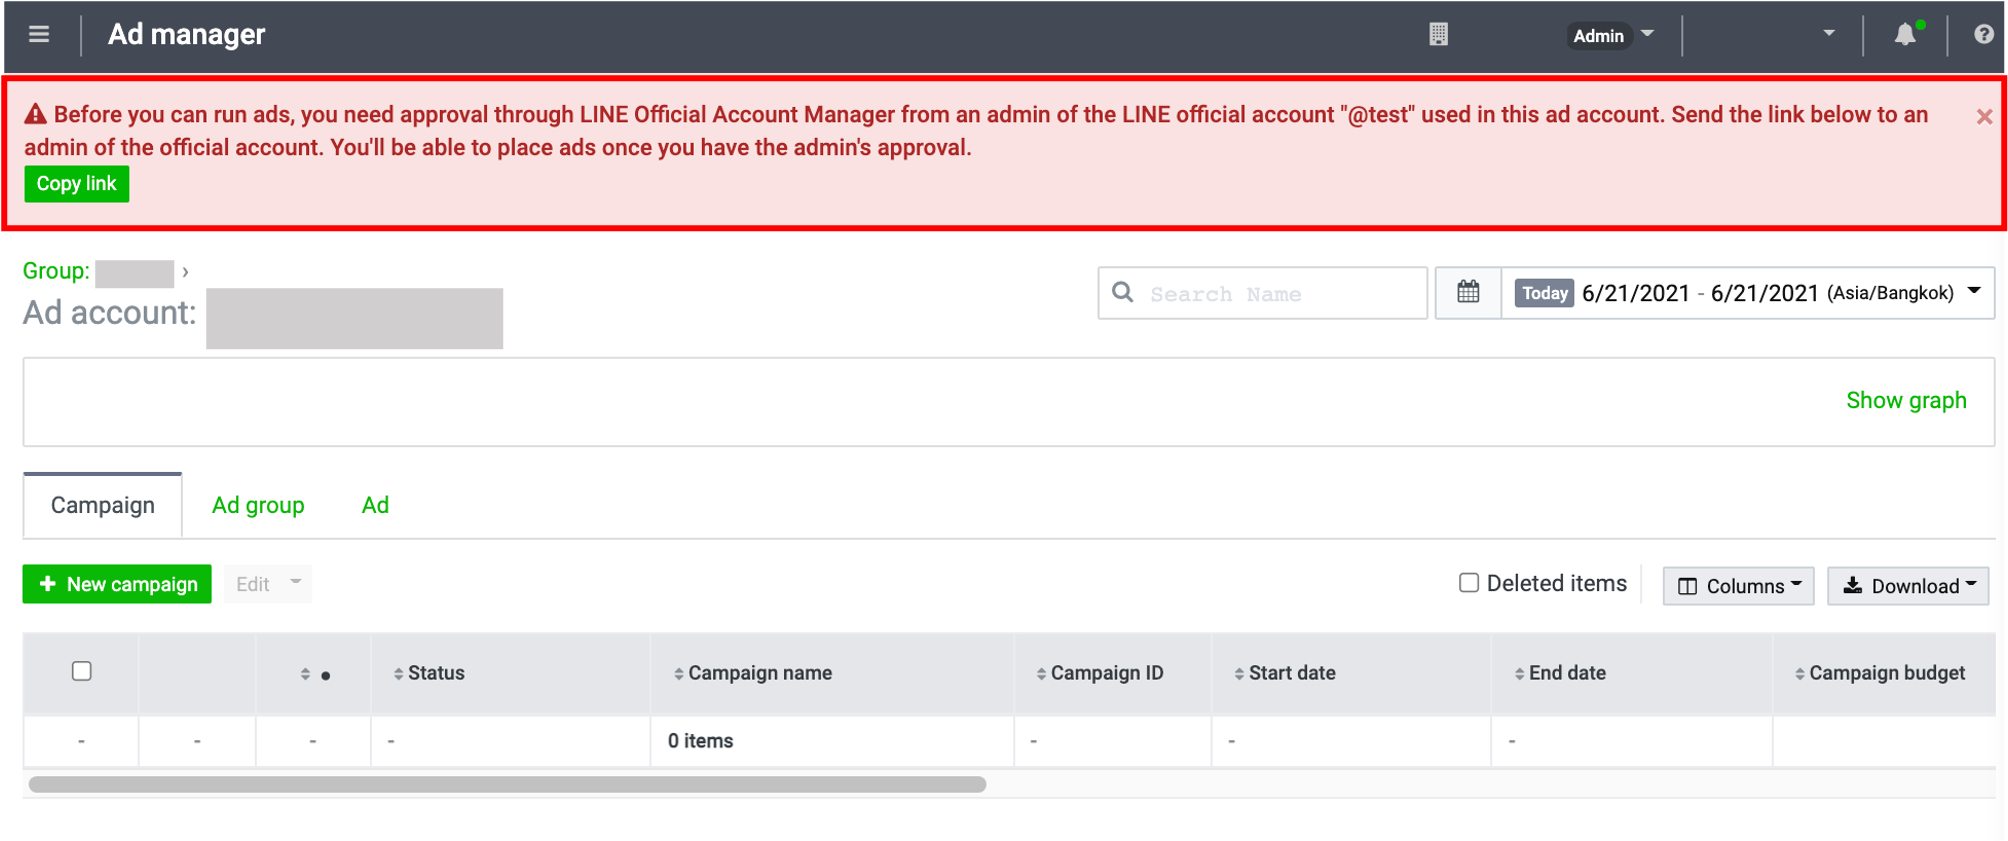
Method 2: Copy approval URL after creating Ad account
- Select the ad account name from which you would like to proceed approval
- Click “Copy link” and send the URL to admin of LINE Official Account that you registered
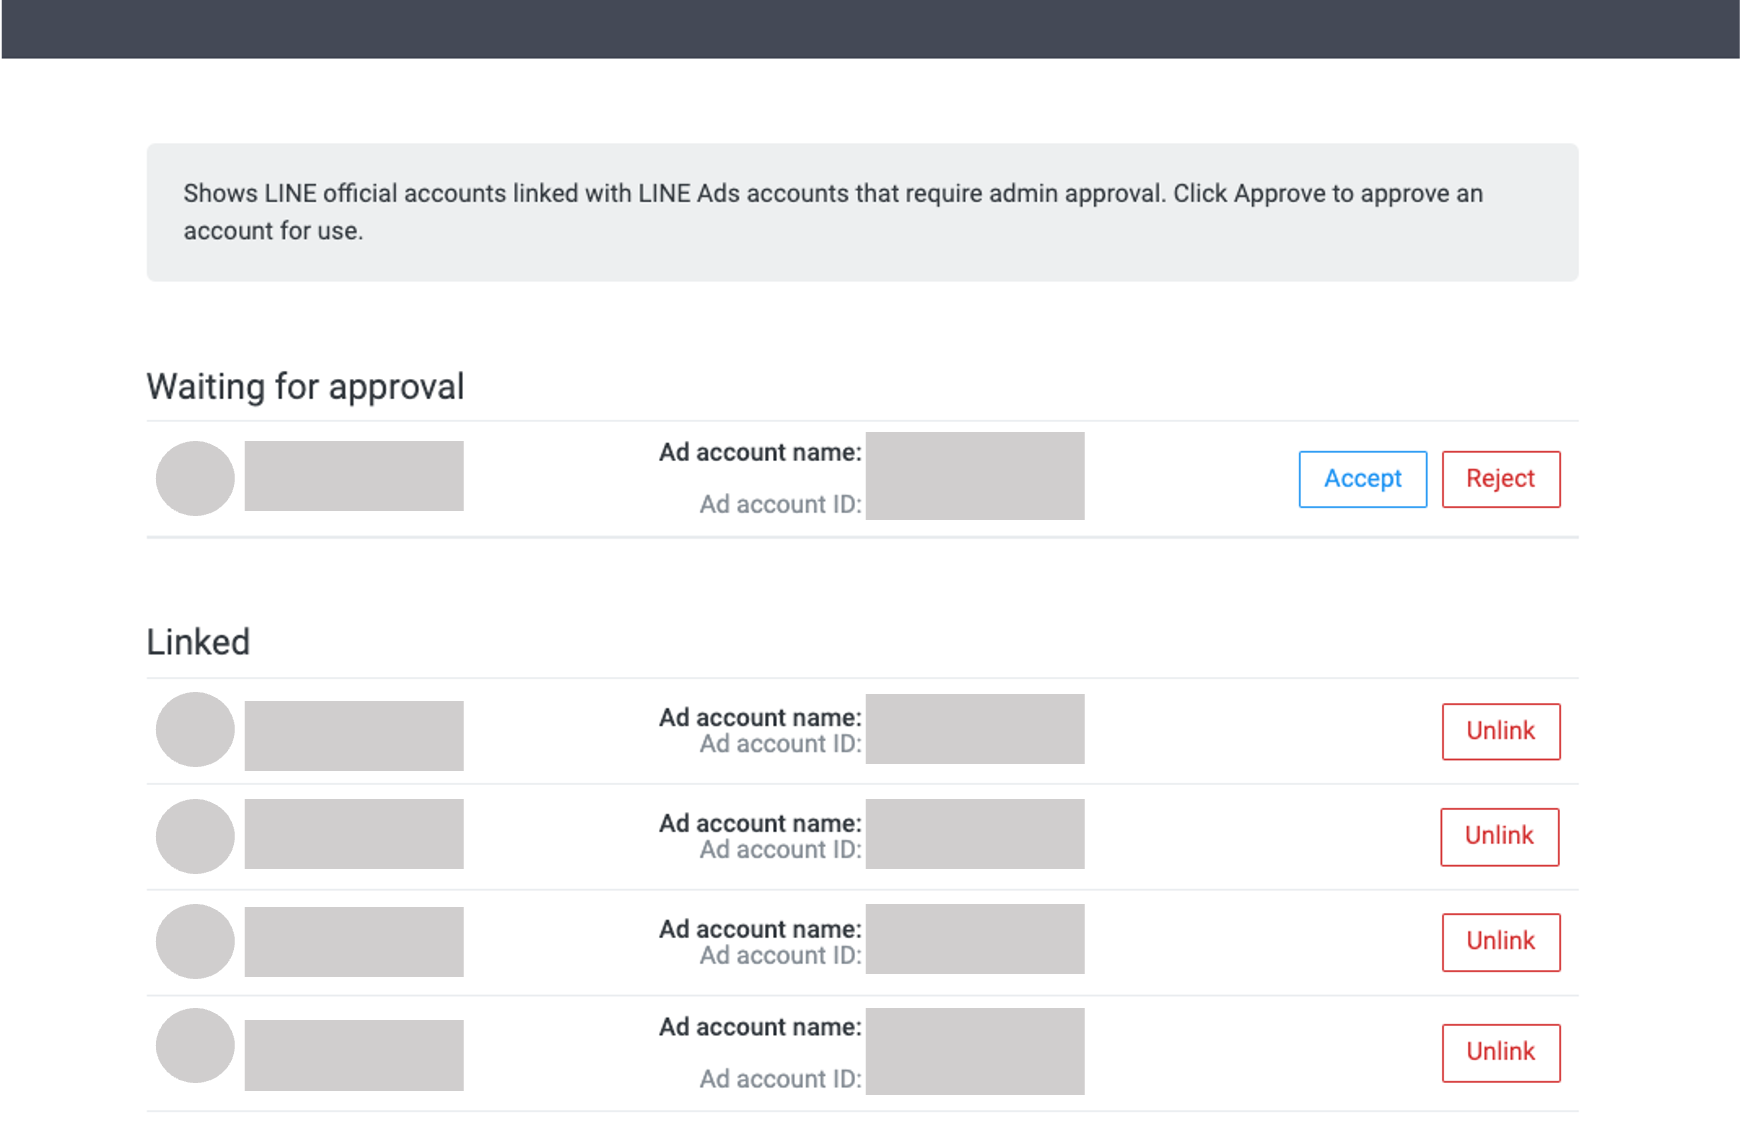
When admin of LINE Official Account receives the approval URL from either method 1 or 2 above
- Open this link and login to LINE Official Account Manager
- Open new tab and paste the approval URL
- Click “Accept” for the ad account you would like to link
Remark:
- Creation of ad account must be completed before the linkage in approval URL
- Always recheck for the login of LINE official account registered
(Last updated: June 25, 2021)
Before you start delivering ads, please ensure that all the settings below are correct and complete.
Are all campaign settings configured correctly?
See how you can check and edit your settings here.
Are all ad group settings configured correctly?
See how you can check and edit your settings here.
Are all ad settings configured correctly?
See how you can check and edit your settings here.
Has the review process for the ad been completed?
See how you can check the review status for the ad here.
An ad will start to display after you have checked all the settings above and updated the status of the campaign, ad group, and ad to “Active.”
* In cases where you have already set a start date and time in the campaign setting page, and all statuses are set to Active, the ad will automatically display on the previously defined date and time.
.png)
(Last updated: October 19, 2020)
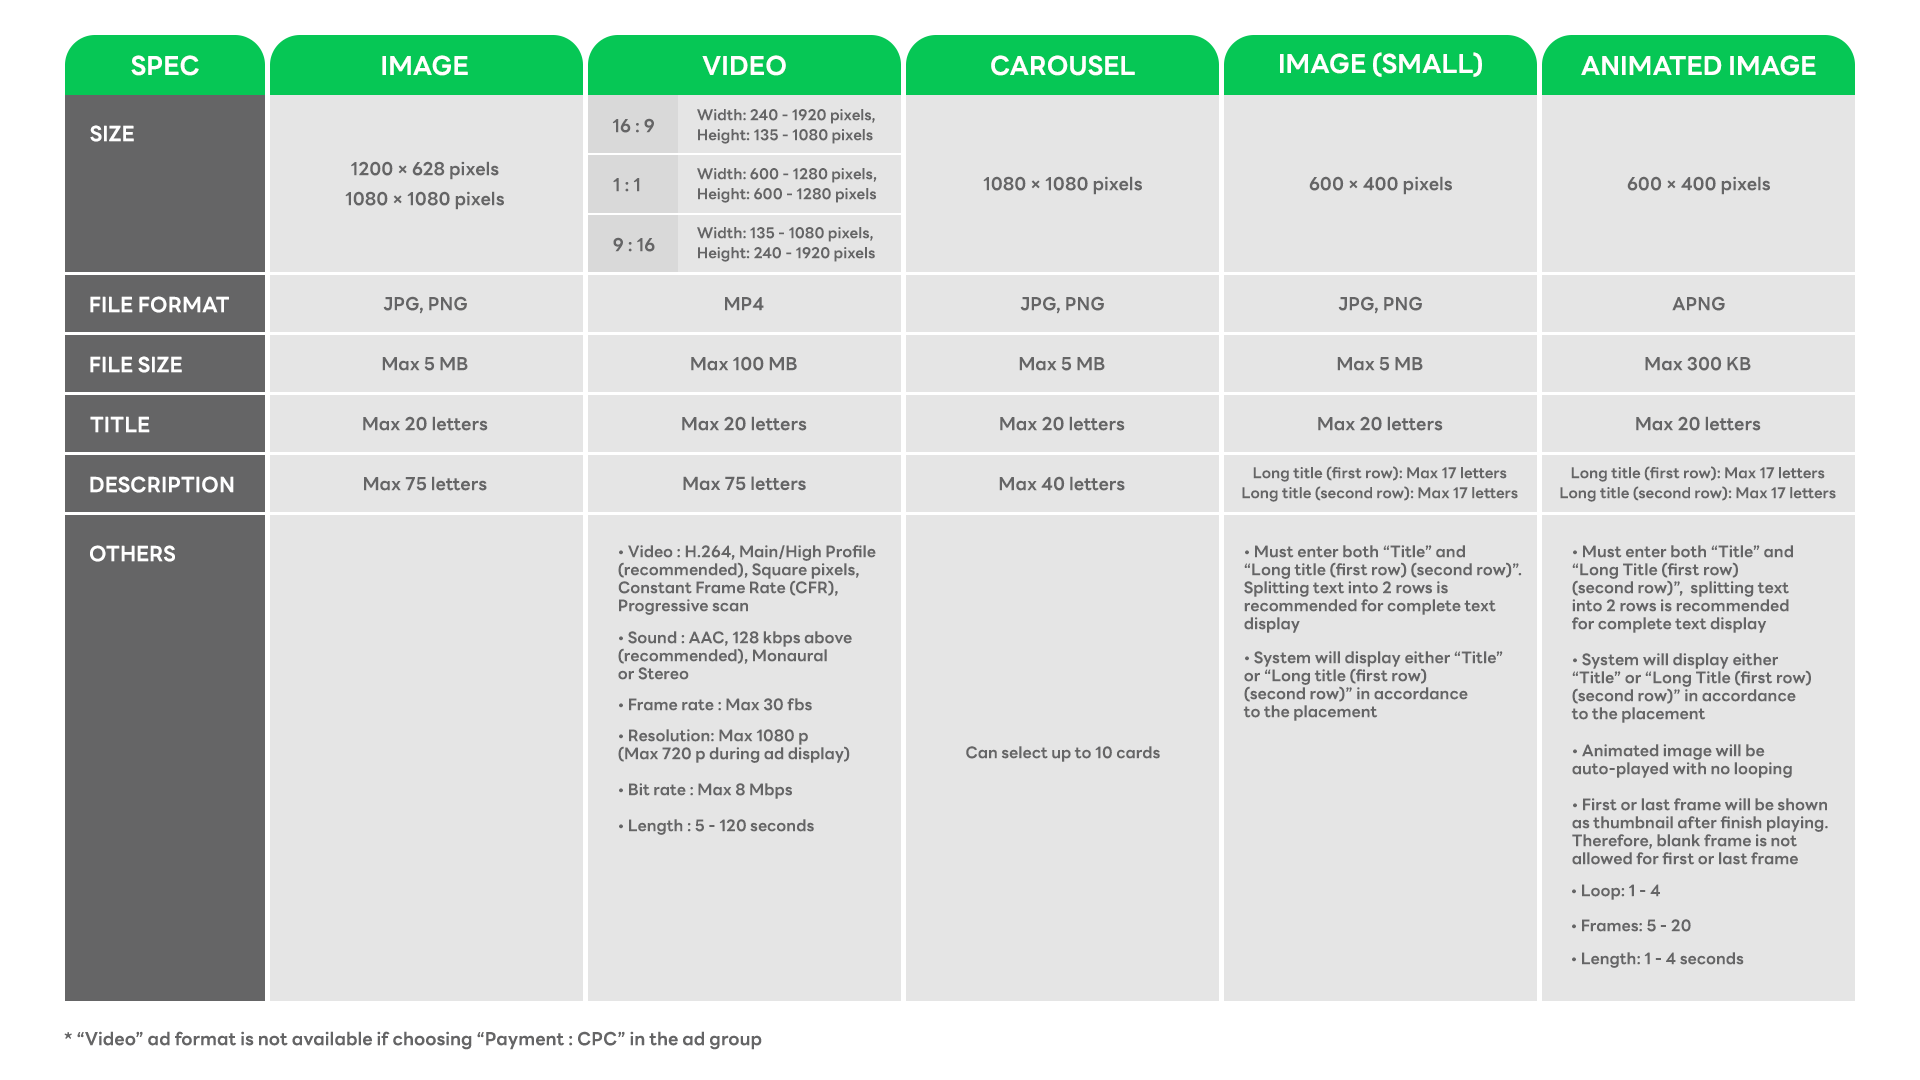
You can recheck specification of each ad format below:
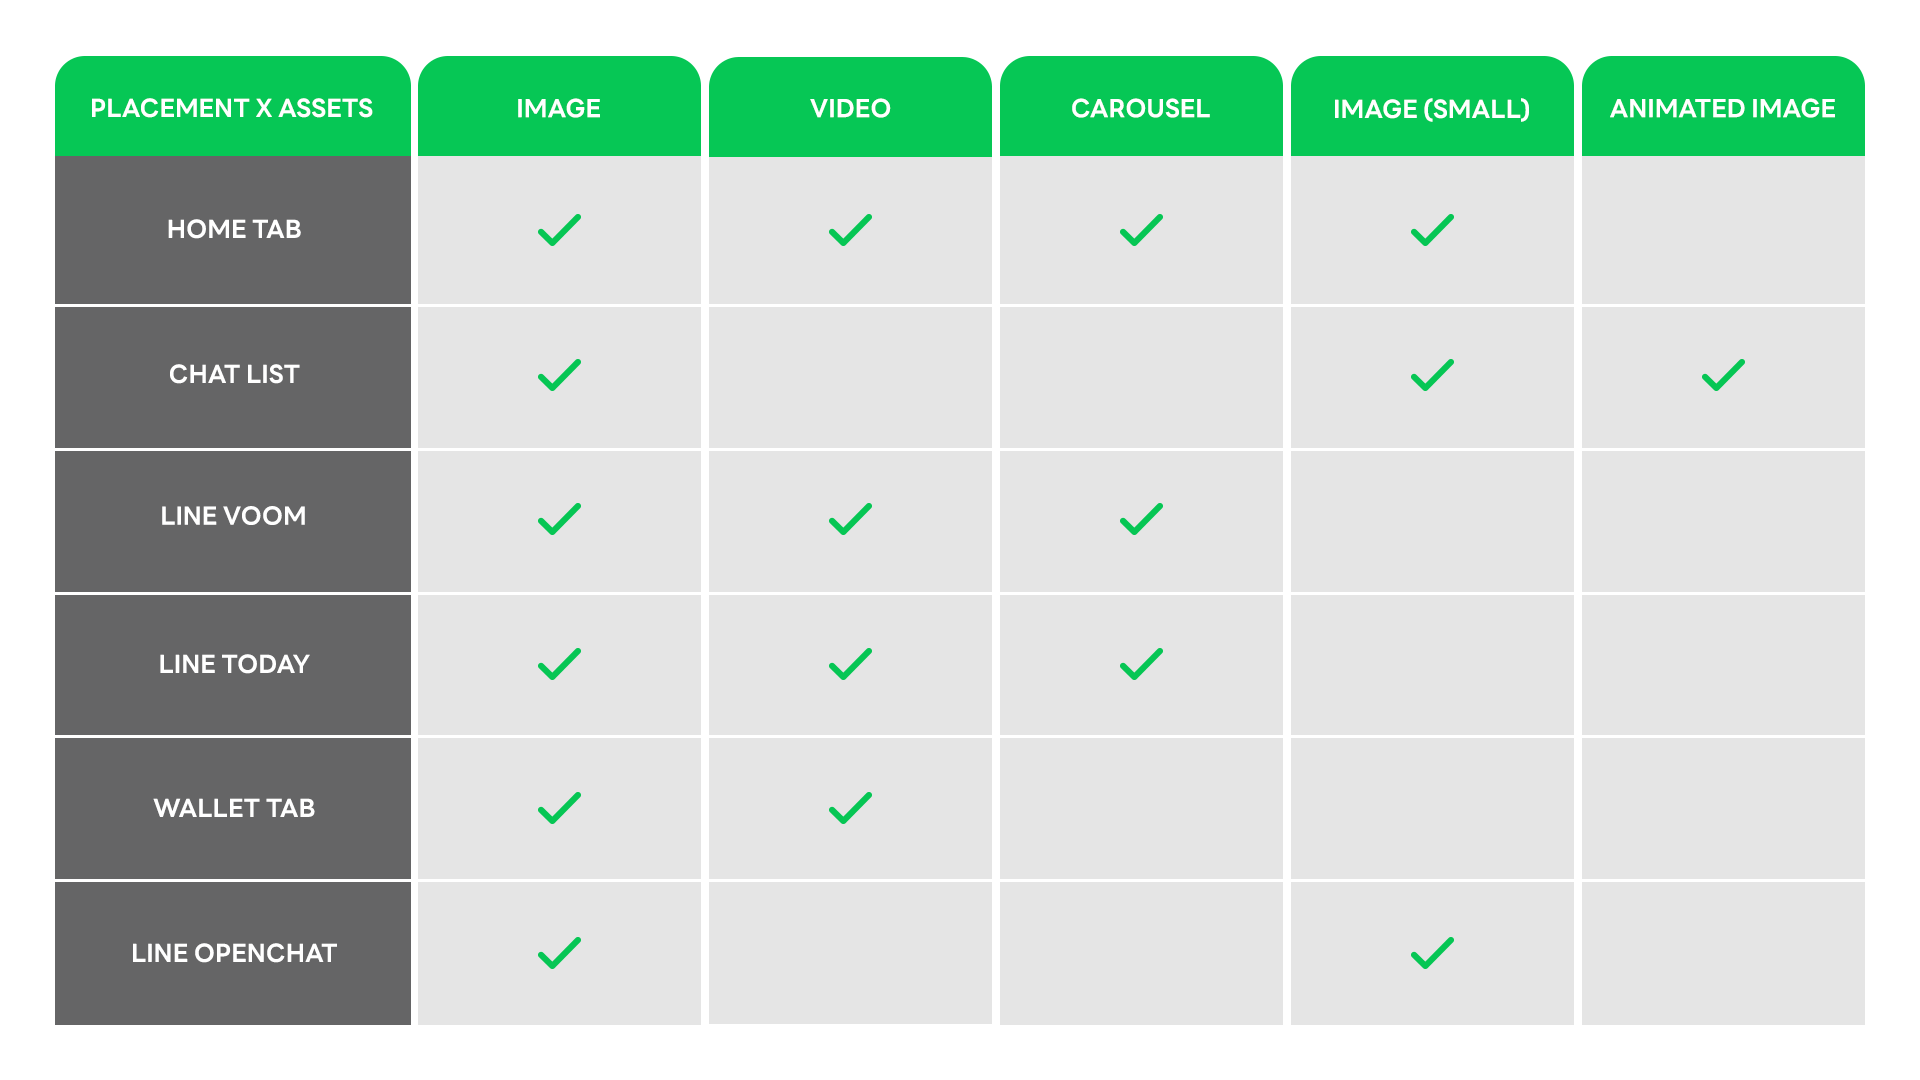
You can recheck LINE placements for each ad format below:
Remark
- LINE Ads will deliver ads to all placements within LINE-related services. You are unable to set ads to be delivered on a particular placement.
- For more information on how to create animated image, please click here.
(Last updated: October 26, 2022)
Your “ad” will undergo a review process within 48 hours after submitted.
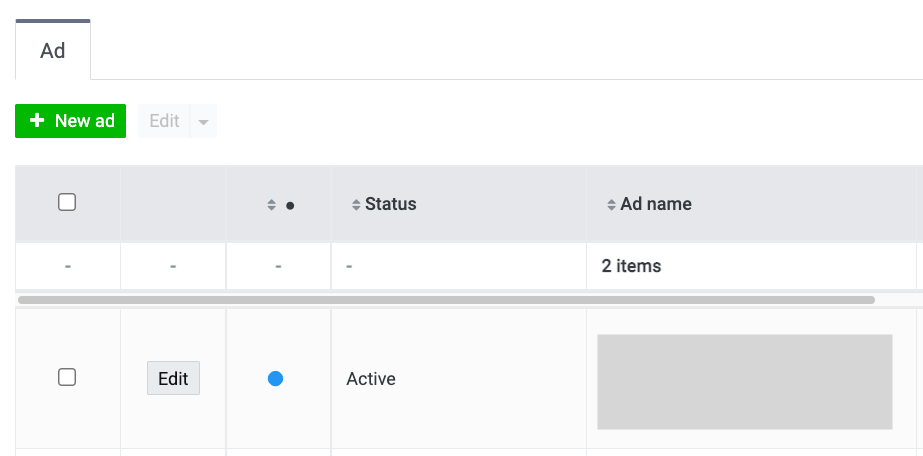
You can check the review status of your ad by following the steps below:
1. Click on the “Ad” tab on the Ad Manager page to see the full ad list.
2. Hover the mouse cursor over the icon in the “Status” field.
In the “Review status,” you will see each status type as follows:
Under review
This means your ad is still in the review process. You can create other ads but cannot deliver the ad that is currently under review.

Active
This means the review process is complete, and your ad is approved. You are able to deliver the ad once all the settings are completed.
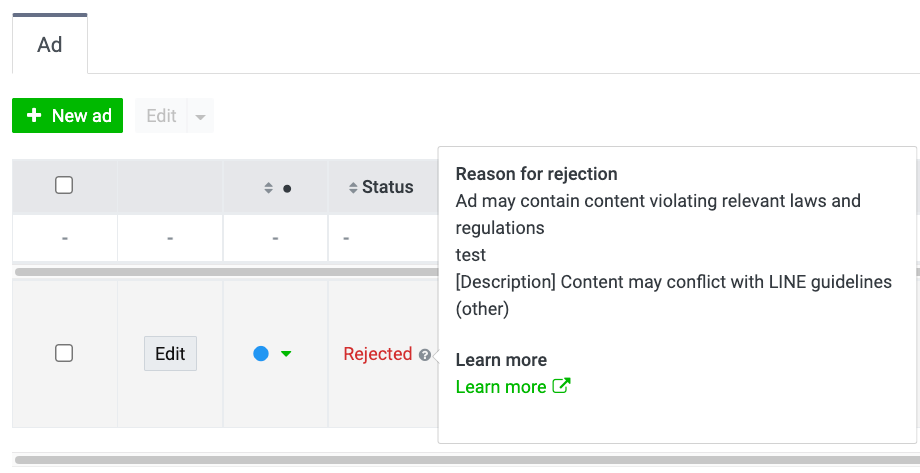
Rejected
This means the review process is complete, but your ad is not approved. As a result, this ad cannot be delivered.You will see the reason your ad has been rejected when you hover the mouse cursor over the icon .
*Please create ad new with the adjustment of rejected detail.
Note:
- You can check ad status only in “Ad” tab
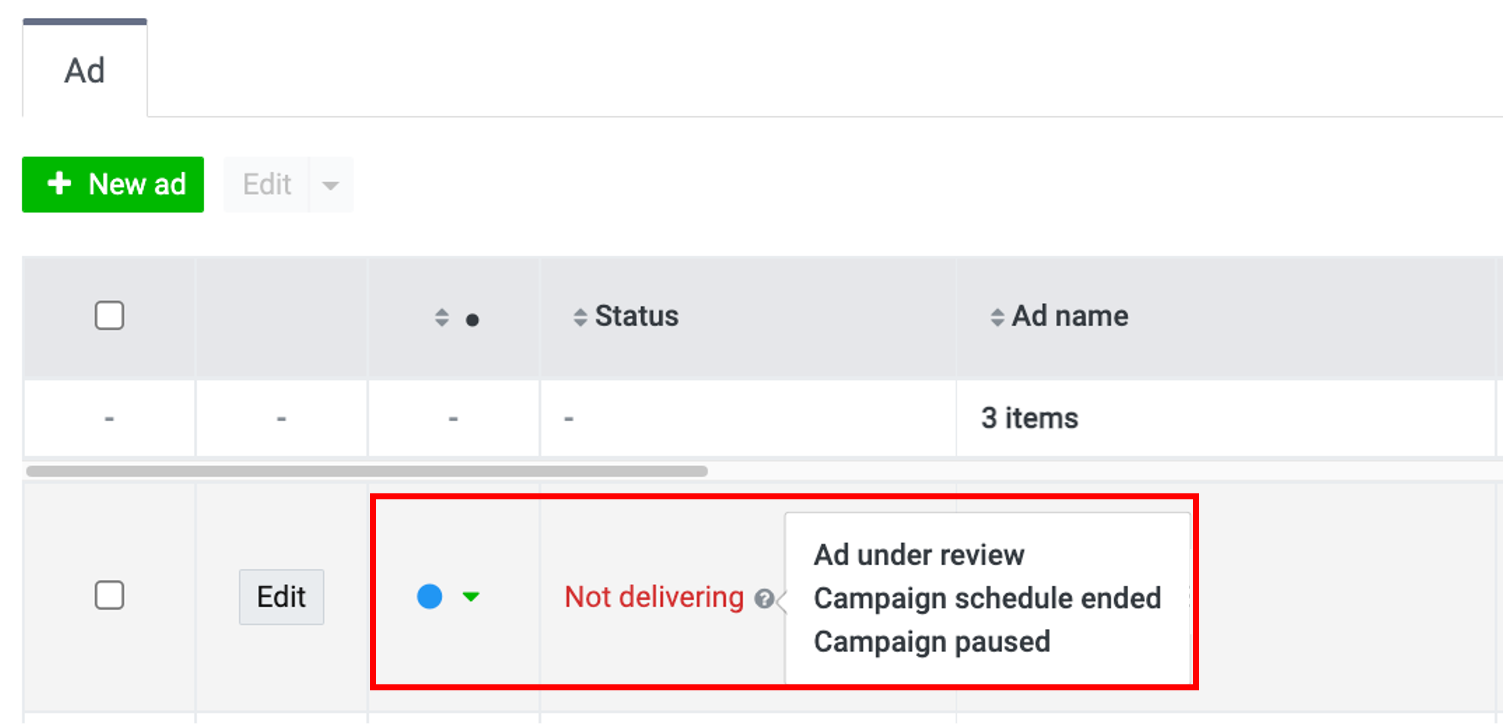
- Approved ad may or may not deliver, depending on your set up “Active” or “Paused”. For more information, click here.
- “Media” such as image and video files won't be reviewed if you haven't created any ads for it. Please create ad and check ad status.
(Last updated: December 8, 2021)
Status describes whether or not the campaign is running during that time. You can set status in 3 levels: campaign, ad group, and ad.
Active. The level you are checking is active and can deliver ads.
Paused. The level you are checking is not active. Ads are not delivered because you have paused them.
Steps to adjust status
Method 1 Select level, click on “Status Symbol”, and select status.
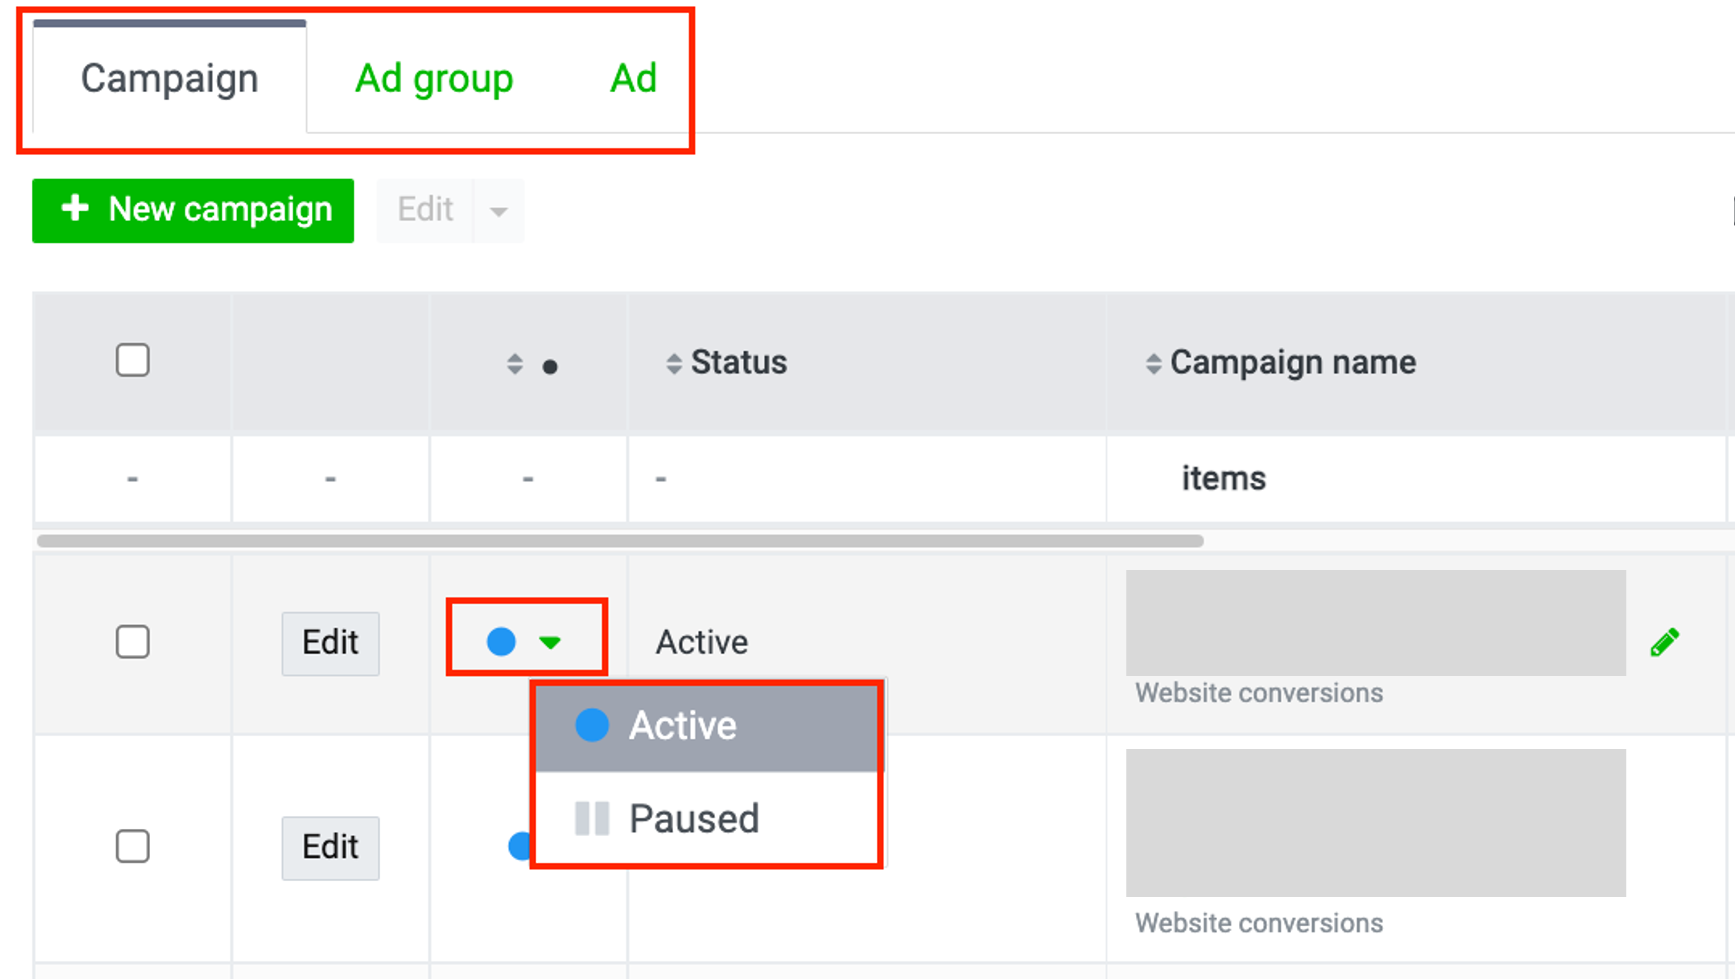
Method 2 Select level, click “Edit”, select the status, and click “Save”

You can adjust your status at any time. Please always check the status along with the description and question mark.
Please be aware of status in each level. In case you would like to run or resume ads, it is necessary to select “Active” status throughout all 3 levels. In case you would like to stop ads, please select “Paused” status.
(Last updated: August 1, 2021)
To measure ad performance through the LINE Ads, you have to insert LINE Tags on the page where you want to track conversions.
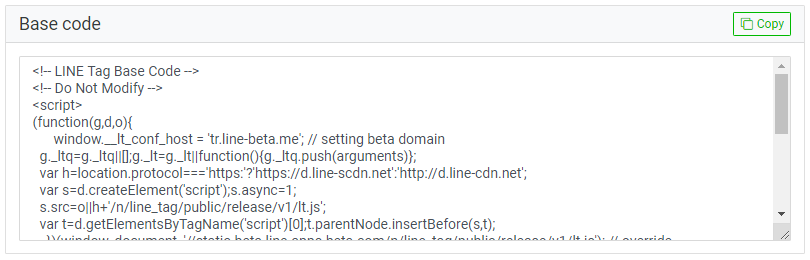
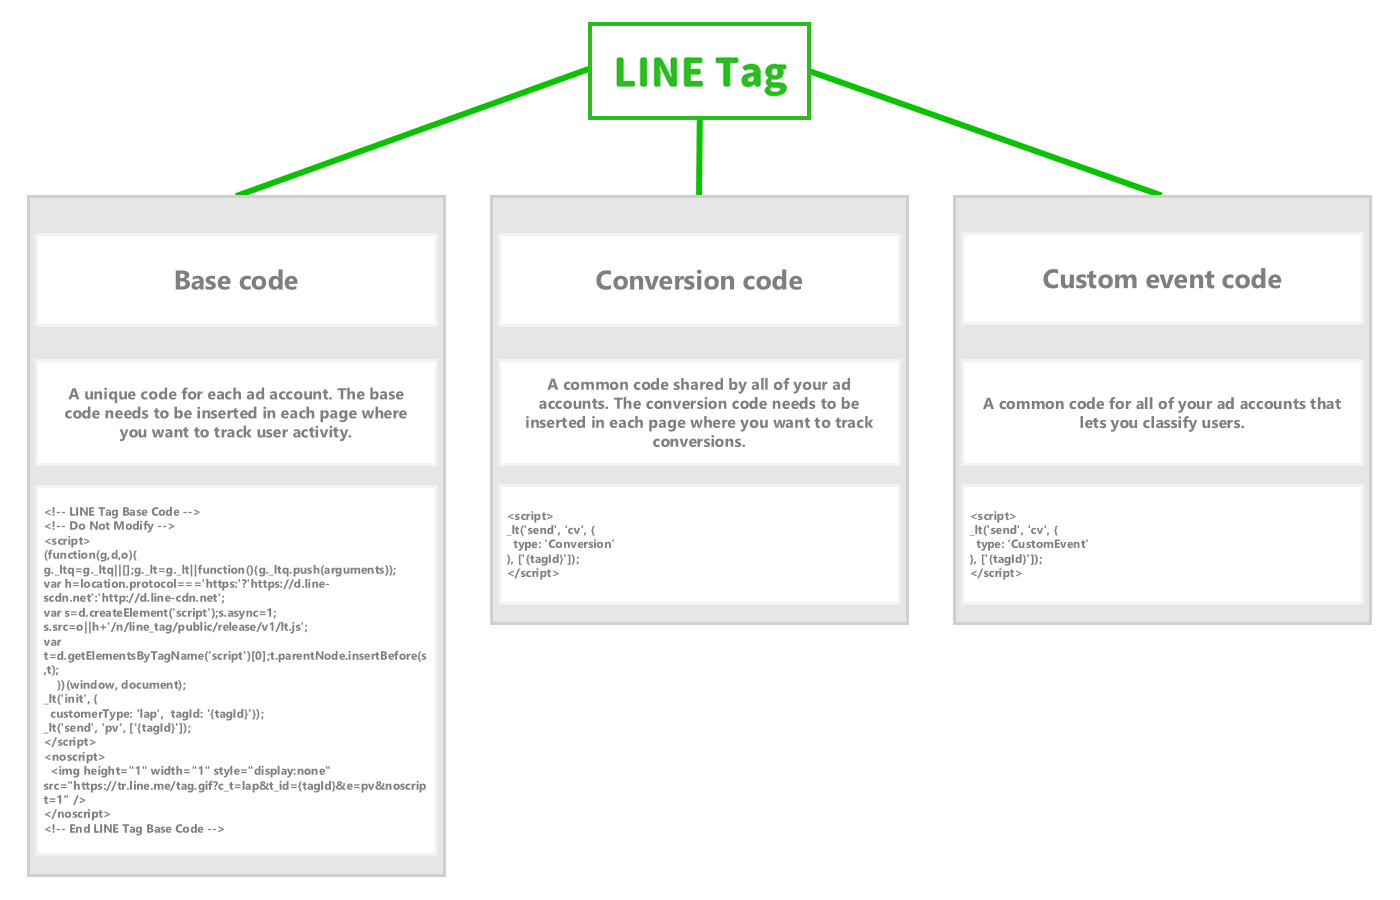
LINE Tags consist of 3 types of code: base code, conversion code, and custom event code.
.png)
LINE Tags can be obtained from the Admin panel of LINE Ads by following the steps below:
1. Click on the “Ad Account” tab on the homepage. > Select the account name where you want to track conversions.
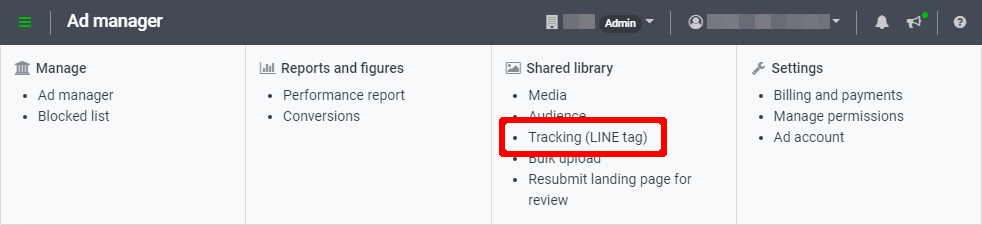
2. Click on the “≡” icon in the upper left of the Ad Manager page. > Go to the “Reports and figures” menu. > Click “Tracking (LINE Tags).”

3. Check the codes that appear on the screen one by one.
You can insert the base code, custom event code, and conversion code on the advertiser’s website as desired.
Please refer to the followings to see how you can insert each type of code:

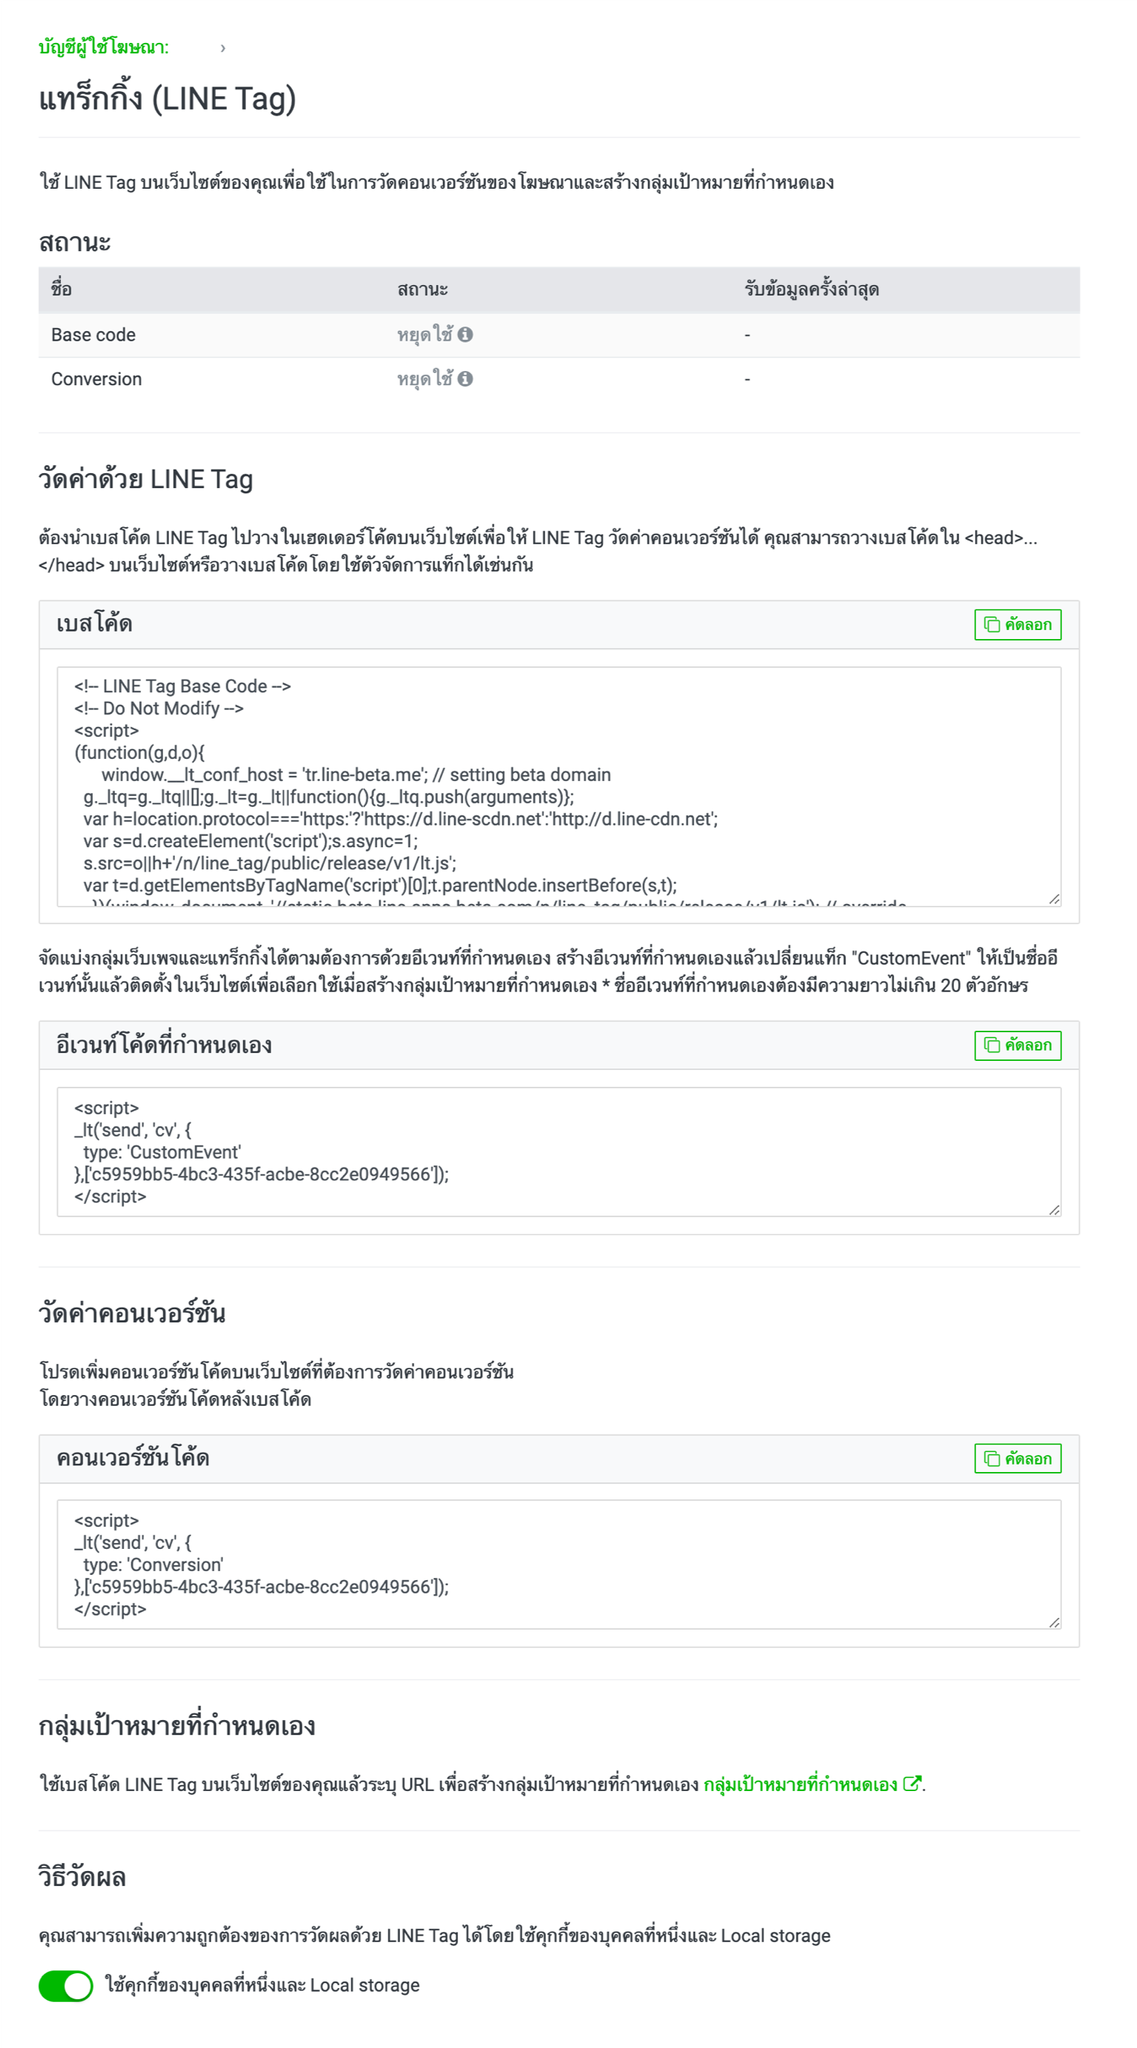
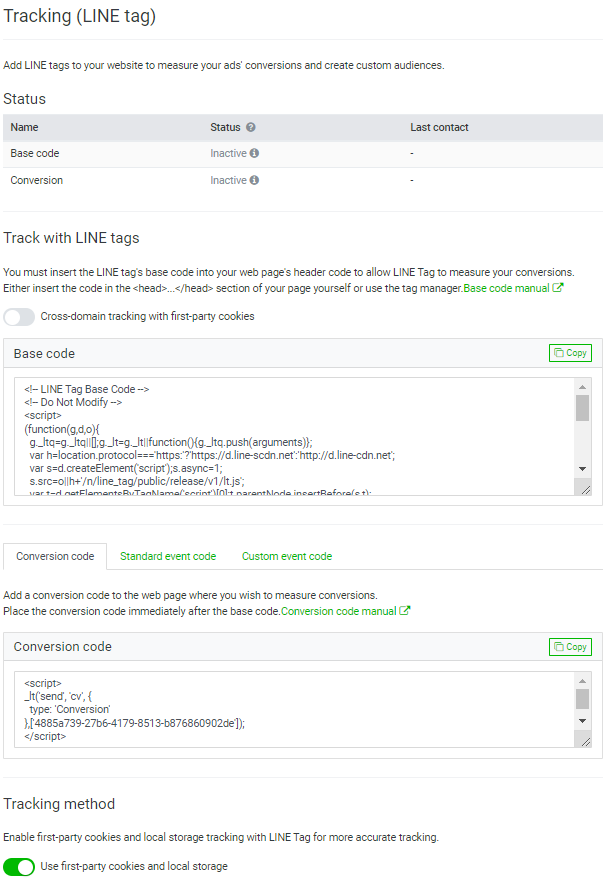
Tracking (LINE Tag) page description
- Status
You can check a tag status from here.
Name: This refers to tag name.
For the event code, the event name set earlier will appear when the tag is triggered.
Status: A tag’s functional status is displayed here.
If the tag is inserted properly, the system will display the status as “Active.”
If the tag remains inactive for 7 days, the status will read “Inactive.”
Last contact: This shows the date and time the tag was last triggered.
- Type of code
Please copy the code that best suits your purpose for use on the website.
- Custom audience
This will lead you to the audience creation page, where you can create an audience for retargeting and a lookalike audience; for example.
LINE Tags can gather audience data that can be of use for other purposes, such as ad retargeting.
- Tracking method
If a third-party cookie is unusable, you may use the first-party cookie or Local Storage instead.
Note:
- If the status still remains Inactive after a LINE Tag has been inserted, this may indicate failed insertion. Please recheck to confirm that the tag was inserted properly.
- Cross-domain tracking that uses first-party cookies requires additional adjustments to the base code. You can find further details here.
(Last updated: October 19, 2020)
Website conversion is a measure of conversions on a website.
You have to insert LINE Tags in order to track the conversions of your website.
* Please see how you can insert LINE Tags here.
There are 2 types of website conversion tracking: tracking by conversion codes and tracking by custom conversions.
Tracking by conversion code
You need to insert conversion codes at the conversion point.
* Please see how you can insert conversion codes here.
When users click on ads displayed on LINE Ads and then enter the website that has inserted conversion codes, the system will trigger LINE Tags to track the number of conversions.
The system will also examine the cookie data to see whether website visitors have clicked on the ad. If there is a click on the ad during the tracking period (30 days for conversion codes), it will be counted as a conversion.
* The result of conversion tracking will be updated in the CV column on the Ad Manager dashboard.
* You can set an attribution period for custom conversions from 1 to 180 days.
* The results may not always be accurate. This depends on device versions and sometimes on the expiration dates of cookie data.
Custom conversion tracking
Custom conversion works effectively for the following purposes:
- Inserting conversion codes somewhere other than the conversion point.
- Tracking conversions based on URLs or custom events.
- Flexibility in attribution period adjustments.
To create custom conversions step by step:
1. Click on the “Ad Account” tab on the homepage. > Select the account name for which you want to create custom conversions.
2. Click on the “≡” icon on the upper left of the Ad Manager page. > Go to “Reports and figures.” > Click “Custom conversions..”
![]()
3. Click “+ New custom
conversion” under the Custom Conversions menu. > Fill out each
item in the field, and finally, click “Save.”.png)
![]()
* The “Last contact” field shows the date and time of when the conversions were last tracked.
* You can set an attribution period from 1 to 180 days.
Specifying URLs:
You may specify single URL or keyword, or use the OR/AND rule to add multiple values.
(Broad keywords or URLs using an asterisk (*) wildcard to substitute certain characters in a string, or entering only the first character of the string, is not allowed.)
<Tracking by using conversion rules>
URL_A and URL_ B
- Using the OR rule: Able to track either URL_A or URL_B.
- Using the AND rule: Tracking is unachievable.
(Conversion rule cannot be set as “Track the number of users who visit both URL_A and URL_ B.”)
Keyword_A and keyword_ B
- Using the OR rule: Able to track URLs that contains either keyword_A or keyword_ B.
- Using the AND rule: Able to track URLs that contains both keyword_A and keyword_ B.
Event rules:
The system will display the names of any active event codes on the drop-down list (only when a custom event code has already been inserted).
Please select the event that you want to be counted as a conversion.
* The event rule “Conversion” refers to a conversion code.
Note:
- You can view tracking results for custom conversions in the performance report.
- Normally, conversions are valid for 30 days. If you want the validity period to last from 1 to 180 days, please select the “Conversion” option and then set the length of time you want.
- You can create up to 100 custom conversions. Once created, you cannot edit the conversion data except for the name and description of the conversions. These conversions cannot be deleted. If a conversion is no longer used, please update its status to “Pause.”
- Since the system does not show real-time updates, even if you have already changed the status to “Pause,” you will see that the status still reads “Active.”
(Last updated: October 19, 2020)
Creating an Audiences
You can create an audience by following the steps below:
1. Click on “Ad Account” on the homepage. > Select the account name for which you want to create an audience.
2. Click on the “≡” icon in the upper left of the Ad Manager page. > Go to “Shared library.” > Click “Audience.”
3. Click “+ New audience” above the list of your audiences.
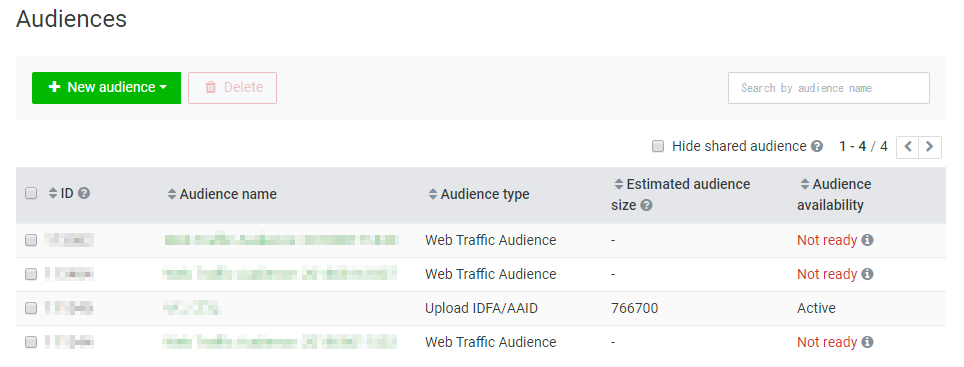
4. Select the type of audience you want to create. > Fill out each item in the field. > Click “Save.”
Please see below for information on the available settings for each type of audience.
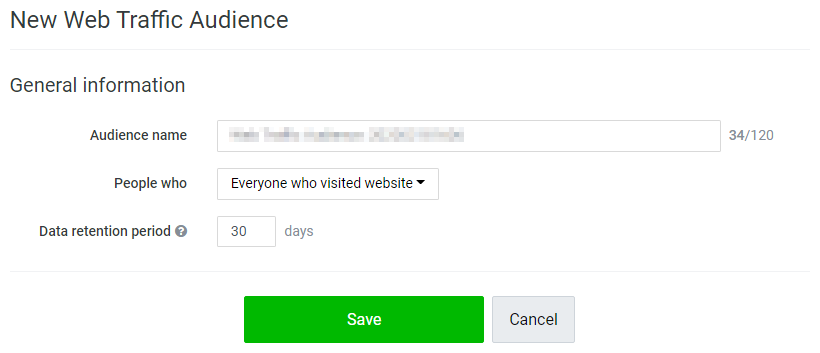
Web traffic audience
- Audience name
This is the name of the audience, which appears on your audience list.
You can set a name for your audience as desired (you can edit the audience name later).
- The ‘People who’ setting
Everyone who visited the website: This option refers to users who visited all website pages with LINE Tags inserted.
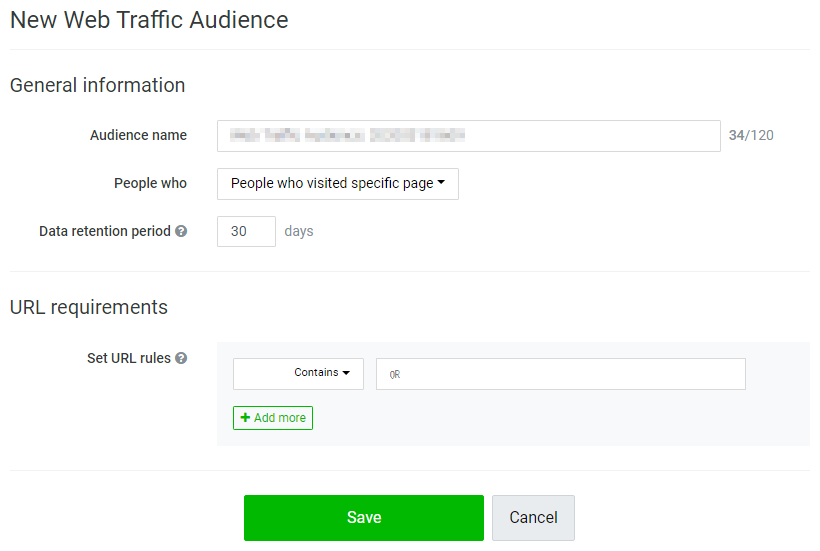
People who visited a specific page: This option refers to users who visited all pages that have LINE Tags inserted with a specific URL rule.
You can specify your target page by adding a single URL or keyword, or you may use the OR/AND rule to add multiple values.
* Broad keywords or URLs using an asterisk (*) wildcard to substitute certain characters in a string, or entering only the first character of the string, is not allowed.
<Specifying a target page using multiple rules>
URL_A and URL_ B
- Using the OR rule: Able to track users who followed either URL_A or URL_B.
- Using the AND rule: User tracking is unachievable.
(This rule cannot be set to “Track users who followed both URL_A and URL_ B.”)
Keyword_A and keyword_ B
- Using the OR rule: Able to track users who followed a URL that contains either keyword_A or keyword_ B.
- Using the AND rule: Able to track users who followed a URL that contains both keyword_A and keyword_ B.
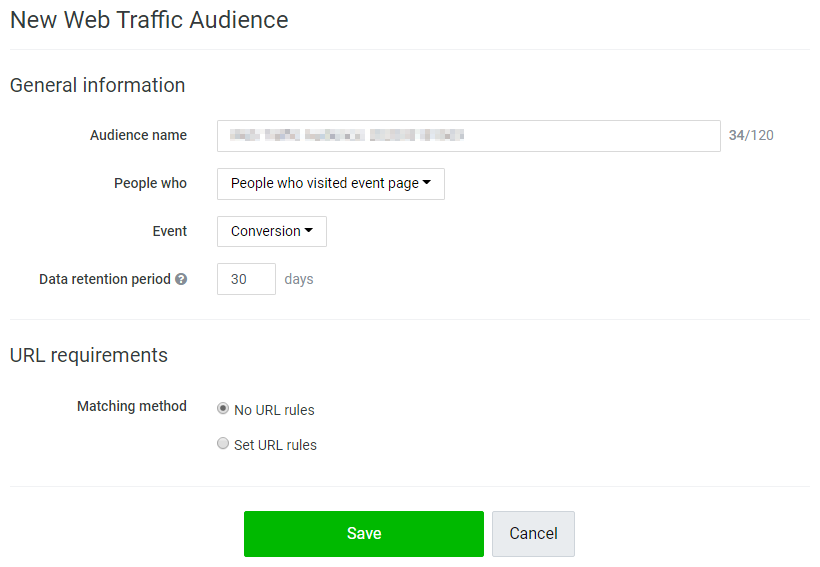
People who visited an event page: This option refers to users who visited pages that have LINE Tag custom event codes inserted.
Once the inserted event code has been triggered, you will be able to select that event from the drop-down list.
To specify a particular page from all pages that have custom event codes inserted, please set URL rules under the URL requirements setting.
This setting functions the same way as for the “People who visited a specific page” setting.
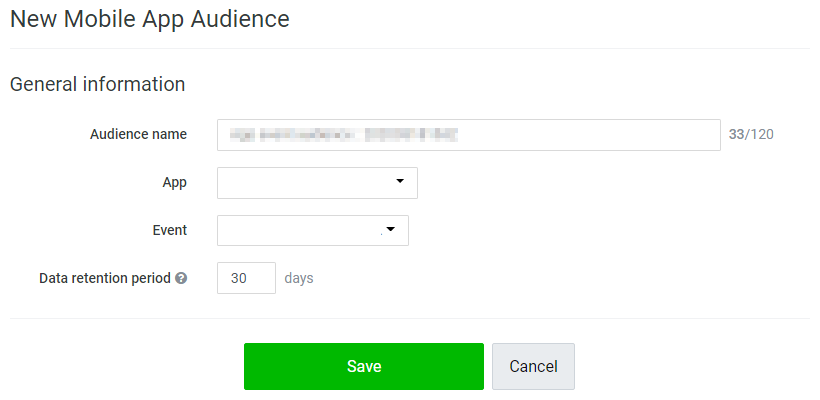
Mobile app audience
* Please click “Media” to register your application and link it to the SDK first.
Set an audience name as desired and select the application that you have already registered.
The event registered on the SDK will appear on the drop-down list. After that, select the event you want to set as your audience.
You can set different parameters based on each event.
Note:
- If an event has not been triggered, the system will not show it on the drop-down list. As a result, you cannot select that event.
- Once an event is triggered, the event name stays undeletable for 180 days, so please be careful when proceeding with this process.
- If an event still does not appear on the drop-down list even though you have already configured its settings on the SDK, it may mean that an error occurred in the linking process or that the event settings on the SDK side are incorrect.
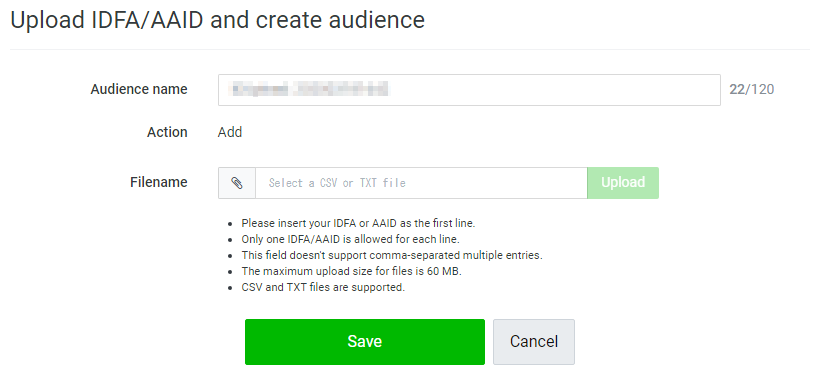
IDFA/AAID upload
You can upload your own IDFA / AAID to create an audience.
Please fill in each item to create an audience.
-Audience name
Display name in an audience list. You can set audience name as desired. (Can be edited afterwards)
-File name
Please select and upload file
File upload requirements
- Be sure to insert the IDFA/AAID as the first line, not the header name.
(You can upload IDFA/AAID using the same file.)
- Only 1 IDFA/AAID is allowed for each line.
- Multiple IDFA/AAID entries separated by delimiters such as comma (,) are not allowed.
- The maximum file upload size is 60 MB.
- The system only supports CSV and TXT file formats.
Add audience method
You can add or overwrite audience data with the following steps.
“Add” refers to the upload of new set of audience
“Overwrite” refers to the replace of existing audience with new version of audience.
In case you use automatic bidding configuration, the overwrite of audience may affect the system learning phase.
Method: Go to Audience > + New audience > Upload IDFA/ AAID > Upload file in accordance to the steps above
Or go to Audience > Click existing audience > Click “Overwrite” and upload file in accordance to the steps above
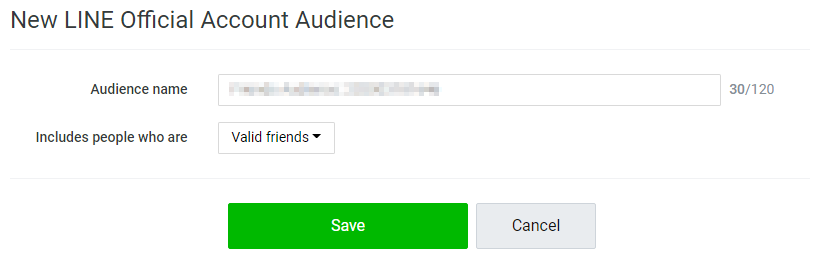
LINE Official Account audience
You can create this type of audience by setting a name for your audience as desired and then select the “Valid friends” or “Friends blocking the account” option.
* Valid friends will include your Target Reach.
* You can create the audience from LINE IDs that link to your account only.
* The number of users in the audience will not match your account's total number of friends because the system does not include users who have deleted your account from their friends list and users in the audience who have not logged in to LINE for a long period of time.
* It may take around 2-3 days before you can put the LINE Official Account audience to use.
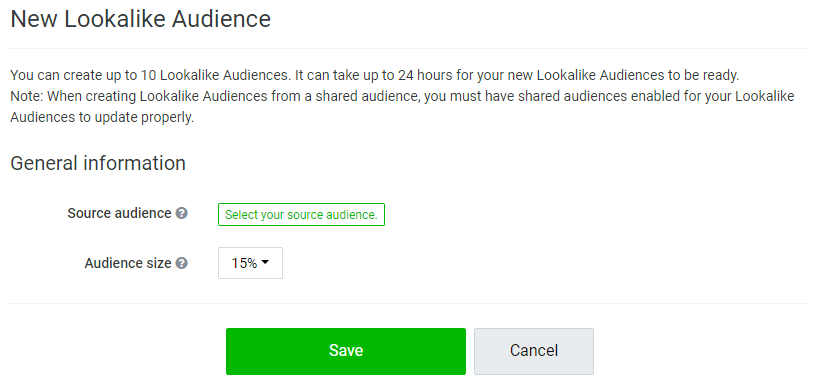
Lookalike audience
Please select a source audience and audience size (from 1-15%).
* It may take around 24 hours before you can put the Lookalike audience to use.
* Lookalike audiences do not include the source audience.
* You can create up to 10 Lookalike audiences.
Video view audience
You can create an audience from the users viewing a particular video by selecting users’ video interaction rate.
· People who clicked the video
· People who viewed the video
· Viewed more than 3 seconds
· Viewed 25% of the video
· Viewed 50% of the video
· Viewed 75% of the video
· Viewed 95% of the video
· Viewed the video to the end
Note:
· You can set up to 30 days validity period. In case the selected video has been paused longer than validity period, audience status will become not ready.
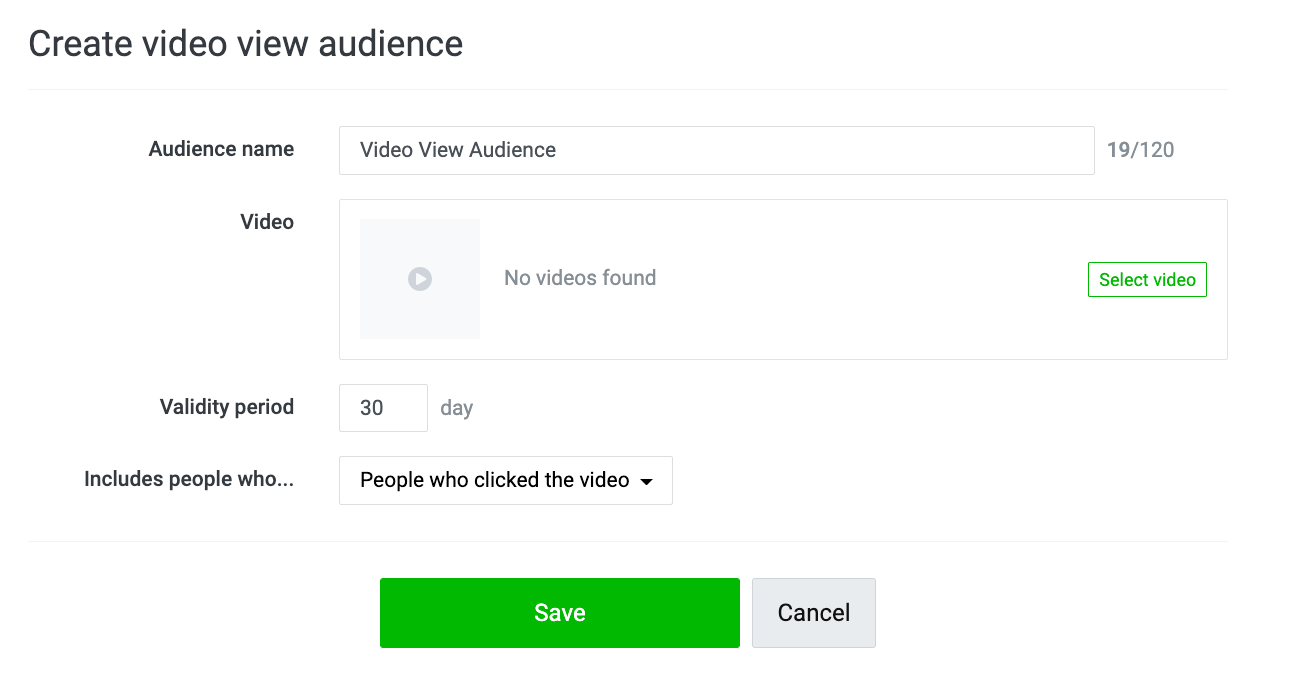
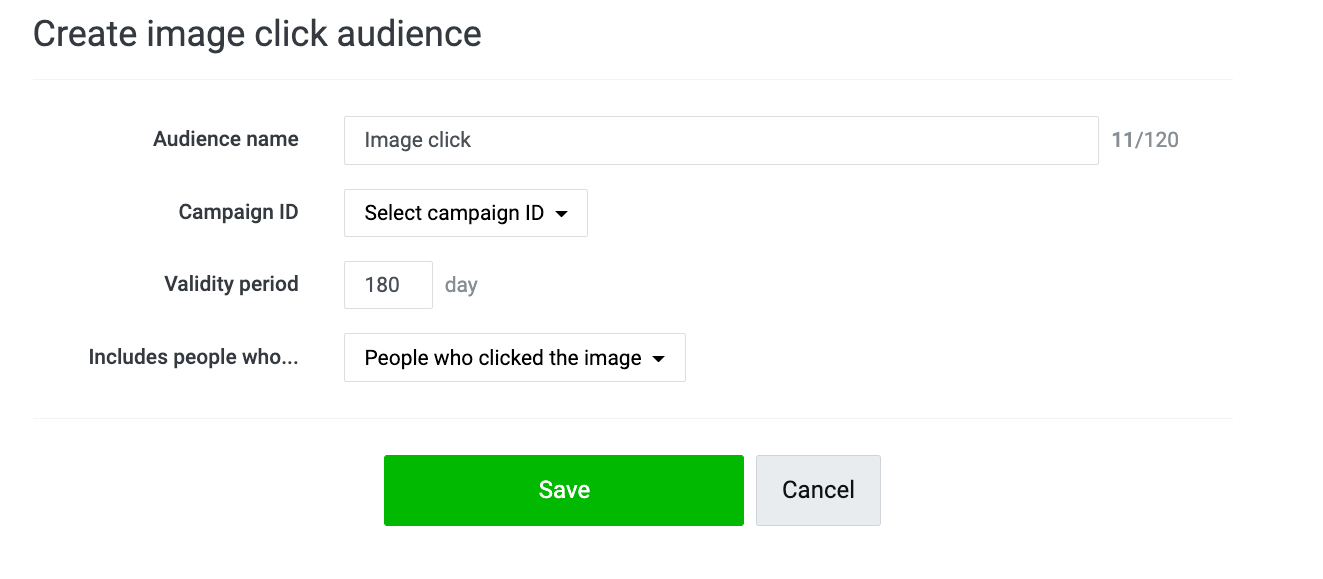
Image click audience
You can create an audience from selecting campaign ID.
Note:
· You can create audience from audience who click image ad format creatives under selected campaign ID. This excludes video ad format creatives.
(Last updated: December 8, 2021)
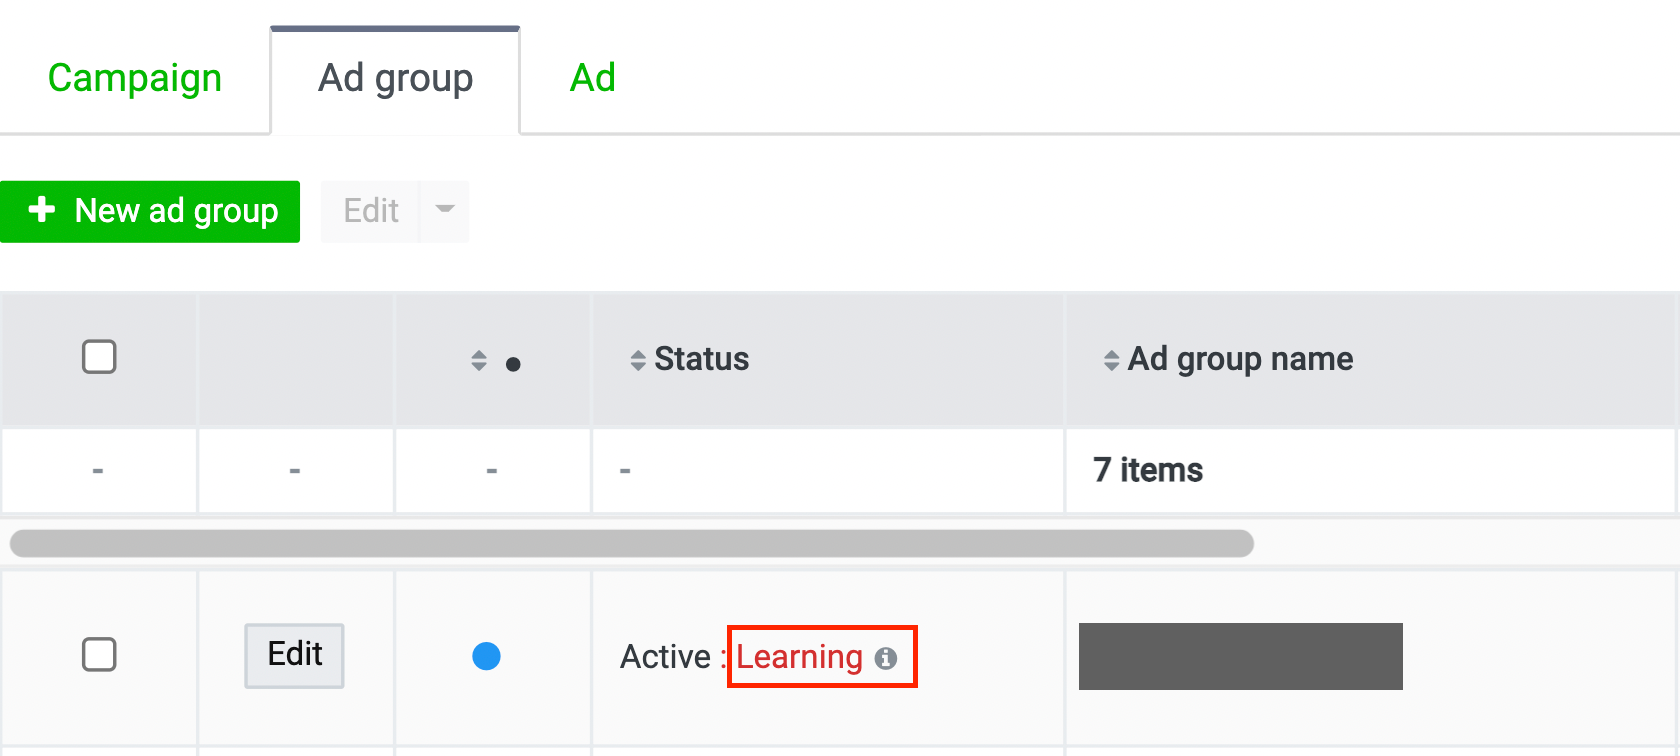
The learning process requires approximately 40 events (for example, clicks/conversions) per ad group to be complete. The number of events has a greater influence on performance improvement than the ad distribution period. The status will change from “Learning” to “Stable” when learning process is complete.
In cases where the learning status remains unchanging or shows only slight progress, you can increase the occurrence probability of events by configuring the basic settings as follows:
1. Increase the audience size.
2. Increase the bidding amount and/or change bidding amount configuration strategy
3. Increase the number of ads per ad group.
Note:
- Resuming a paused ad group may result in relearning.
(Last updated: October 1, 2021)
Optimization tips for effective campaign
1. Determine the appropriate budget and period that align with your campaign goals and system’s learning
2. Structure your campaign for results comparison and analysis. For example, you can layer a targeting option per ad group.
3. Optimize your campaign.
- Allocate more budget to ad groups and ads that are performing well by yourself or utilize Campaign optimization budget feature. For more information on CBO, click here.
- Continue to adjust settings for low performing ad groups and ads. You may consider pausing particular ad group and ads if the result does not improve.
- Nonetheless, the setting should not be adjusted too frequently such as every hour or every day
4. Make use of your custom audience and cross-targeting audience from LINE Official Account.
5. Regularly monitor the performance.
Improve your impression and budget spend
1. Expand your audience size per ad group or create several ad groups to compare results.
2. Choose “Event cost cap” bidding strategy. This strategy has chance to use a slightly higher bid than your bid amount to maximize as many results as possible.
3. Increase bid amount
4. Increase number of active ads. Pause ads with low performance or low click through rate (CTR) and launch new ads.
(Last updated: October 1, 2021)
You can make payments through credit card or coupon only.
Available credit cards must be issued by either of the following companies:
- VISA
- Mastercard
- JCB
- TPN
* Payment through a prepaid card is not accepted.
Please see below for the credit card registration method and timing for payments:
(Last updated: March 31, 2021)
LINE Ads self-serve has 2 main payment methods available.
1. Automatic payment
2. Manual payment
Payment method 1: automatic payment
After your ads run, LINE Ads automatically charges you based on 2 criteria of ad usage: whenever your account reaches a certain amount or a fixed period, whichever reaches first.
1.1 Threshold amount. LINE Ads automatically charges you whenever your account reaches a certain threshold amount, starting from 1,000, 5,000, 10,000 to 15,000 THB. Threshold amount will be updated to another level when successful automatic payment by threshold amount is achieved. With the fourth successful payment, you will continue to be charged at the fourth threshold level or 15,000 THB.
1.2 Fixed period. LINE Ads automatically charges you 20 days after your first ad launch or after your last payment.
*You can check your ending balance at "Billing and Payment"
*If the discount coupon is active, payment will be proceeded with coupon first, before your credit card.
* Your account may be charged several times a day, depending on ad usage.
* If more than 1 credit card is registered, payment will be proceeded with your selected primary card first.
Payment method 2: manual payment
You can make a manual payment anytime by following the steps below.
1. Click on the “Ad account” tab on the homepage. > Select the ad account linked to the payer info that you want to use for making a manual payment.
2. Click on the “≡” icon on the upper left of the Ad Manager screen. > Go to “Settings.” > Select “Billing and payments.”

3. Click on the payer name for which you want to make a manual payment.

4. Click on the “Pay now” button in the center of the screen.

5. Select the credit card for your payment and then click “Pay.” Your credit card will then be charged in full according to the outstanding balance

(Last updated: August 25, 2021)
Starting balance describes unpaid balance of previous months. Although, your campaign is not active in the occurring month, the unpaid balance will be charged as usual when the payment threshold is reached.
Ending balance summarizes the unpaid balance for each month.
You can check your starting balance and payment information any time at "Billing and payments"
Example 1
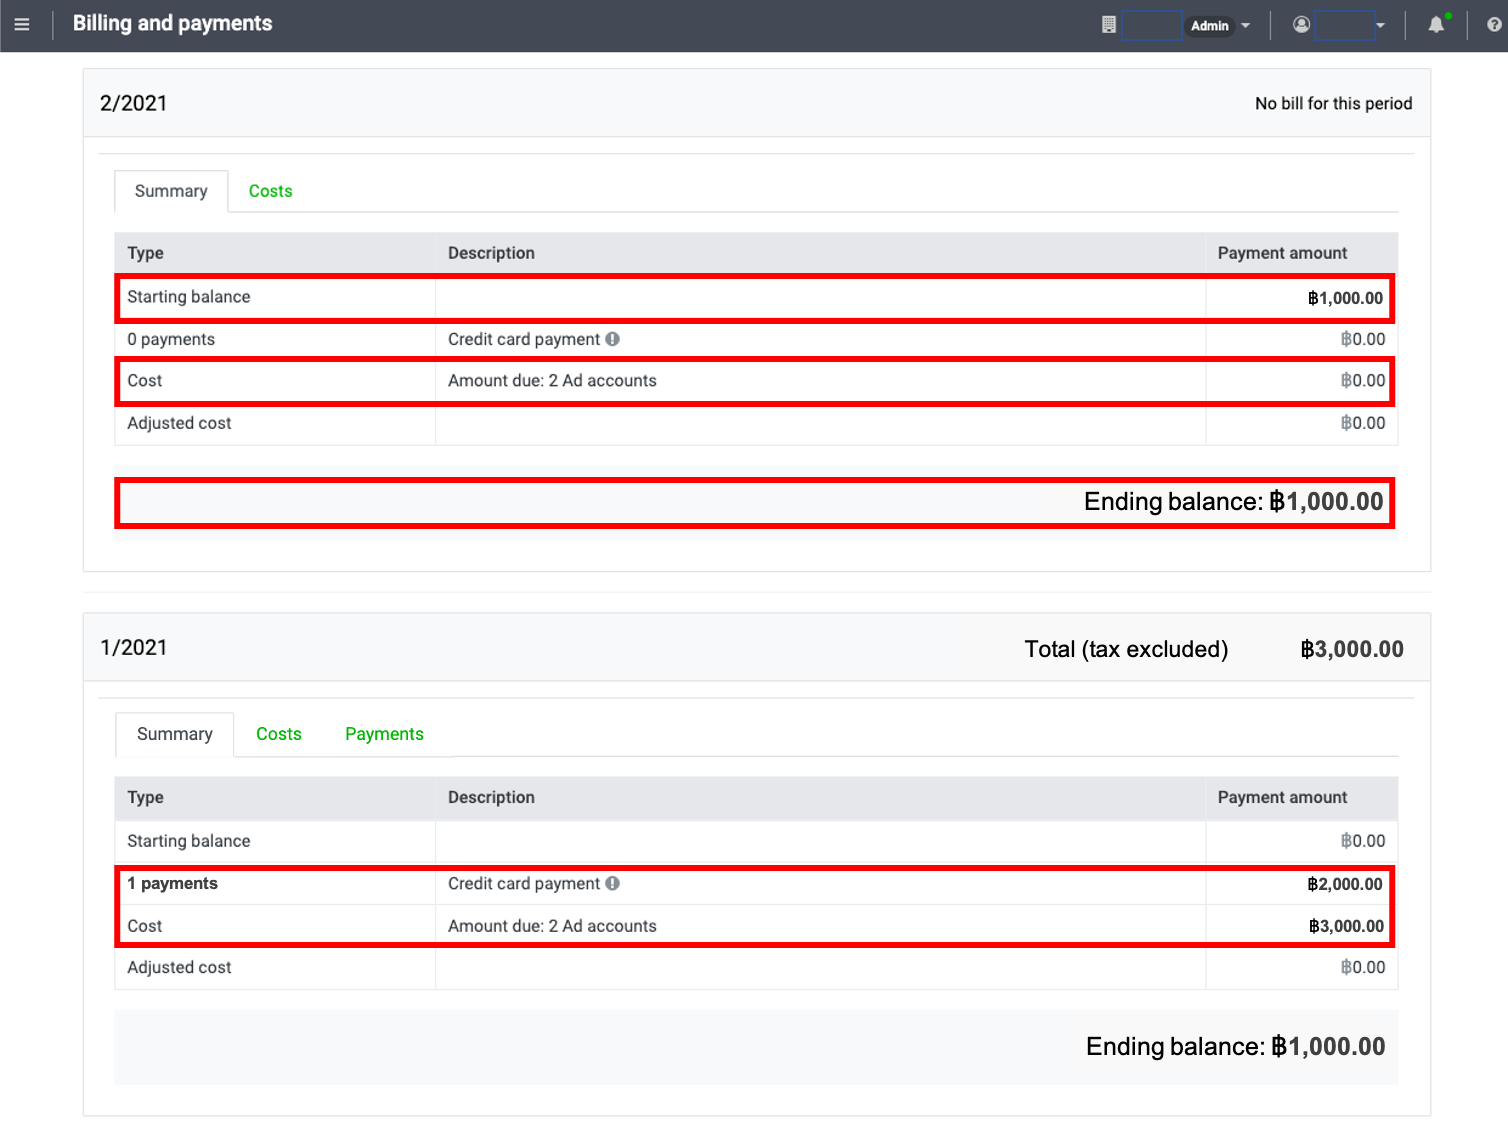
Month 1/2021:
Ad cost is 3,000 THB. 2,000 THB has been paid. Therefore, your ending balance is 1,000 THB.
Month 2/2021:
There is 0 THB cost. There is a starting balance record (or the unpaid balance of the previous months) of 1,000 THB, resulting in the ending balance (or monthly unpaid summary) of 1,000 THB.
*In the first example, there is no ad delivery, and so no cost in the second month. Once all of the unpaid balance is successfully paid, your ending balance will be updated to 0 THB.
Example 2
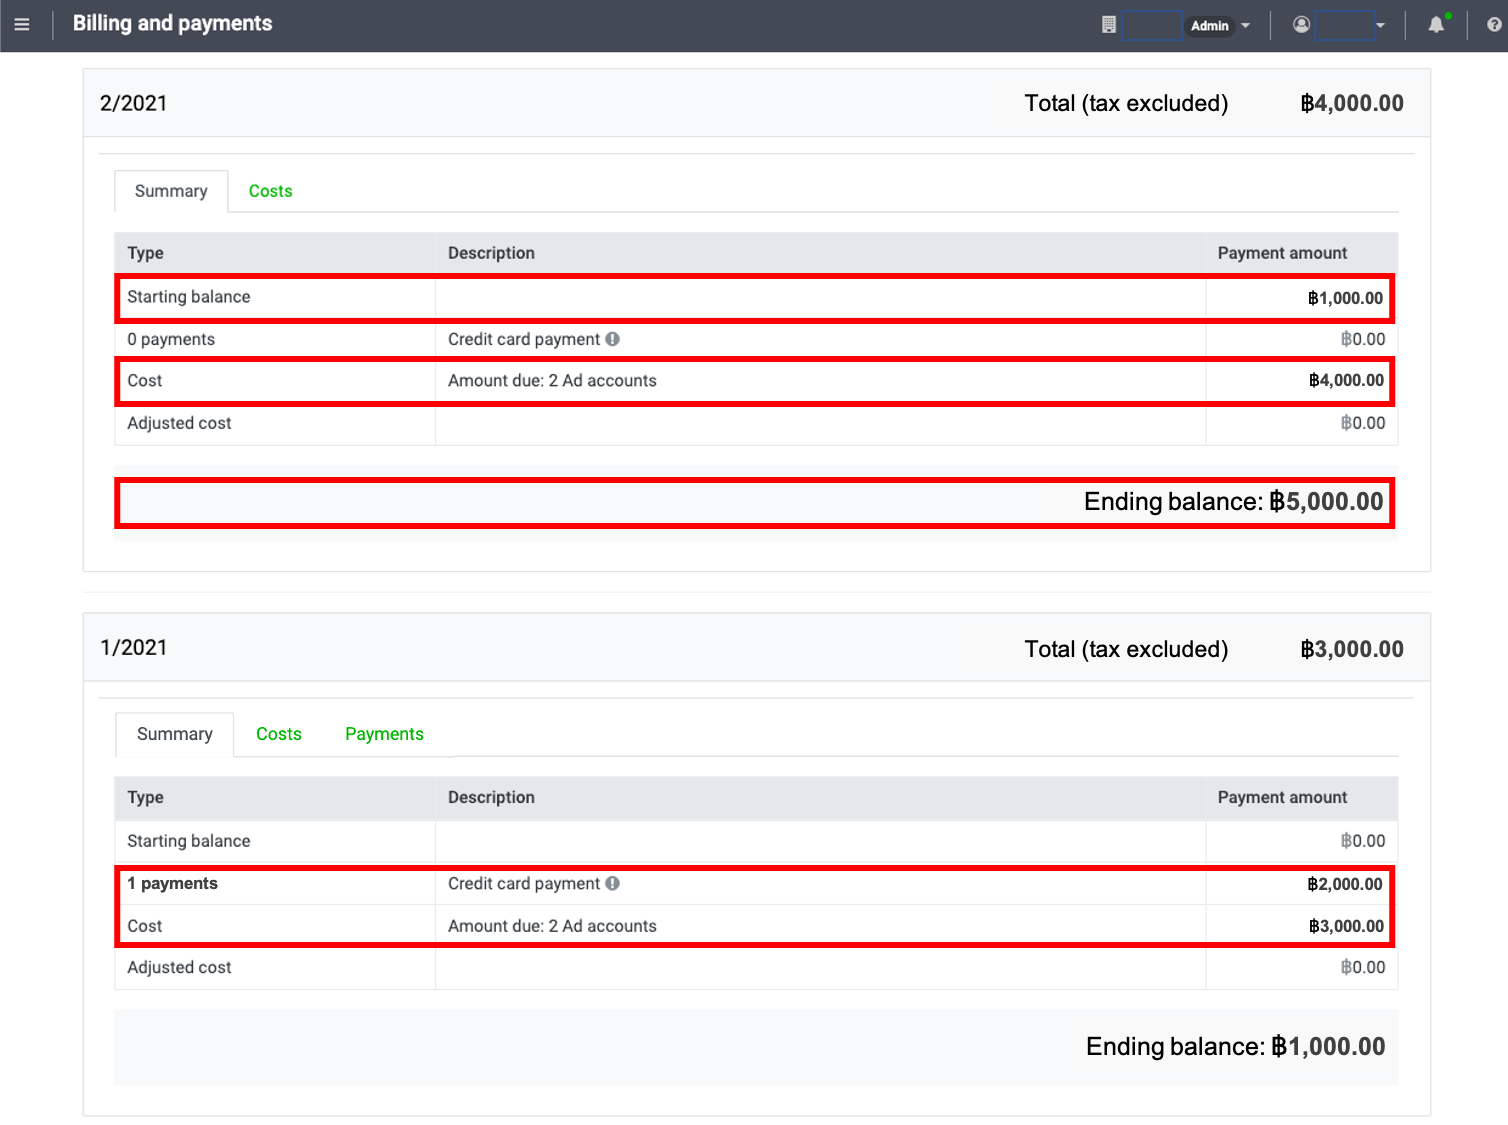
Month 1/2021:
Ad cost is 3,000 THB. 2,000 THB has been paid. Therefore, your ending balance is 1,000 THB.
Month 2/2021:
Ad cost is 4,000 THB. There is a starting balance record (or the unpaid balance of the previous months) of 1,000 THB, resulting in the total ending balance (or monthly unpaid summary) of 5,000 THB.
*In the second example, unpaid balance of the previous months is now combined with the new cost of the most recent month.
For more detail on payment timing, please click here
For more detail on overall payment information, please click here
(Last updated: August 1, 2021)
You can check all the details of your costs and request payment receipts by following the steps below:
1. Click on the “Ad account” tab on the homepage. > Select the ad account that has been linked to the billing info for which you want to check the details.
2. Click on the “≡” icon on the upper left of the Ad Manager screen. > Go to “Settings.” > Select “Billing and payments.”
.png)
3. Click on the Payer name for which you want to check the details.
.png)
4. Click “Payments.”
5. Click on the item under the “Description,” and you will be able to download the receipts for payments made during each billing cycle.
.png)
(Last updated: March 1, 2021)
As receipt/ tax invoices for “sole proprietor” business type contains personal data, you can grant downloading receipt/ tax invoice access to 1 user per 1 payer info to keep your personal data private and secure.
For “new ad accounts” created after 26 January 2022, you can set finance permission setting by the following steps.
1. Fill in your Payer info detail, and grant downloading receipt/ tax invoice access by entering user email address at “Finance permission”.

2. After creating a payer info, you can check how to register a credit card here
3. User with finance permission role can check more detail on downloading receipt/ tax invoices here
Note:
· For new ad account, payer info creator will have finance permission by default.
For “existing ad accounts created before 26 January 2022” and “ad accounts that would like to edit finance permission”, you can check and set your finance permission by following the steps.
1. Click on the “≡” icon in the upper left of the Ad Manager screen. > Go to “Settings.” > Select “Billing and payments.”

2. Click the payer name that you want to check

3. Click “Settings” on the upper right side of the screen.

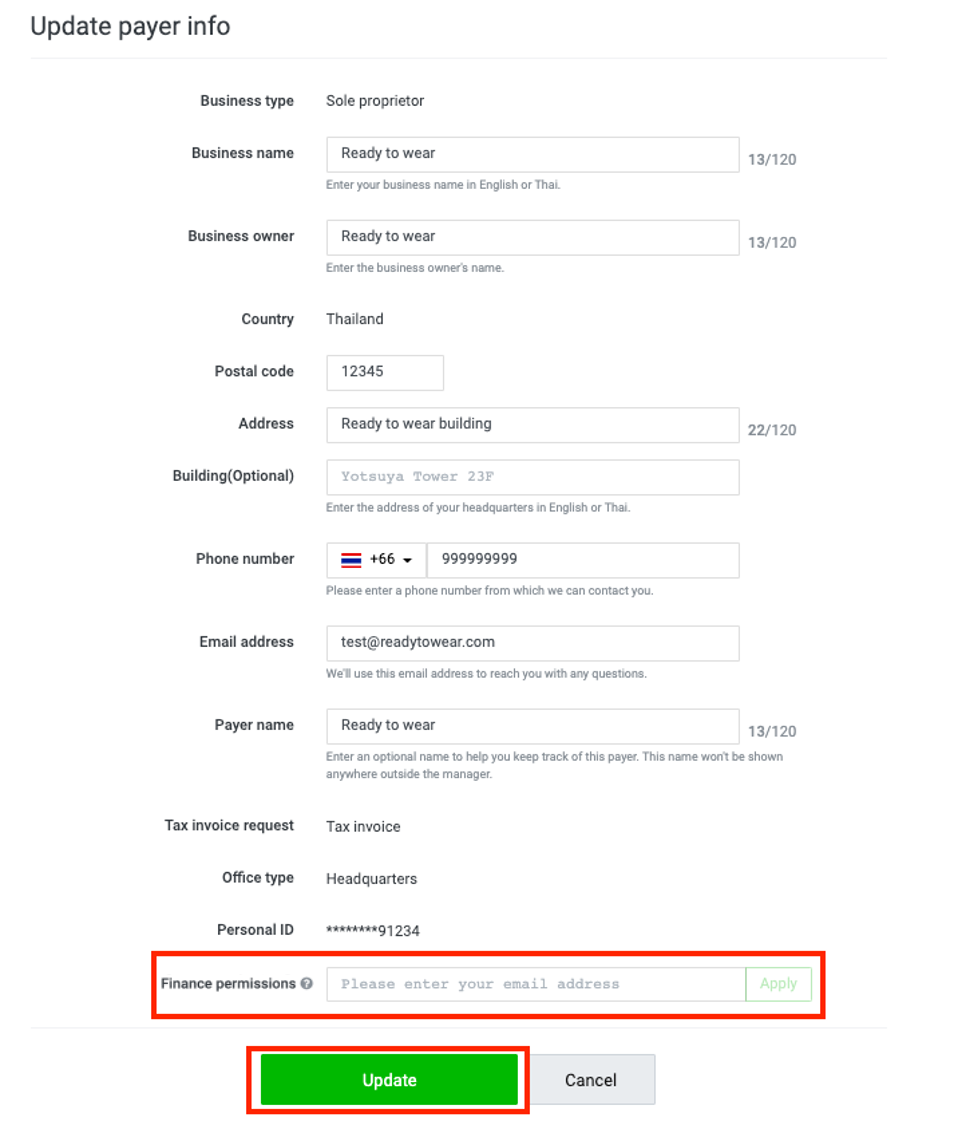
4. The payer info that you have registered will then appear on the screen. Click “Edit”.
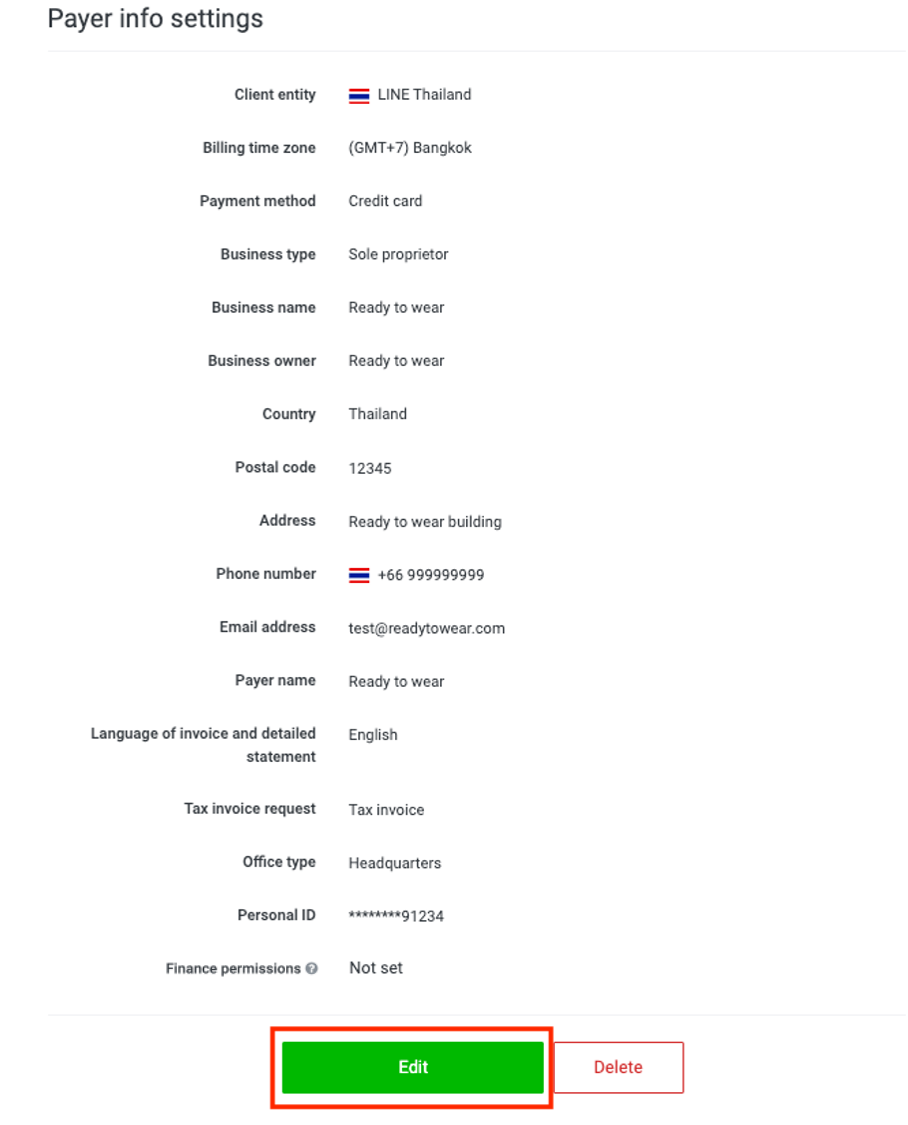
5. Enter email address for finance permission, click “Apply” and “Update”
6. User with finance permission role can check more detail on downloading receipt/ tax invoices here
Note:
· You will not be able to download receipt in case finance permission setting is not set. However, this will not affect ad setting and delivery.
· User with finance permission is the only person who can download receipt, and transfer finance permission to another user in “Billing and payments” tab.
· You can grant finance permission to yourself or another user who have “Admin” role only.
· An error will occur in case of granting finance permission to user who does not have the admin role.
· You can grant users with “Admin” role in “Manage permission” tab prior to finance permission setting by following the steps here
(Last updated: January 26, 2022)
You can request a withholding tax refund by following the steps below:
1. Click on the “Ad account” tab on the homepage. > Select the ad account that has been linked to the billing info for which you want to check the details.
2. Click on the “≡” icon on the upper left of the Ad Manager screen. > Go to “Settings.” > Select “Billing and payments.”
.png)
3. Click on the Payer name for which you want to check the details.
.png)
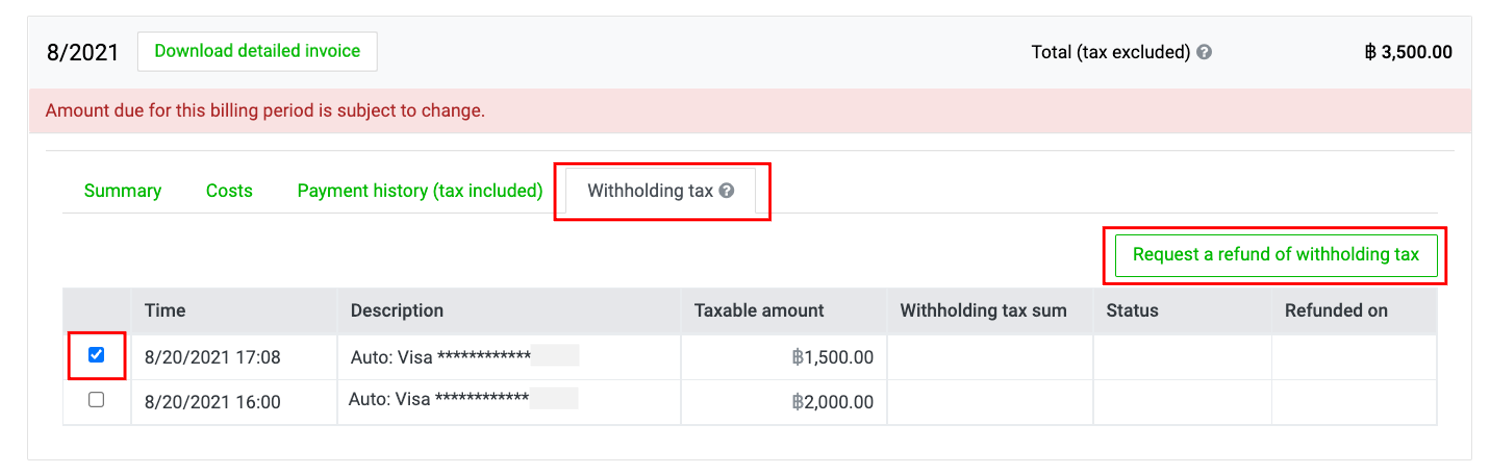
4. Click on the “Withholding tax” tab.
5. Select the “checkbox” in front of the desired item and then click on the “Request a withholding tax refund” tab
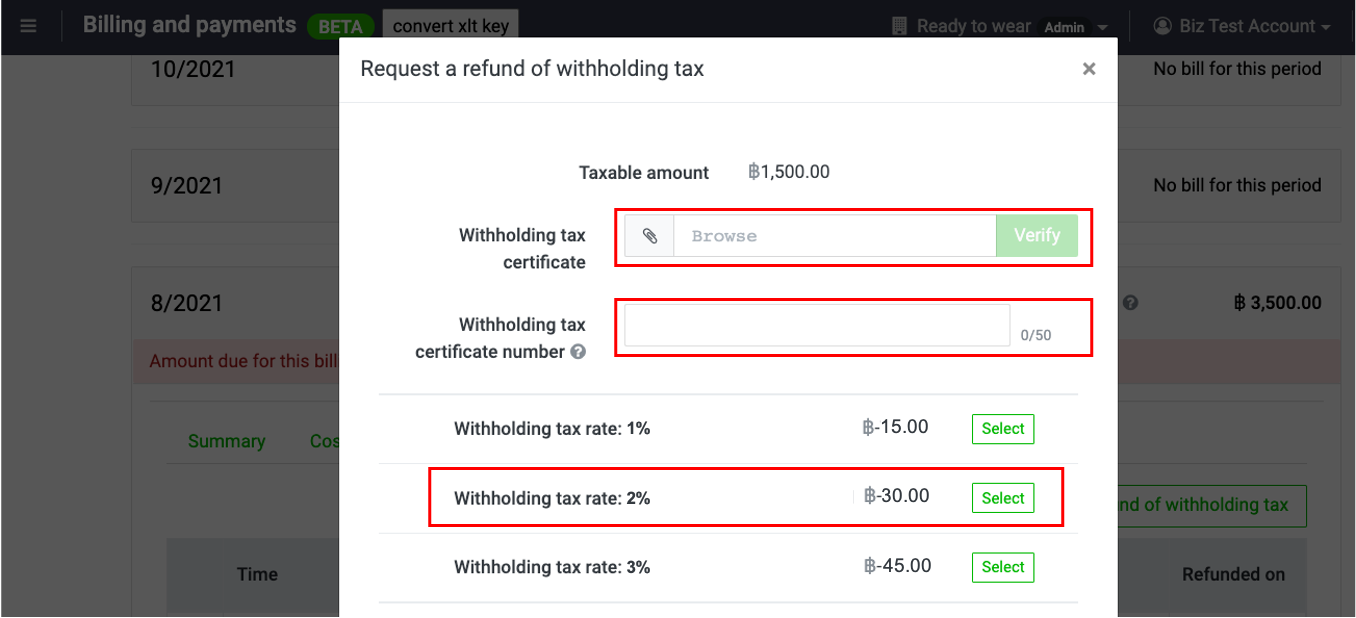
6. Upload your withholding tax certificate into the system. Select the “Withholding tax rate: 2%” option for LINE Ads (LINE Ads) advertising cost, and then click “Submit request”
7. Please send the original withholding tax certificate to the following address:
LINE Company (Thailand) Limited
AR Team
127 Gaysorn Tower, 17th-18th Floor, Ratchadamri Road, Lumphini Subdistrict, Pathumwan District, Bangkok 10330
Note:
- Send a request with a scanned image attachment of your withholding tax certificate within 60 days of the date of payment.
- When your application status reads "Pending documents," please mail the physical withholding tax certificate to the address below within 30 days of your request submission.
- If you wish to request a withholding tax refund, you have to submit requests depending on the payments made for each billing cycle. For example, If you have settled payments through a credit card for 3 billing cycles in January, you have to submit your requests for a withholding tax refund 3 times using the “Request a withholding tax refund” button, together with the file uploads of the required documents, and also send the original documents to LINE Company (Thailand) Limited for every request.
- Withholding tax request can be made from “Corporation” and “Foreign corporation” business types with “Tax invoice” request only.
- Once LINE receives your documents through the postal service, it takes 7 days for the review process to be completed. If your request is approved, the appropriate tax amount will be deducted from your next LINE Ads bill. You can check your withholding tax refund under 2 menus at “Payment amount” on the billing and payment page.
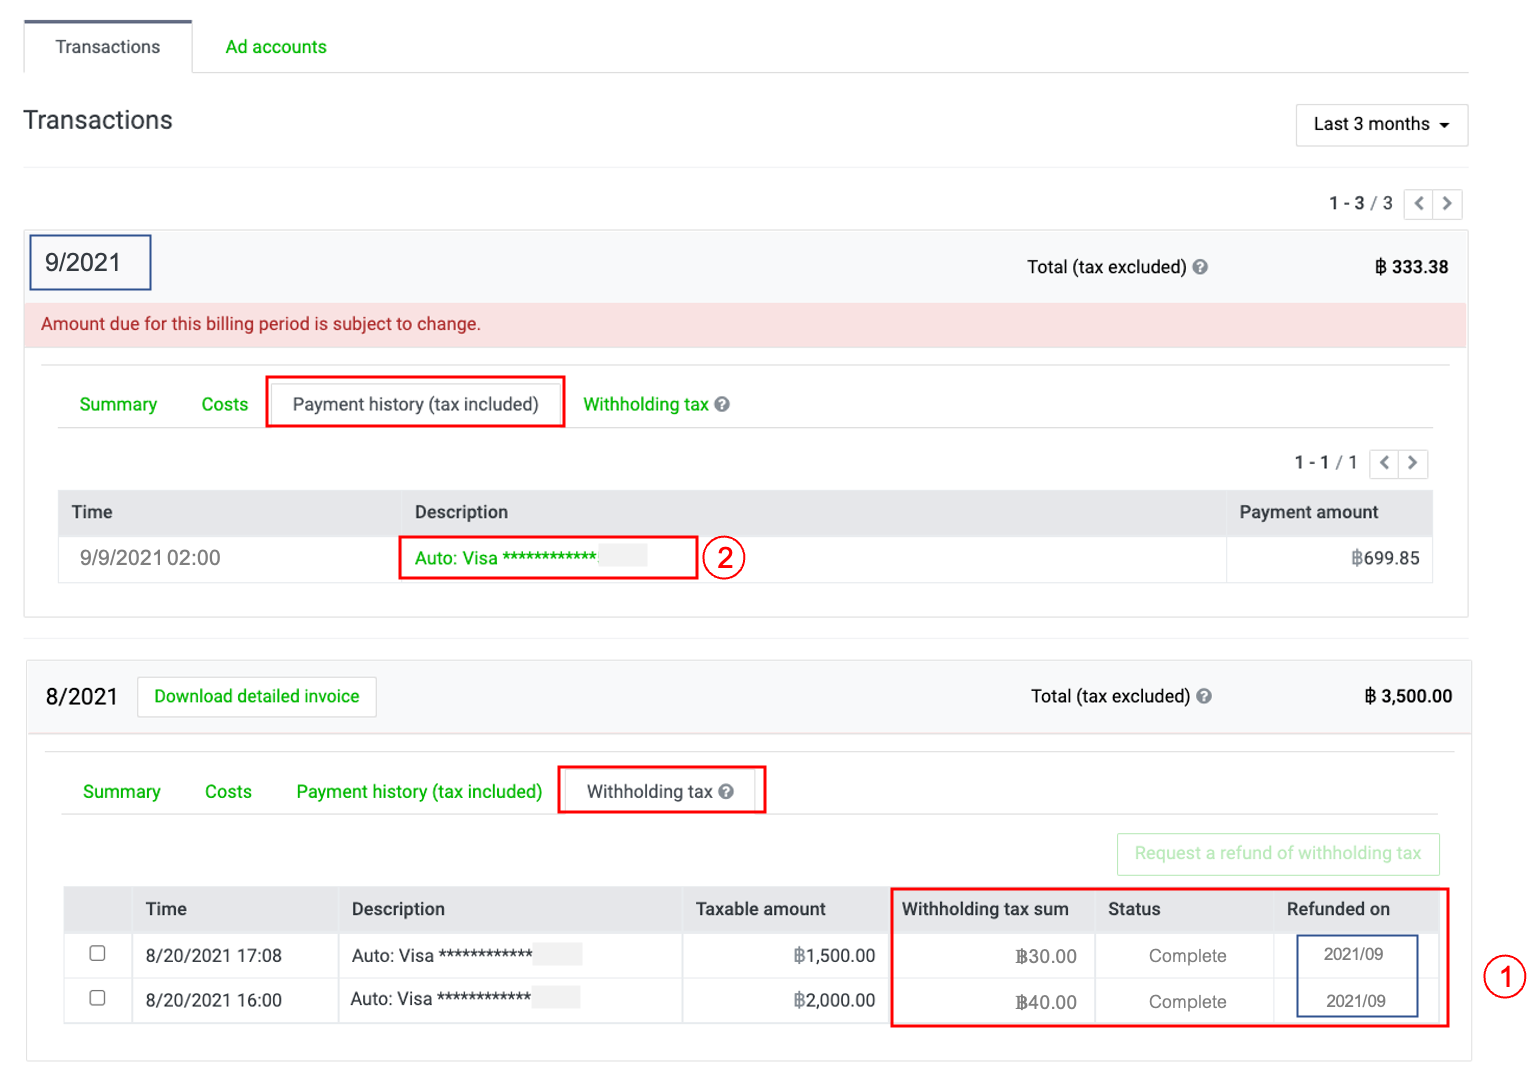
1. Check withholding tax status at “Withholding tax” tab.
2. In case the status is completed and dashboard shows the refunded is proceeded in which month (for example, 2021/09), check the deducted withholding tax amount in the advertisement billing by downloading receipt/ tax invoice at “Payments” tab.
(Last updated: December 8, 2021)
Creating a Business ID
You can create your LINE Business ID by following the steps below:
1. Open this link. > Click “Create an account.”
2. Enter the email address that you want to use for logging in and then click “Send signup link.”
3. The system will send a signup email to the email address that you entered. Please review all the details and then click the signup link within the email.
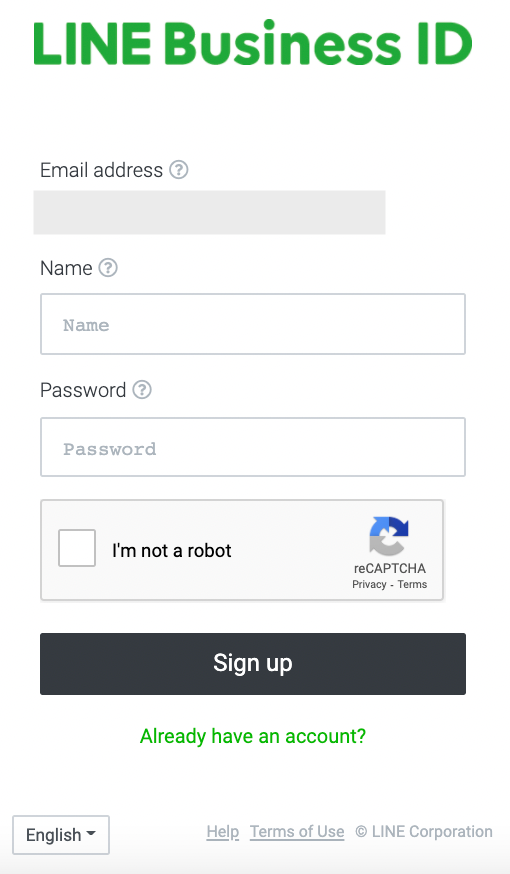
4. Enter your name and password. > Click “Sign up.”
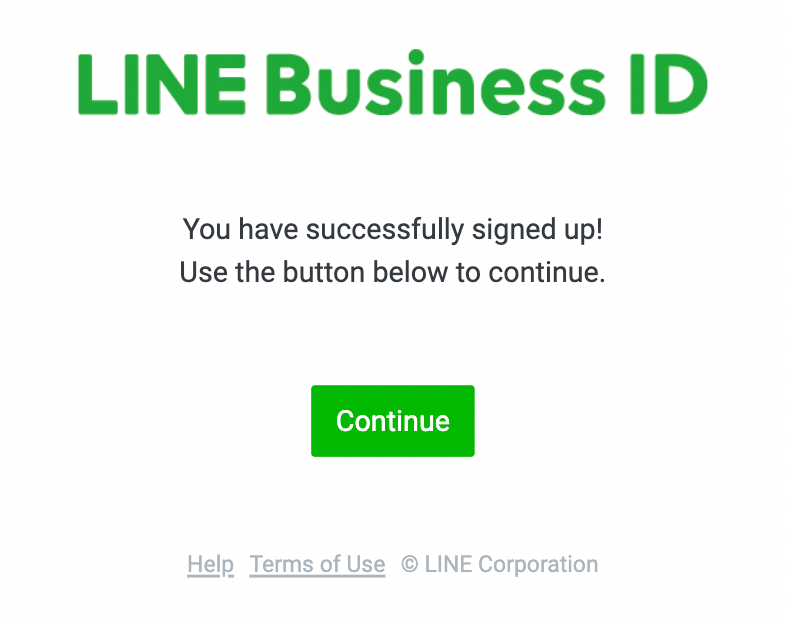
5. The message “You have successfully signed up!” will appear on the screen. > Click “Continue.”
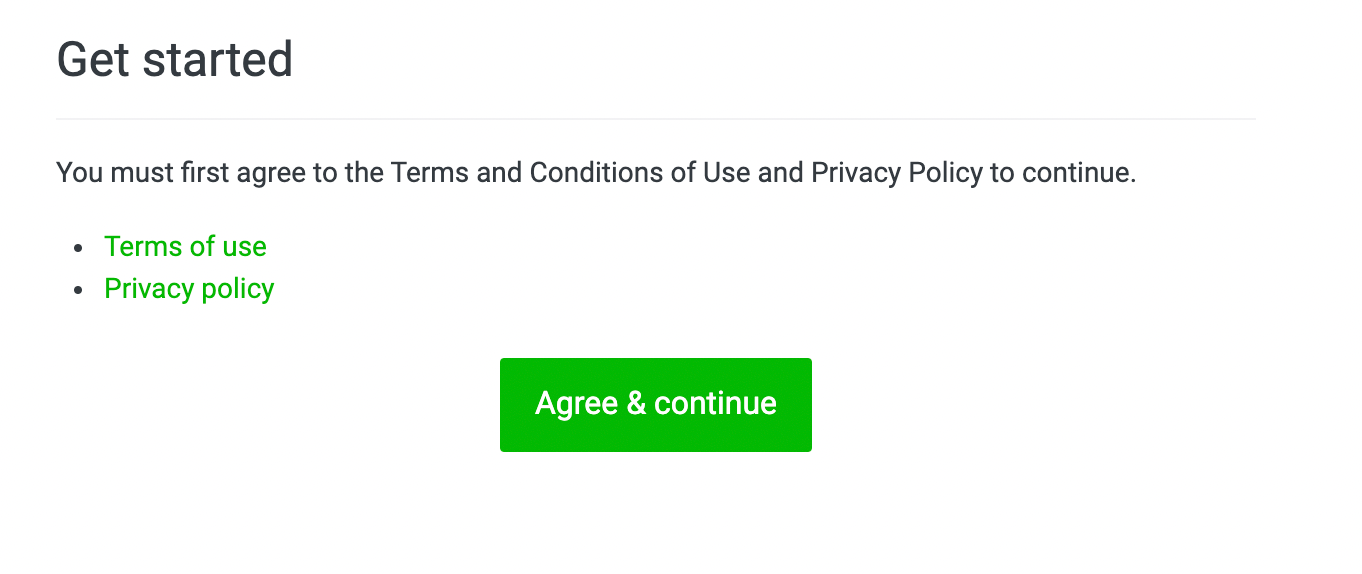
6. Please review the Terms and Conditions of the Use and Privacy Policy. Then click “Agree & continue.”
* If you already have your LINE Business ID, please log in here.
(Last updated: October 19, 2020)
You can link your LINE ID to LINE Business account after entering LINE Ad manager by following below steps:
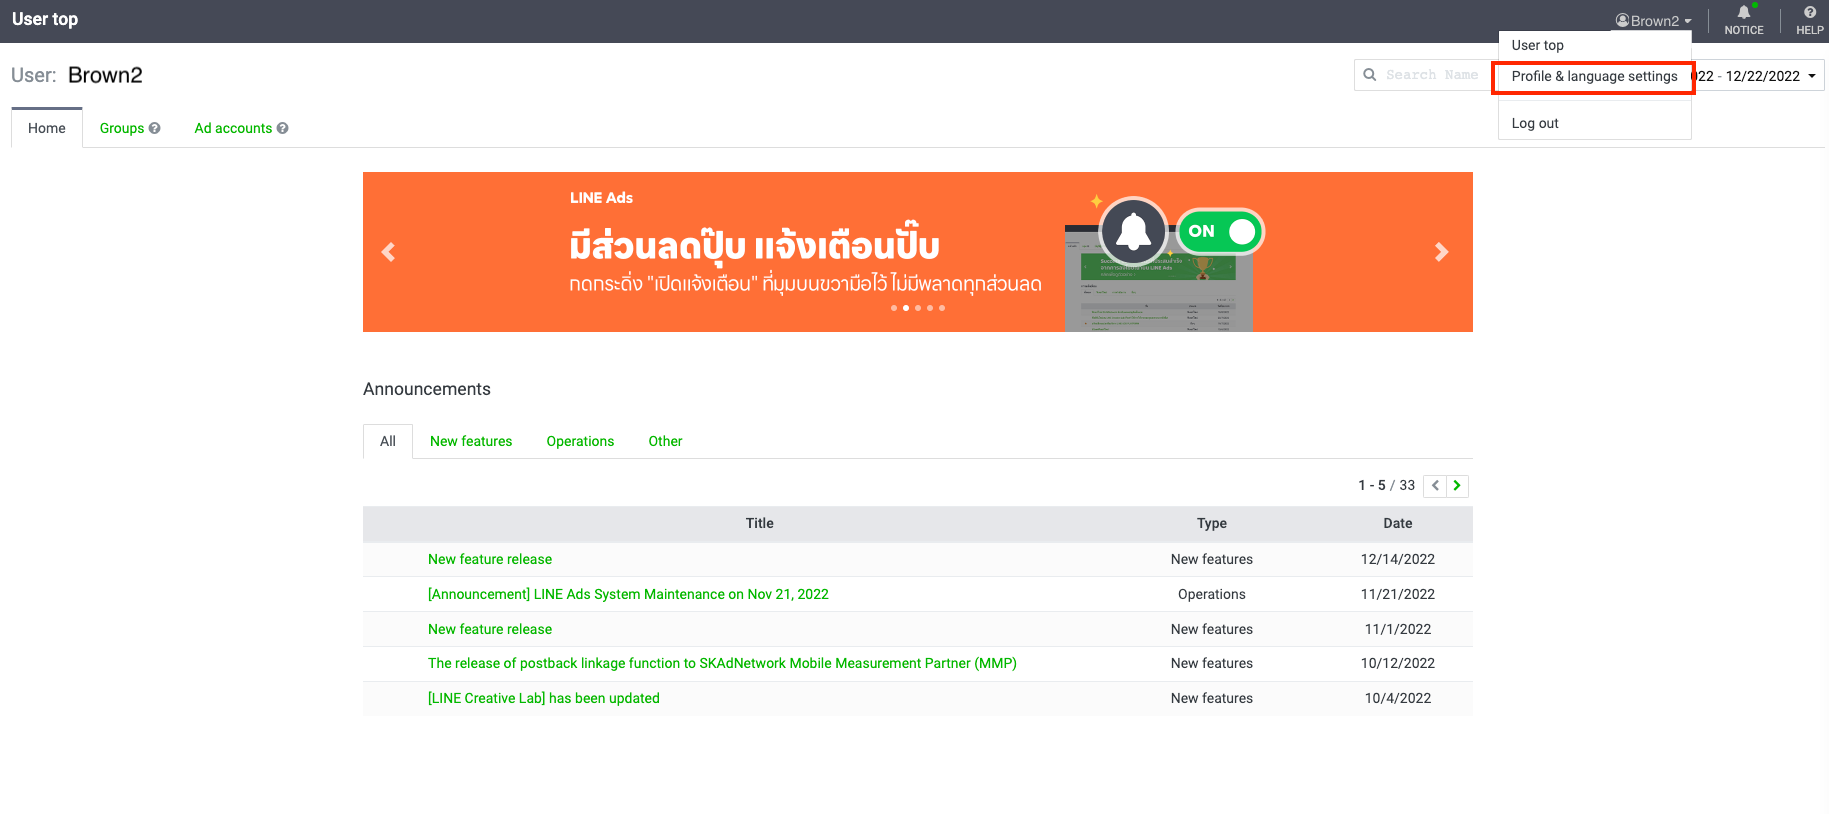
1. Go to profile and language setting

2. Click link

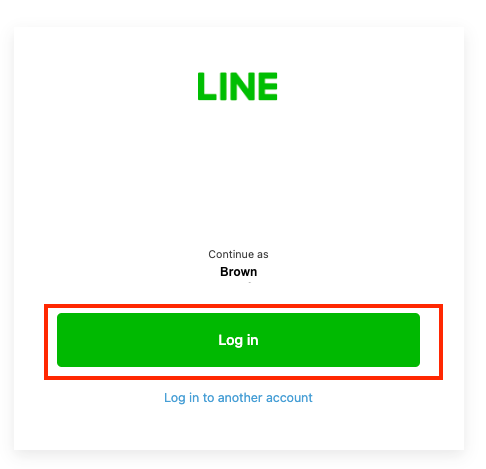
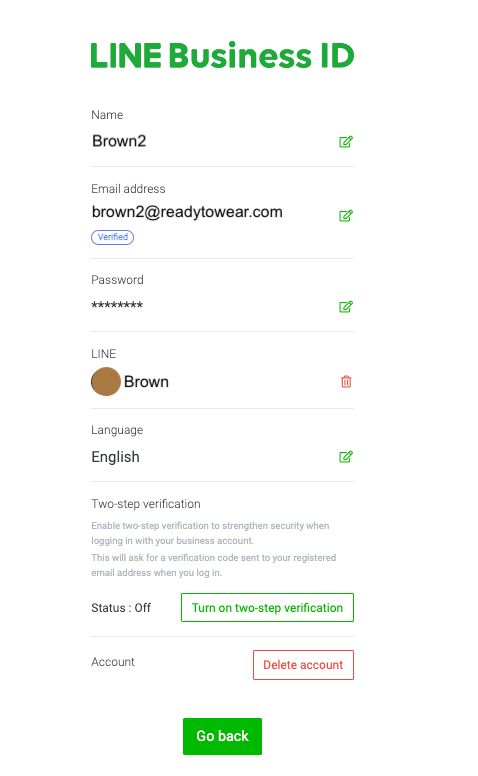
3. Click log in to your LINE ID. If LINE ID has never been used with another LINE Business ID, the linkage will be completed.
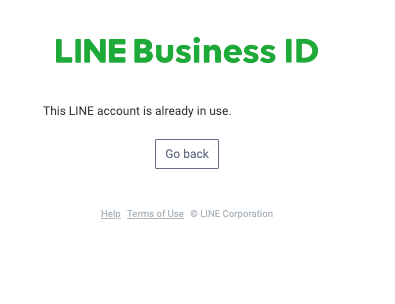
In case LINE ID has been linked to another LINE Business ID, you will receive error message. Please proceed with following steps.
1. Error message of This LINE account is already in use is shown.
2. Log out from your current account (Account B that you cannot link LINE ID)

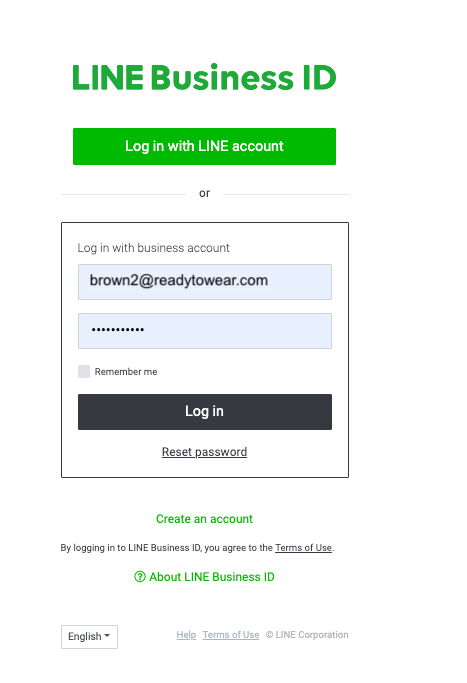
3. Re-log in with LINE account (Account A)
4. Go to profile and language setting

5. Click delete LINE ID for this account (Account A)
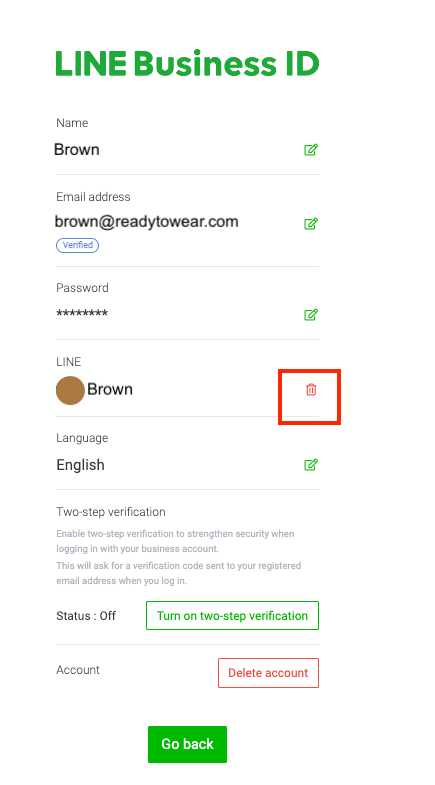
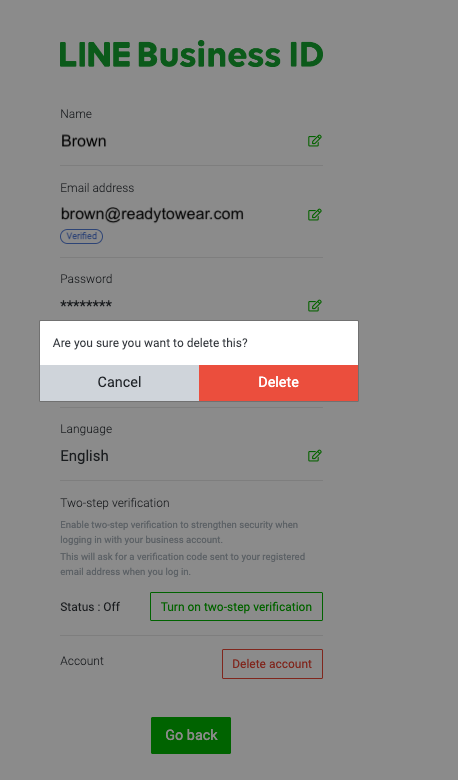
6. Log out from Account A
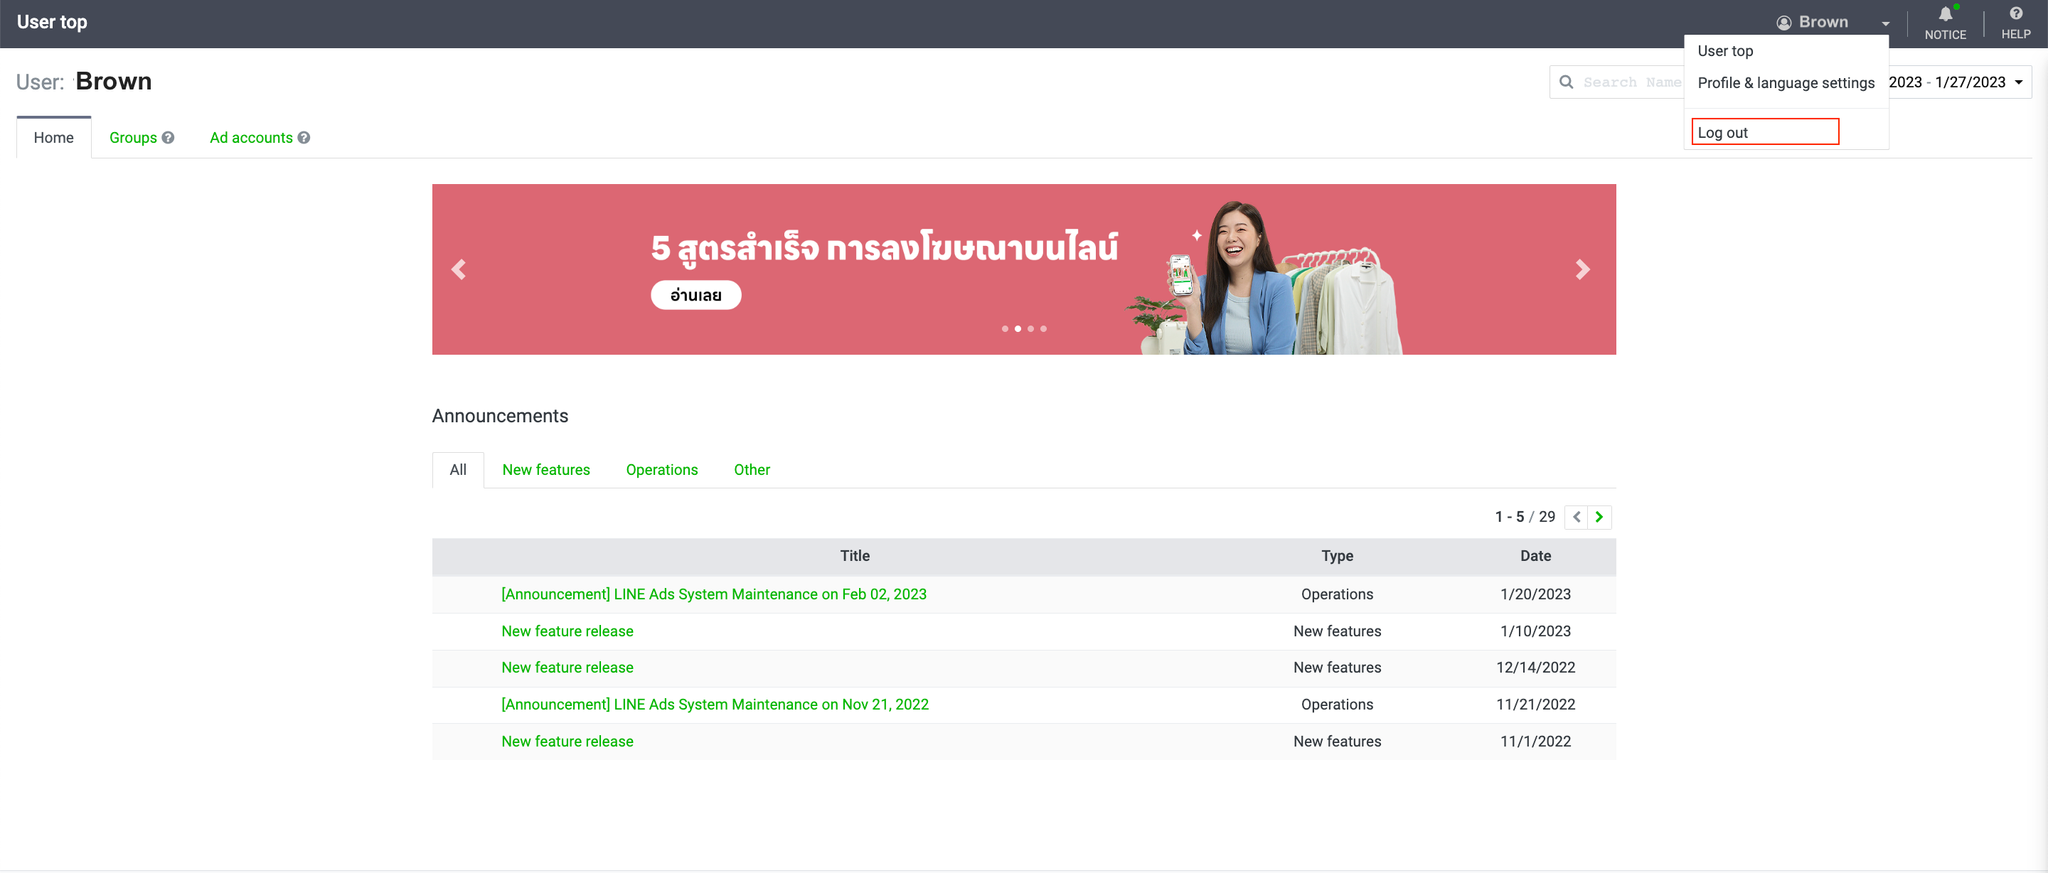
7. Re-log in to Account B that you were unable to link LINE ID in the beginning
8. Go to profile and language setting
9. Click link
10. Click log in with your LINE ID

11. LINE ID link is completed
(Last updated: February 8, 2023)
Ad account structure
The following is the structure of an ad account.
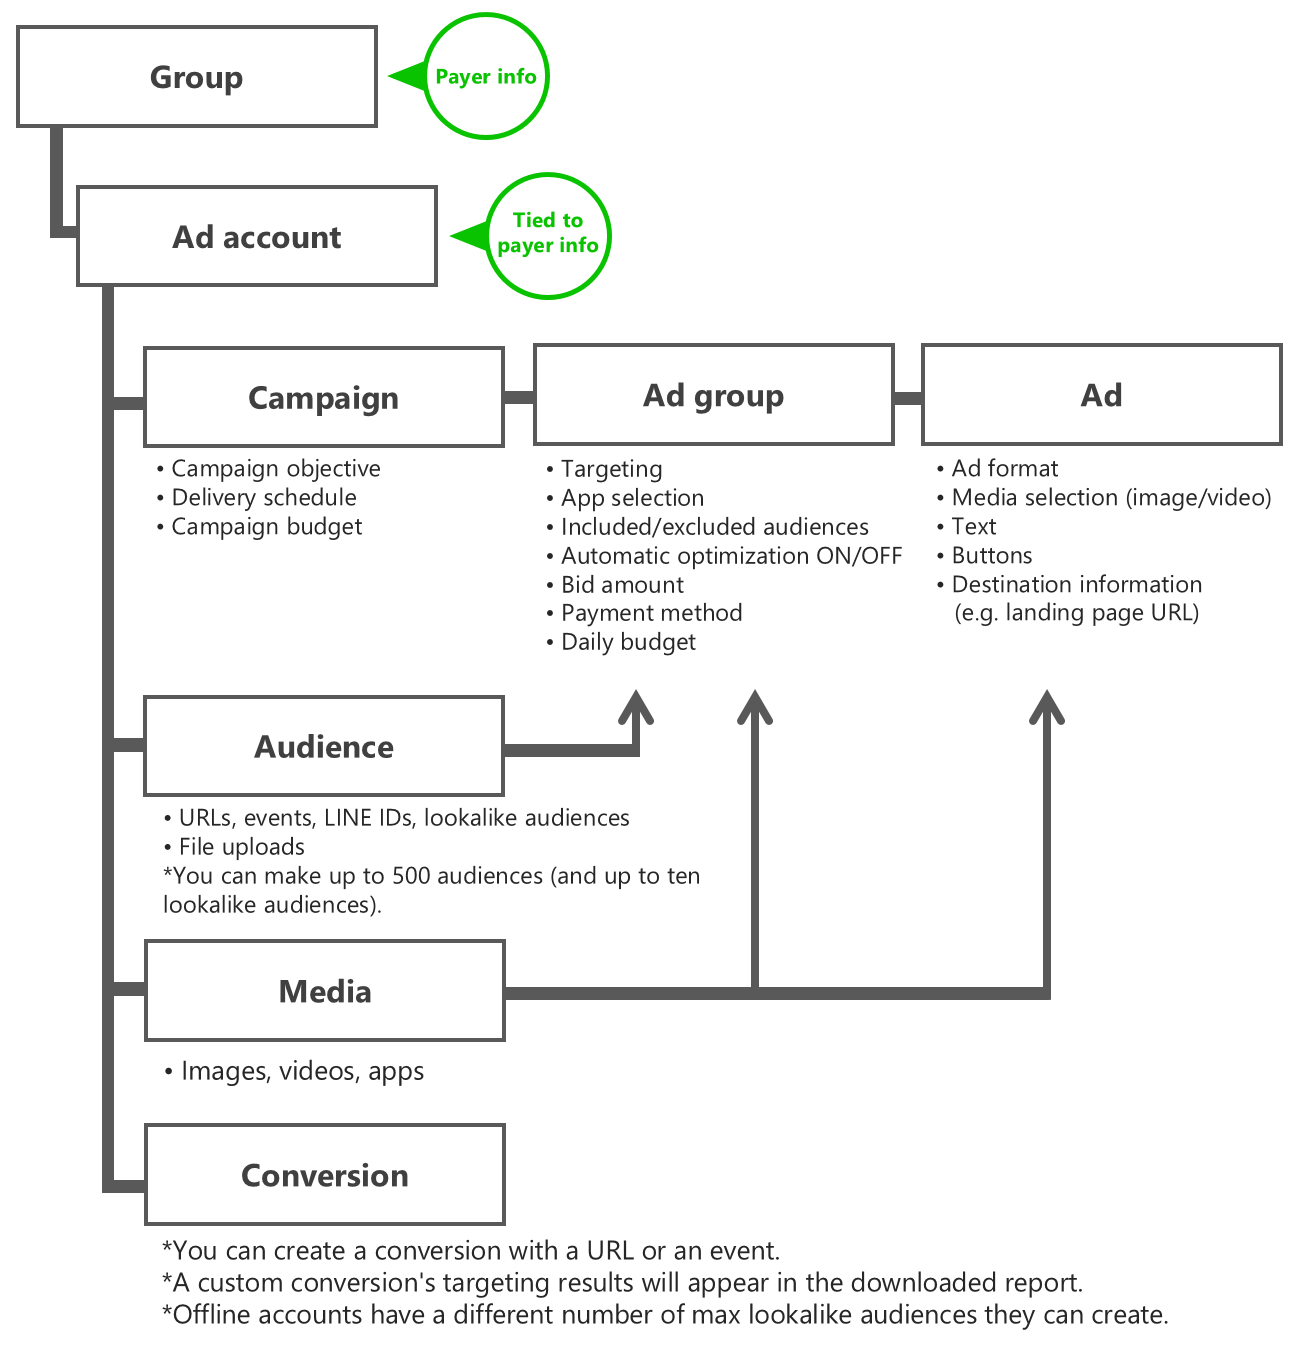
Note:
- To deliver an ad, you first have to create your LINE Official Account.
- You are required to register the payer info in “Groups.”
- The layout of the actual admin panel of the LINE Ads is subject to change without prior notice and may appear differently from the illustrations on this page.
(Last updated: October 19, 2020)
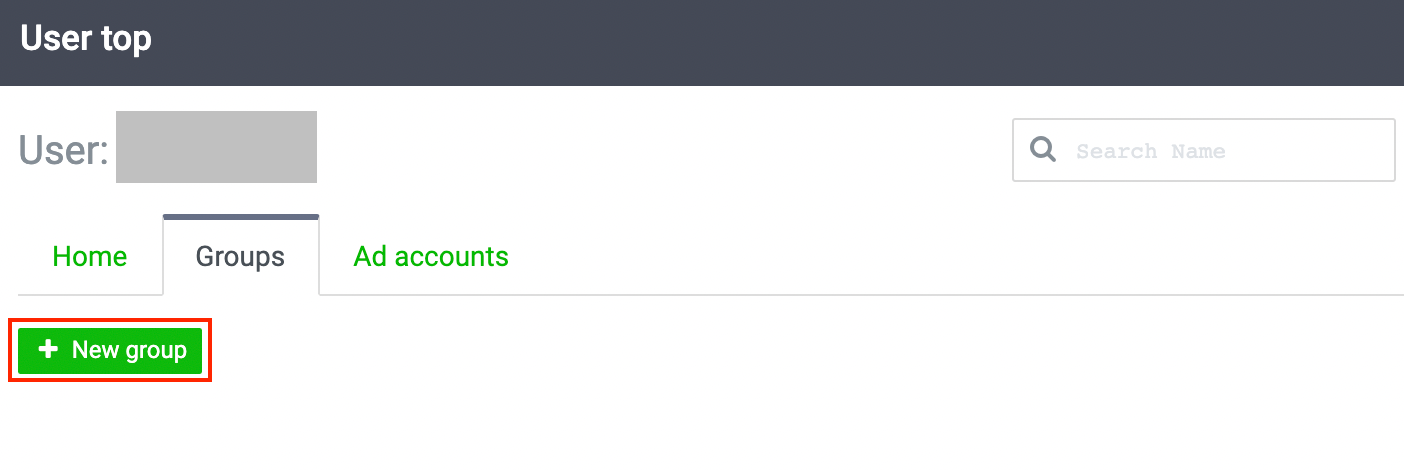
1. Click on the “+ New group” button in the upper left of the homepage.
.png)
2. Enter the desired group name in the “Group name” field under general information.
3. Enter payer info.
4. Click “Create.”
You are required to provide the information as detailed below:
General information
- Group name
Please set the display name (optional) of the group as you desire.
The display name that you have set will be visible on the admin panel of the LINE Ads only; it will not appear on the ads you deliver.
Payer info
- This is the payer information required for billing (only Self-Serve accounts are required to register this information).
Select the “Set payer info for the group” option and then register your payer information. If you wish to set payer information for each ad account separately, please select the other option.
- Client entity
Select LINE Thailand.
- Business type (information as specified in the electronic invoice)
Please search for the corporate registration number of the invoiced entity and then select the name of the corporation, sole proprietor, or foreign corporation.
- Requesting tax invoices
You can request an abbreviated tax invoice or full tax invoice.
Customers who are corporations wishing to request withholding tax refunds are required to request full tax invoices. Please also ensure that all company details are completely filled out.
Note:
* One account can create up to 100 groups.
* Groups that are linked to the approved ad account cannot be deleted.
(Last updated: October 19, 2020)
Creating an ad account
An ad account is an account used for managing ads on the LINE Ads.
To deliver ads, please create an ad account.
Generally, you have to separate ad accounts specifically for each product.
If you have already created a group, please create a new ad account within the existing group.
You can create an ad account by following the steps below:
1. Open the group in which you want to create an ad account. > Click on the “Ad accounts” tab. > Click “+ New ad account.”

2. Fill out every required field and then click “Create.”
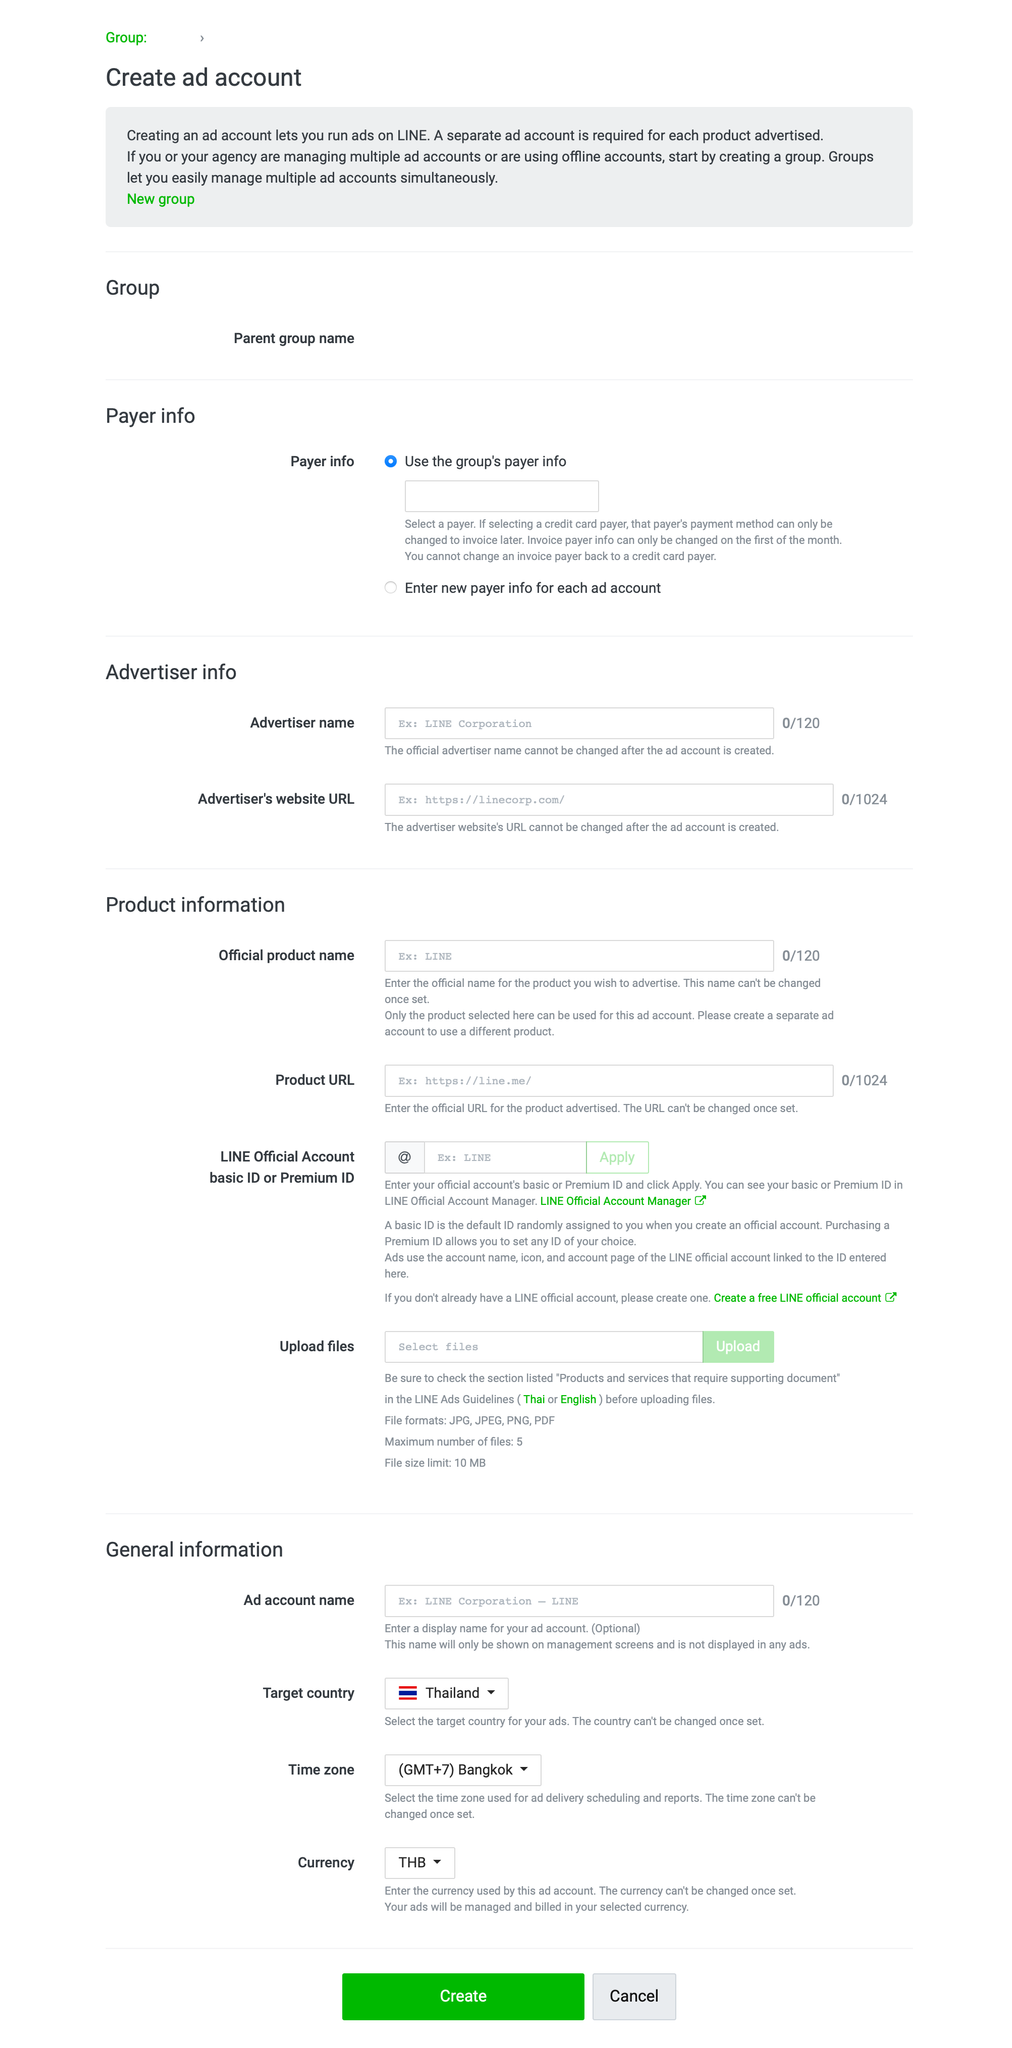
Payer info
Use the same payer information that you have registered for creating the group.
Please select “Use the group’s payer info” and then select payer info from the list.
To register new payer info, please select “Enter new payer info for each ad account.” and then register the payer info.
* You can see more information on registering payer info here.
Advertiser info
Please enter an official advertiser name and advertiser the website URL created by the advertiser’s company.
* Please ensure that the advertiser name and website URL are correct before registering your ad account.
Product information
Please enter the official product name, product URL, and basic ID or Premium ID of your LINE Official Account.
* Please ensure that the product name, product URL, and basic ID or Premium ID of your LINE Official Account are correct before registering your ad account.
You can create your LINE Official Account here.
If the ad account registrant does not perform the role of an admin of your LINE Official Account, a URL will appear on the upper section of the screen.
Once the ad account is created, please be sure to inform the admin of your LINE Official Account to open that URL and grant permission to link the ad account to your LINE Official Account.
General information
The system will automatically fill out the required fields for you based on the information you have entered for previous settings from “Payer info” to “Product information.”
The ad account name will be displayed on the ad account list on the homepage.
Note:
* Once your ad account has been created, the registered information will undergo a review process.
* After an ad account has been approved, it cannot be deleted.
* After an ad account has been created, you can edit only the payer info and the name of the ad account.
* The primary reason that could cause your ads to be rejected is that the product information and the content on the website accessed by the provided URL do not match. Please remember to recheck if all of your product information matches the website content before registering your ad account.
(Last updated: October 19, 2020)
Registering a credit card
To use the LINE Ads, you first have to register a credit card.
* You can see the names of the companies issuing credit cards that you can register here.
To register a credit card:
1. Go to the homepage and select the ad account or group for which you want to register a credit card. > Click on an ad account name on the “Ad accounts” tab or a group name on the “Groups” tab.
2. Click on the “≡” icon on the upper left of the Ad Manager screen. > Go to “Settings.” > Select “Billing and payments.”

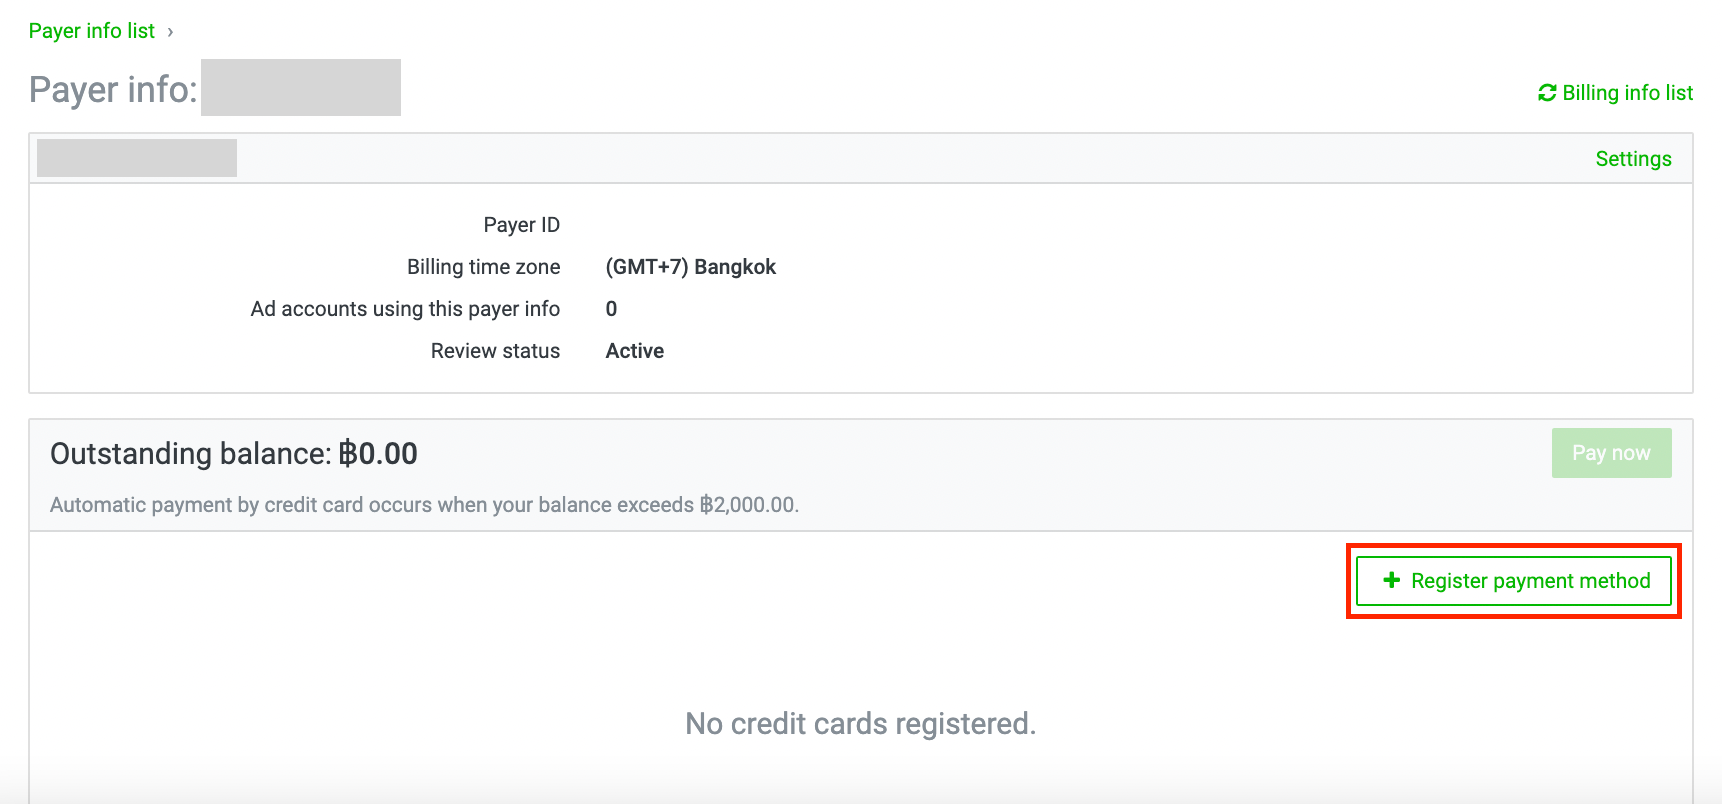
3. On the payer list page, click on the payer name for which you want to register a credit card.
* If you have not added the “Payer info,” please do so before registering a credit card.
* You can see more information on adding payer info here.

4. Click “Register payment method” in the middle of the screen.
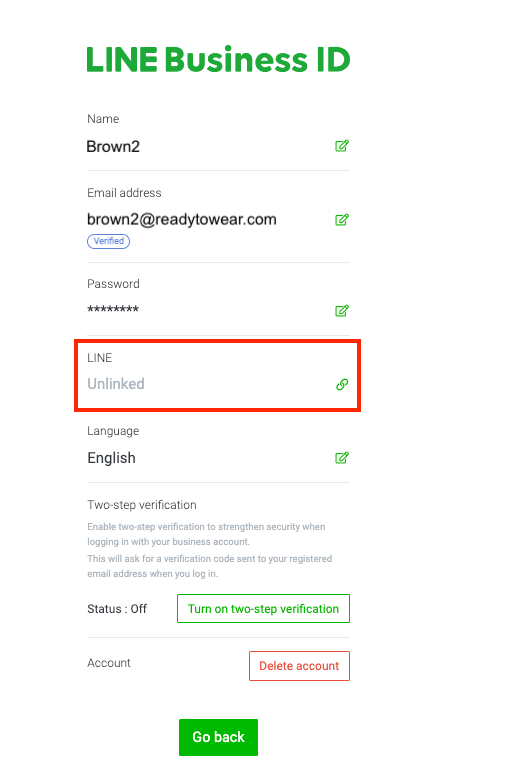
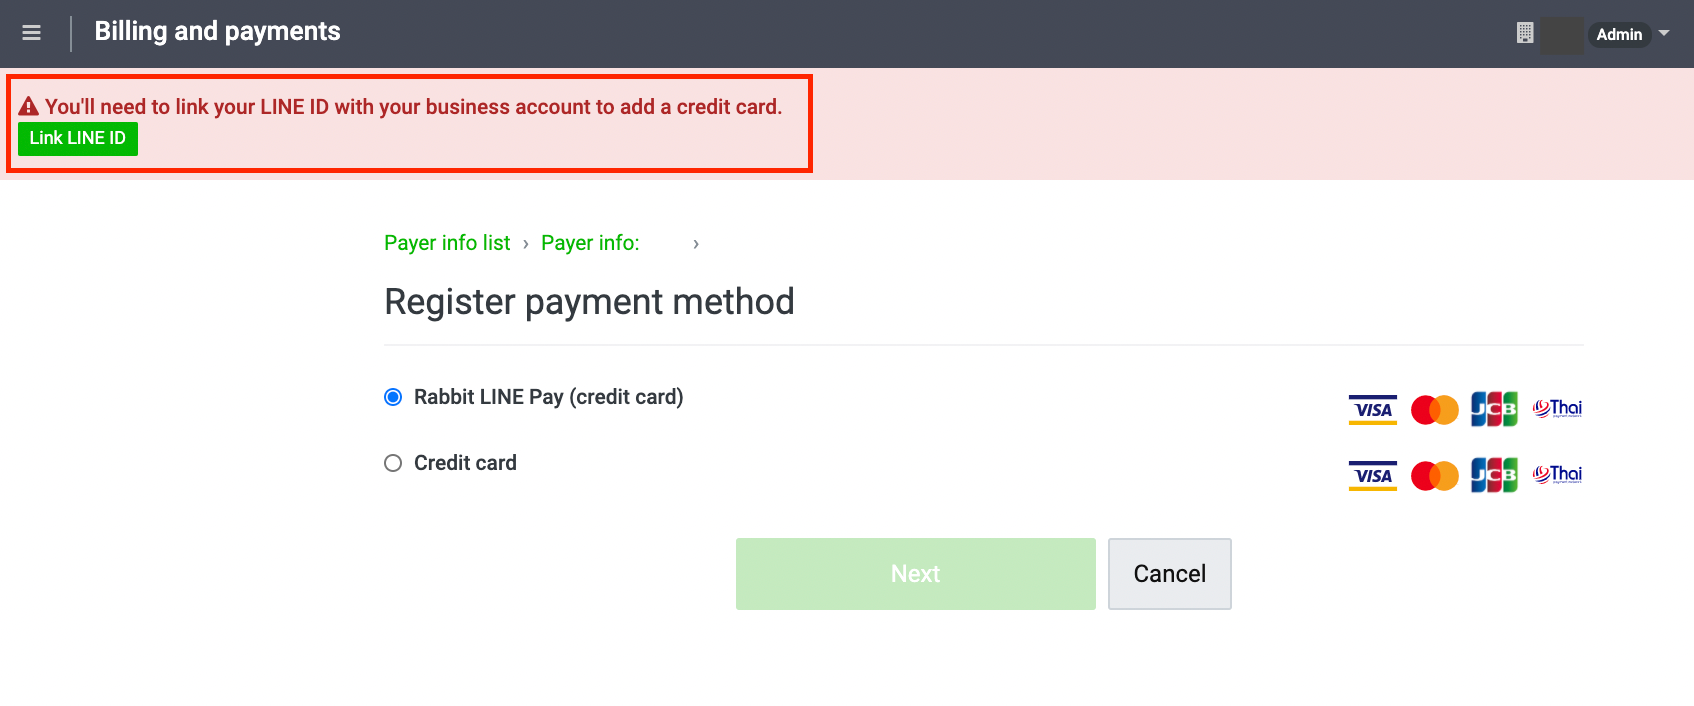
5. If you have not linked your LINE ID to your business account, please follow the steps below:
5.1 Click “Link LINE ID.”
5.2 Click on the “Link” icon on the right side of the “LINE” field.

5.3 Enter the email address and password of your LINE Account. > Click the “Log in.”

5.4 Click on the “Go back” button if the system does not automatically bring you to the groups screen.

6. Select the “Rabbit LINE Pay (credit card)” or “Credit card” option.
.png)
Please check the smartphone that you use for logging in to your LINE Account.
.png)
6.1.2 If you have not registered a credit card for your LINE Account, please register a new card first. If your LINE Account already has a credit card registered, please select the existing credit card and then click “Register.”

6.2 If you select the credit card option:
6.2.1 Please enter the card number, expiration date, and security code (CVV/CVC) of the credit card you would like to register.

You can register multiple credit cards and set credit card priority for payment as well.
* You can see more information on setting credit card priority for payments here.
(Last updated: October 19, 2020)
Logging in to the Ad Manager page
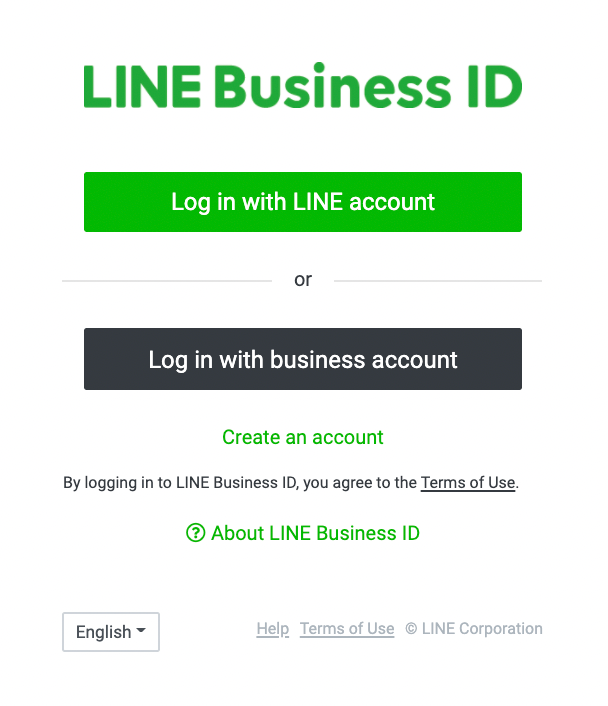
You can log in to the LINE Ads with LINE Business ID:
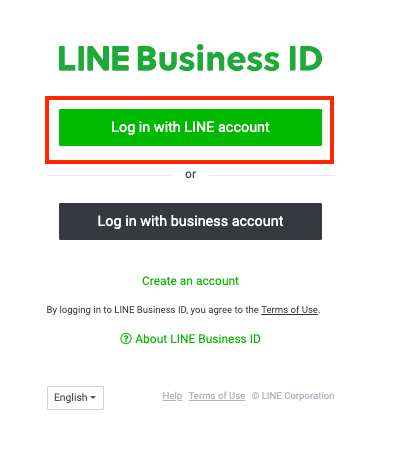
There are 2 methods: “Log in with LINE account” and “Log in with business account”
Log in with LINE account
You can log in to LINE Ads with existing LINE account of prior registered email address and password in LINE application. Please ensure you log in with your currently in-used LINE account.
1. Open this link and choose “Log in with LINE account”
2. System will display PIN password. Please fill in the displayed password in LINE application linked with the same email address used in the log in within 3 minutes. System will cancel the log in attempt if the correct password is not filled within 3 minutes.
3. Once the log in is successful, you will be directed to LINE Ads Manager.
*If you forget your password, please click here
2 steps verification
LINE uses 2 steps verification for the log in via website and application management screen with “LINE Account” from October 19, 2020 onwards. Therefore, system may request you to fill in the confirmation password on LINE application in your smartphone. The password will be displayed after you enter email address and password.
Log in with email address
If you prefer not to use LINE account or prefer to use another email address to log in to LINE Ads, you can register another in-used email address.
1. Open this link and choose “Log in with business account”. Then, enter your email address and password.
2. Once the log in is successful, you will be directed to LINE Ads Manager.
*If you forget your password, you can set up your new password by choosing “Set a new password” during the log in.
(Last updated: April 1, 2021)
Changing password
You can change your password by following the steps below:
1. Click on the username on the top right of the screen. > Click “Profile.”

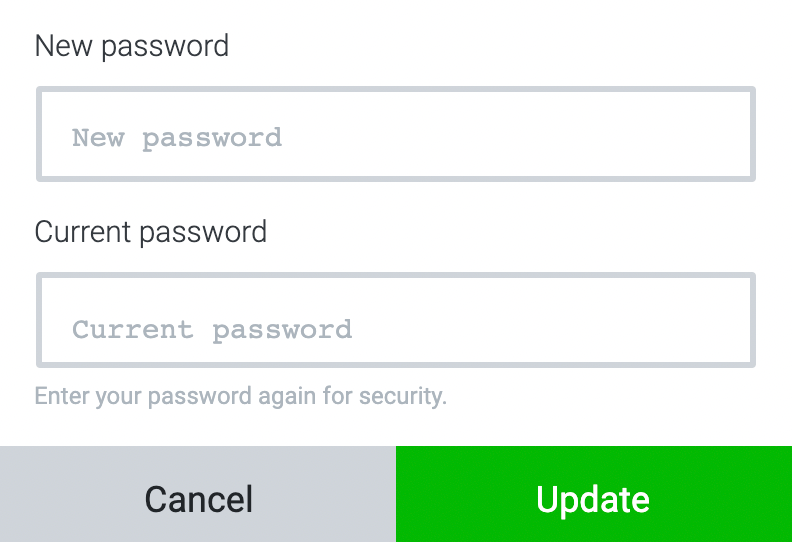
2. Click on the icon next to the password input field.
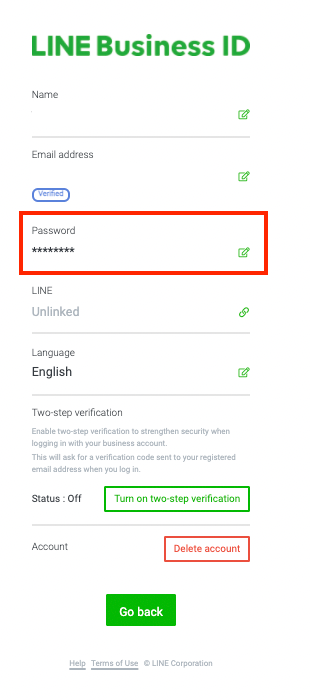
3. Enter a new password, followed by your current password. > Click “Update.”
If you have forgotten your password, please click on this link and then enter the email address that you have registered for your account.
The system will then send a password reset link to that email address. Please reset your password by following the instructions in the email.
(Last updated: October 19, 2020)
Adding users and managing permissions on the LINE Ads
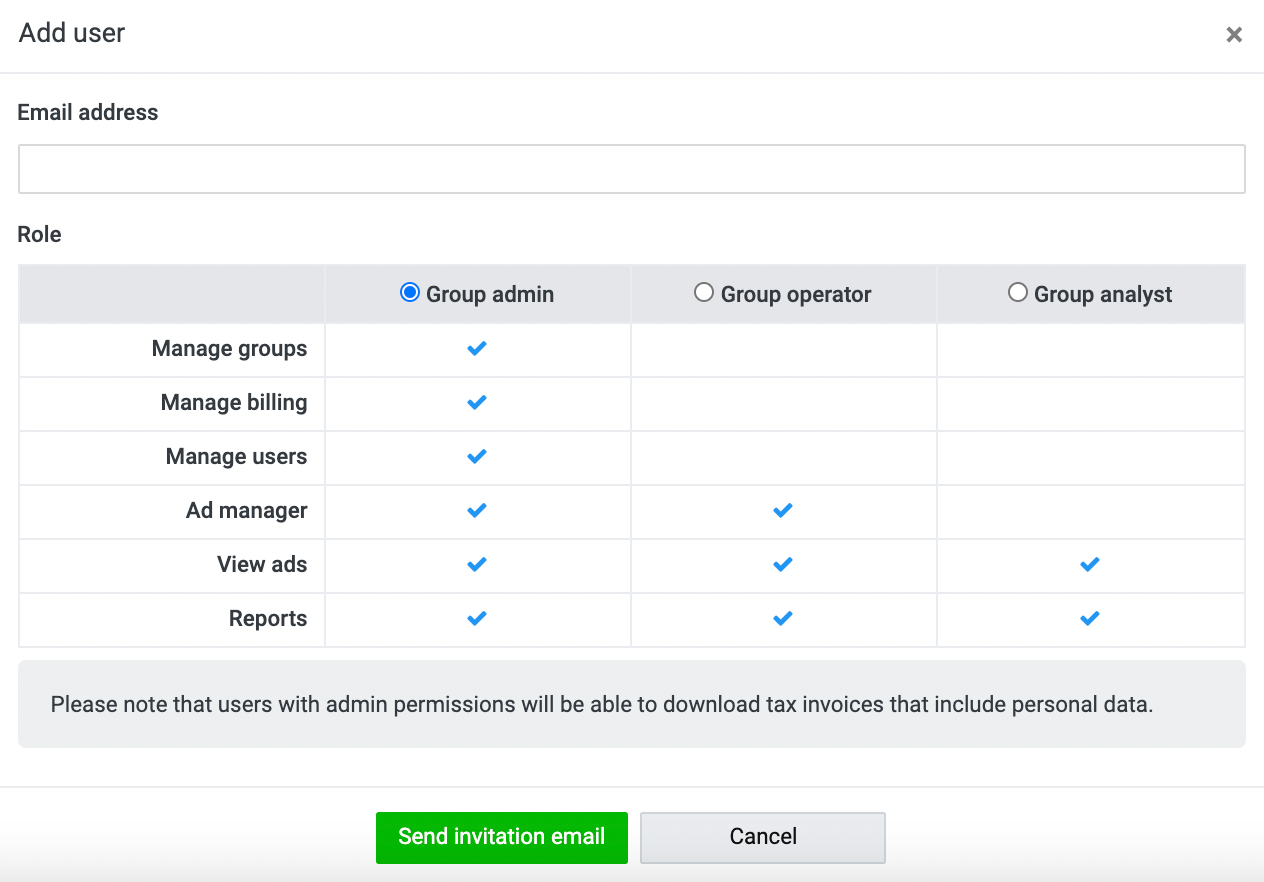
When you add new users to your LINE Ads, you can assign roles and permissions to these users.
There are 3 user roles: “Admin,” “Operator,” and “Analyst.” Each role has a different level of access permission. You can separately manage and set permissions for each group or ad account.
To add users and manage permissions on the LINE Ads:
1. Click on the “Groups” or “Ad accounts” tab on the homepage. > Select the group name or ad account name to which you want to add users.
2. Click on the “≡” icon on the upper left of the Ad Manager screen.
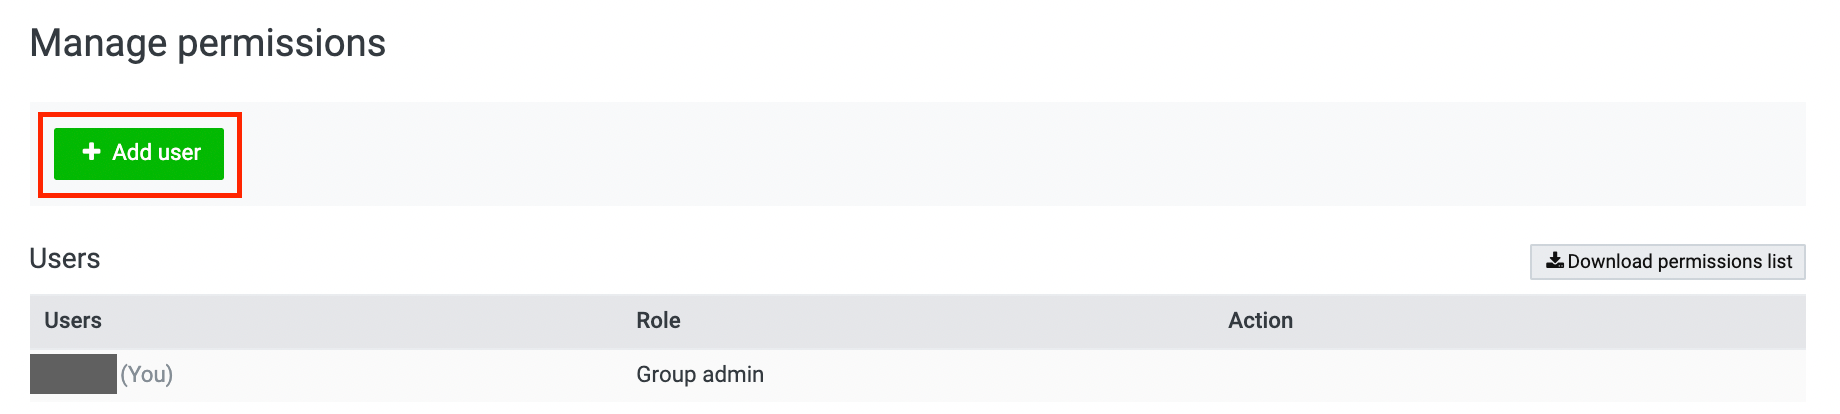
3. Go to the “Settings” menu. > Click “Manage permissions” on the Ad Manager screen.

4. Click “+ Add user.”
5. Enter the email address of the users you want to add to your account. > Select a role for each user. > Click the “Send invitation email” tab.
6. The process of adding users and assigning permissions is complete when the users you want to add to your account receive the invitation email and accept the invitation.
You can edit or delete permissions by opening the “Manage permissions” page and following the step 3 above. > Click “Edit” or “Delete” in the “Action” column on the users tab.
(Last updated: October 19, 2020)
You have to create a campaign before delivering ads. There are several campaign objectives available to choose from, depending on your purpose.
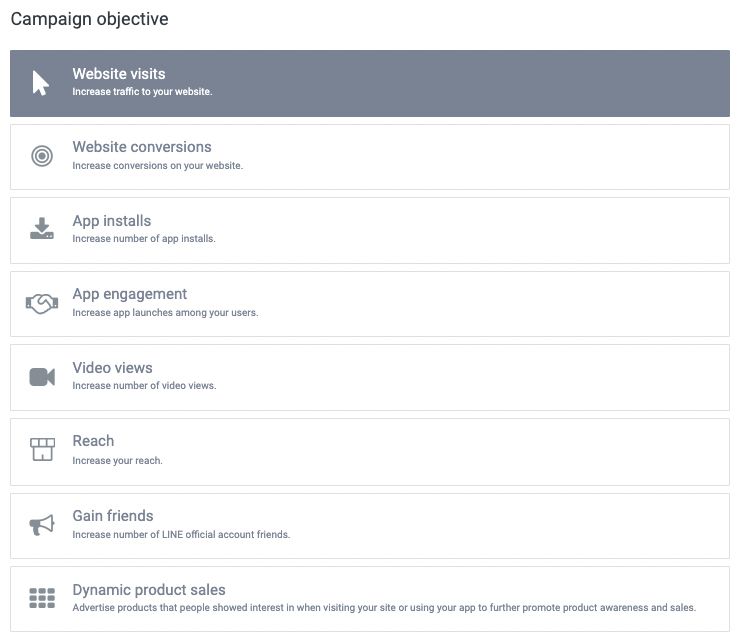
Website visits
Increase traffic to your website.
Website conversions
Increase conversions on your website.
App installs
Increase the number of app installs.
App engagement
Increase app launches among your users.
Video views
Increase your video views.
Gain friends
Increase the number of friends on your LINE Official Account.
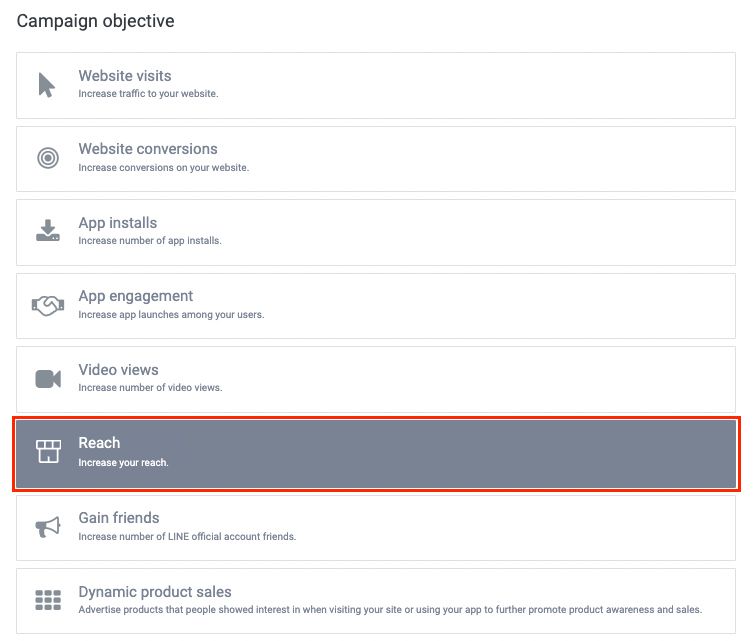
Reach
Increase the reach of your ads.
Dynamic product sales (Contact LINE Agency Partner)
Display ads for products in which users show interest when visiting your website or using your app. This way, you can promote product awareness and boost product purchases.
Note:
The types of ads that you can create and the available features are different, depending on the campaign objective you select.
Please choose the campaign objective that suits the purpose of the ads you want to deliver.
(Last updated: June 8, 2022)
Reach Objective
Increase the reach of your ads.
Frequency setting: 1 to 10 times
Interval setting: 1 to 31 days
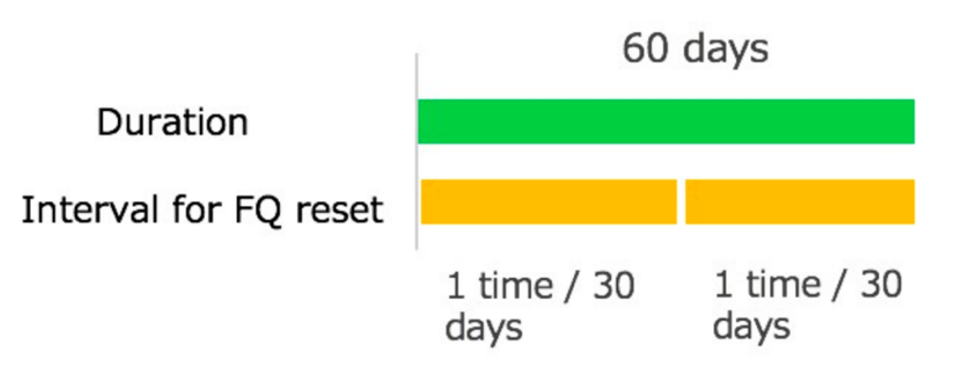
Example: Set frequency at 1 and interval at 30 days
If the campaign duration is 60 days, a user will see ad 2 times.
Bidding strategy: Manual, Cost Cap, Bid Cap, No Limit
Click here for more information.
Ad format: Image, Small Image, Video, Carousel
(Last updated: June 8, 2022)
Creating campaigns
You must create campaign in order to activate your ad. You can manage the objectives, schedules, and maximum spending limits for each of your campaigns.
Select the right campaign objectives
- Website visits
Increase traffic to your website. Best suited for one who would like to increase page views of their websites.
- Website conversions
Increase conversions on your website. Best suited for one who would like increase purchase on websites. This campaign objective enables the automatic bidding configuration to maximize conversion.
- App installs
Increase the number of app installs. Best suited for one who would like to increase app installs. This campaign objective enables the automatic bidding configuration to maximize installs.
- App engagement
Increase app launches among your users. Best suited for one who would like to re-engage users who already installed application or users who previously installed application but not currently in-use to open and use the app again.
- Video views
Increase your video views. Best suited one who would like mass audience to view your video ads. This enables the automatic bidding configuration to maximize 3-second views and complete views.
*Only website is allowed as landing page.
- Gain friends
Increase the number of friends on your LINE Official Account. Best suited for one who would like to increase customer base and make use of their LINE Official Account.
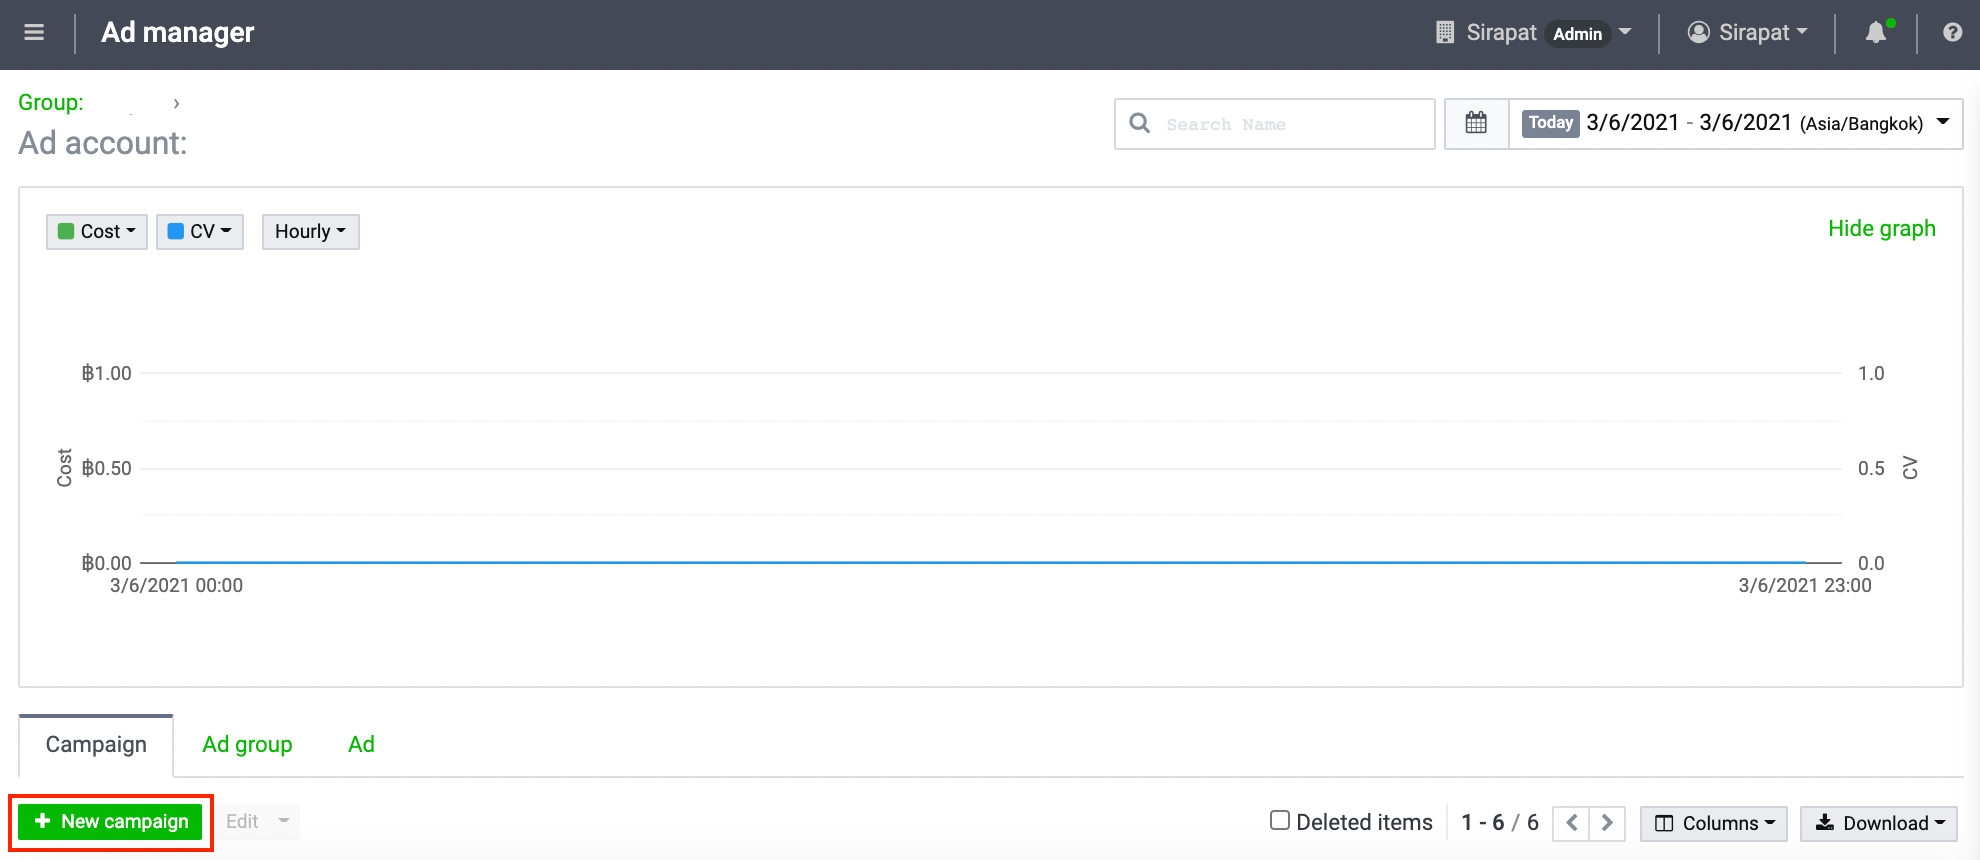
You can create a campaign by following the steps below:
1. Click “+ New campaign” under the Campaign tab.
2. Select a campaign objective.
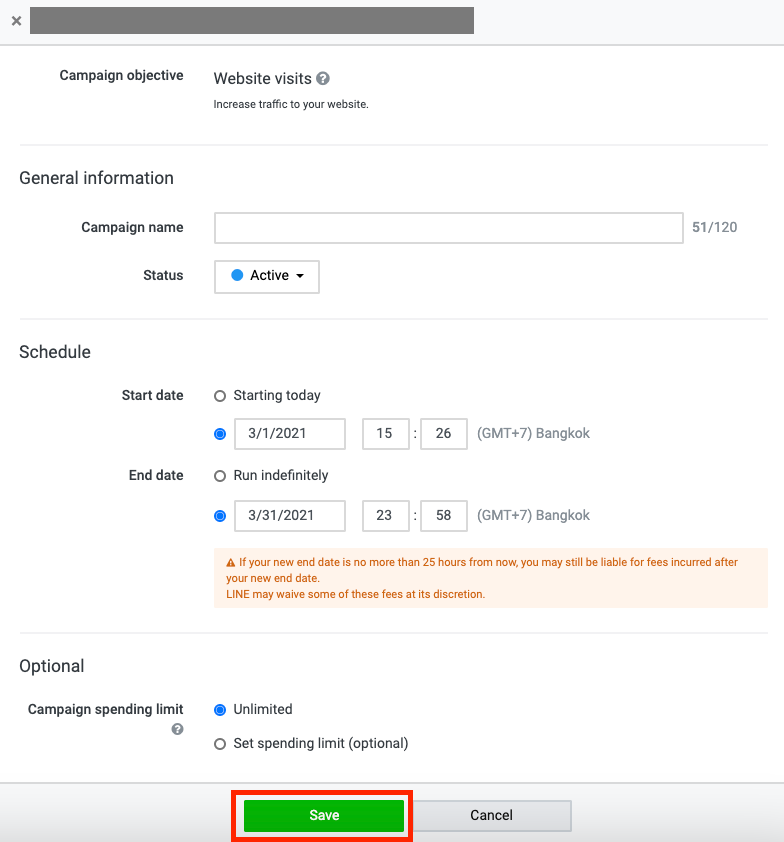
3. Enter the general information, followed by selecting the campaign schedule and configuring the other optional settings.
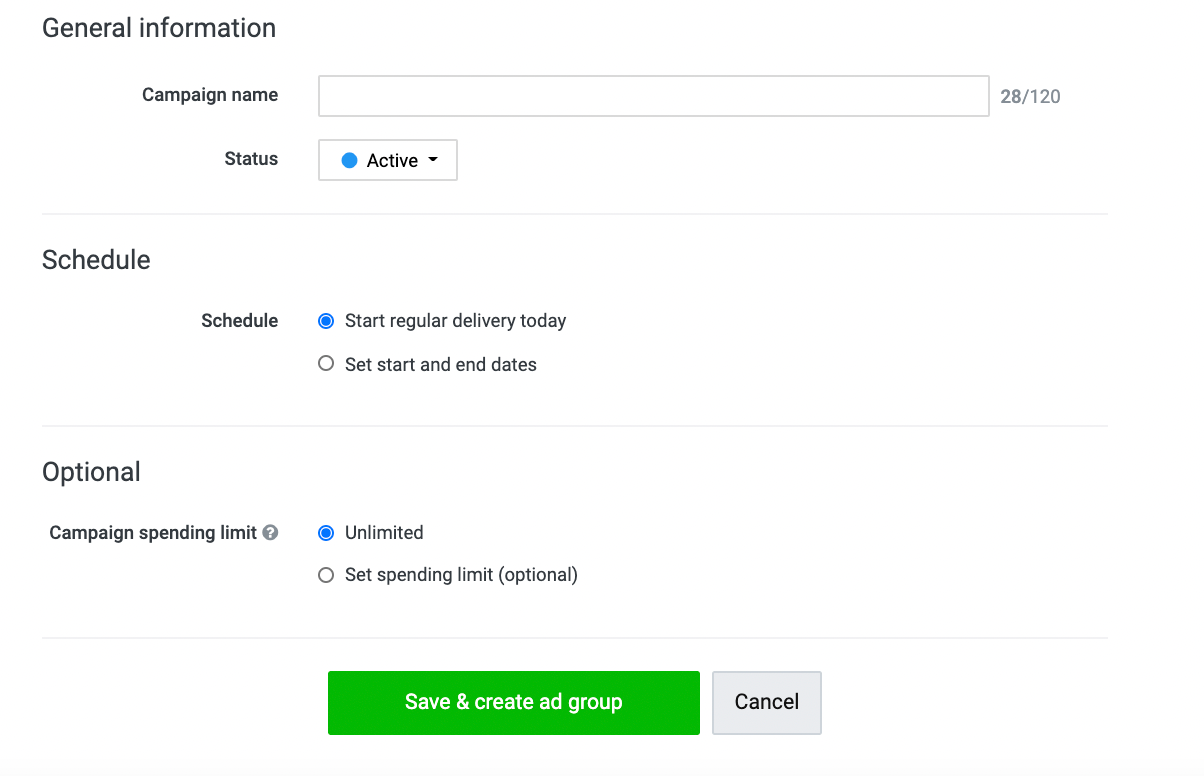
General information
Set a name and status for your campaign as desired.
Schedule
You can choose between “Start regular delivery today” and “Set start and end date” options.
Campaign spending limit
You can choose whether to set a monthly spending limit or an in-total budget covering the entire campaign period for your campaign.
Monthly budget: This option allows you to set the available budget per month.
In total: Select this option when you want to set a budget for your ad campaign that will span several months.
* You can see more information on the Campaign budgets page.
4. Click “Save & create ad group.”
- Once you are done with creating campaign, please proceed with creating ad groups as the next step.
(Last updated: June 8, 2022)
Creating ad groups
Ad group is a feature used for setting targets, bidding amounts, and daily budgets.
You can spend less time managing ads if you separate ad groups that use different criteria for ad performance; for example, by click rates or conversion rates.
You can open the ad group creation screen by choosing either of the 2 options as follows:
Open after creating a campaign
After you have completed all the required information and selected all the mandatory options on the campaign creation page, click “Save & create ad group;” the ad group creation screen will then appear.
Open from the homepage
1. Click on the “Ad account” tab on the homepage. > Select the ad account name from which you would like to deliver an ad.
2. Click on the “Ad group” tab on the Ad Manager screen. > Click “+ New ad group.”
.png)
The following are the details of each setting on the new ad group screen.
General information
- Campaign
Please select the campaign for which you would like to create an ad group.
* If you have it, click “Save & create ad group” on the campaign creation screen; the system will use the campaign you have just created by default.
* If you want to select another campaign, please click on the “Edit” button.
- Ad group name
This is the ad group name that will be displayed on the ad group list.
- Status
Please select Active or Pause.
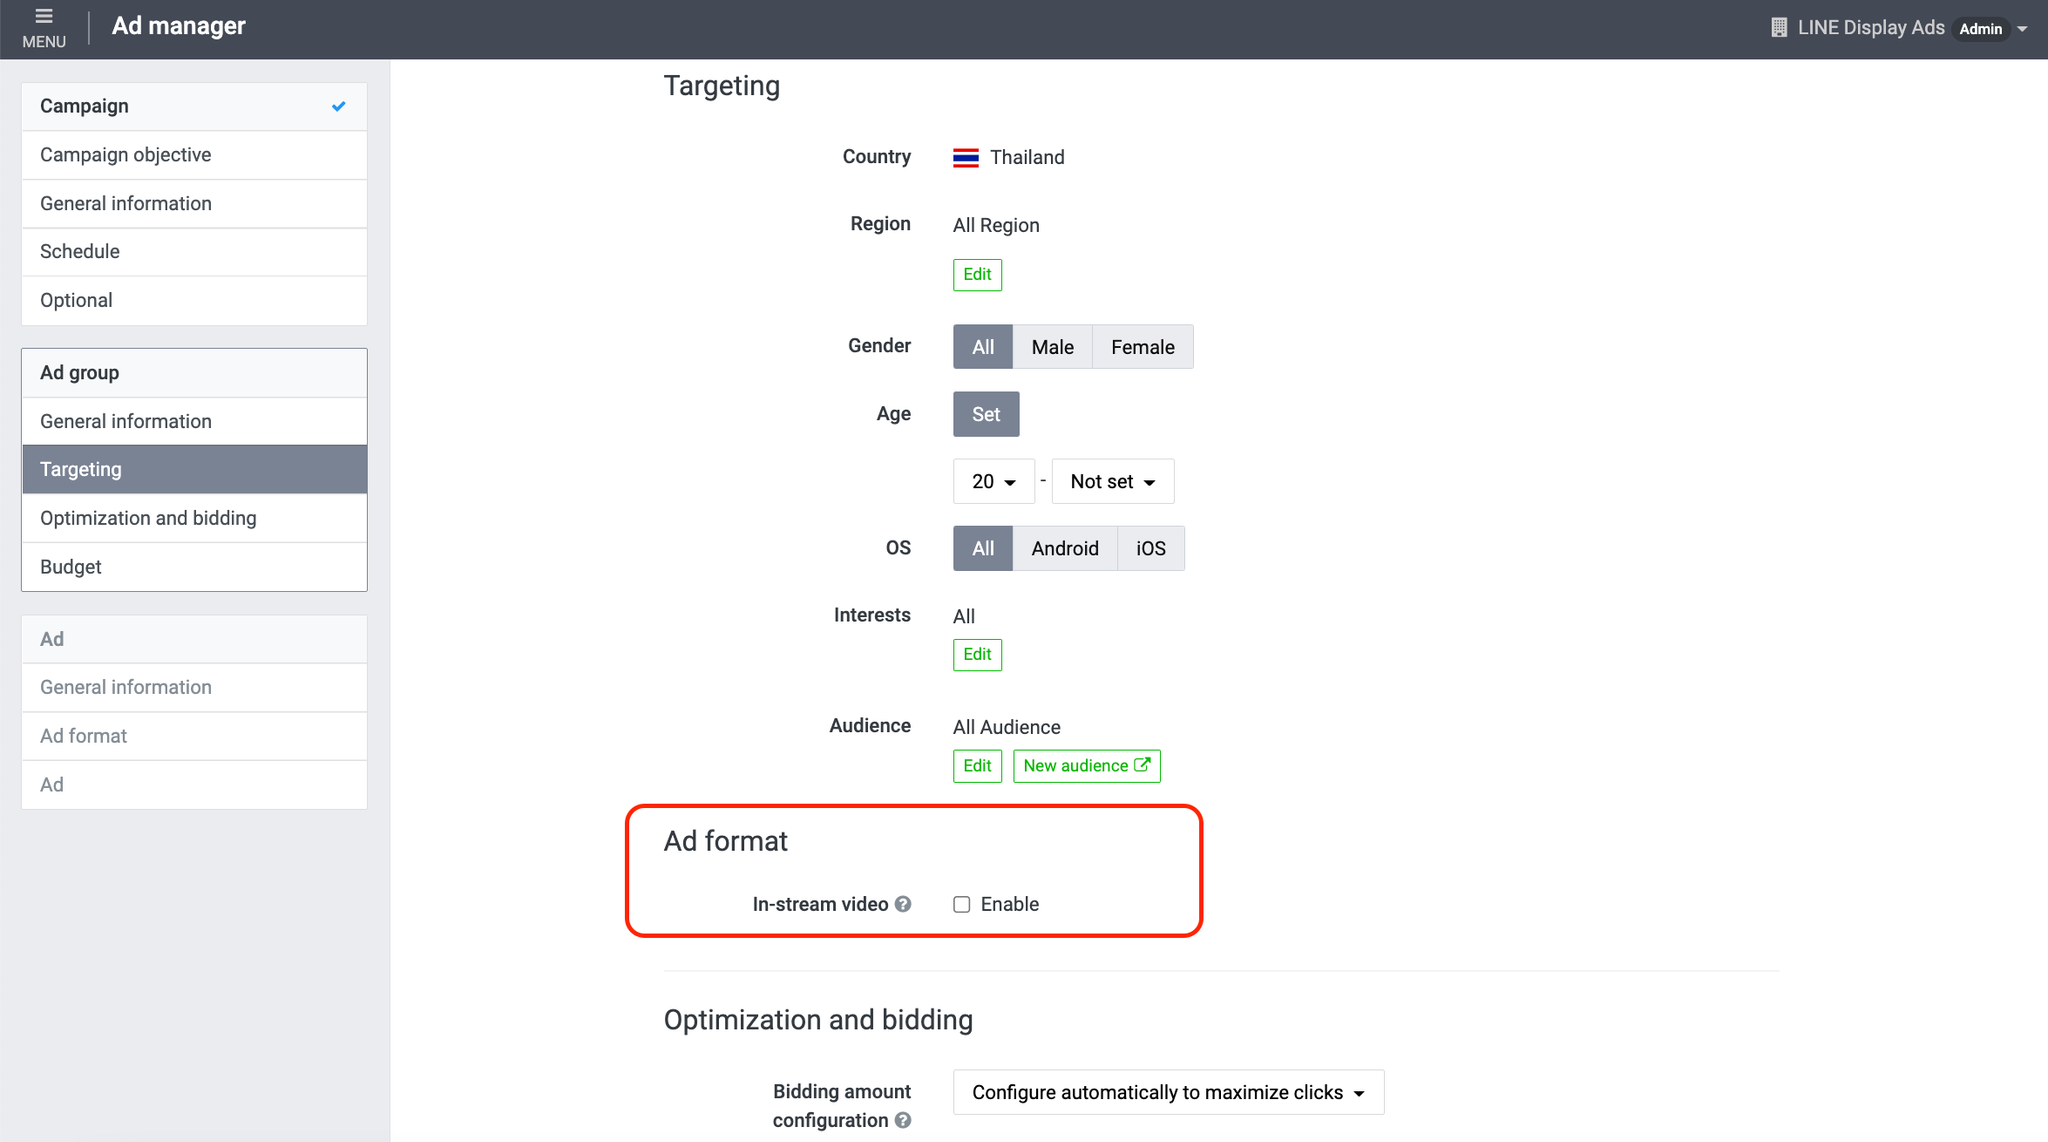
Targeting
Set the targeting properly to be aligned to your ad delivery objectives.
Please refer to the following for more information on targeting.
Delivering ads using audiences
Delivering ads with demographic targeting

Optimization and bidding
Setting the bidding amount per unit
- Bidding amount configuration
Please choose the right bidding method for the defined campaign objectives.
- Payment method
If you select the “Configure automatically to maximize clicks” option for bidding amount configuration, the system will automatically select the “Cost per click (CPC)” option for your payment method.
If you select the “Manual bidding” option for bidding amount configuration, you will be able to select either of the following for your payment method:
Cost per click (CPC)
Cost per thousand impressions (CPM)
You can see more information on the bidding method in Bidding methods and bidding amount.
Budget setting
You can set a daily budget for each ad group by entering the amount you plan to pay per day.
A daily budget can be set starting from 0.01 baht, which will increase at the rate of 0.01 baht per unit. The budget you set for each ad group can enhance your ad delivery performance. You can also configure the setting to allow the display of a particular ad during a period of 24 hours.
Please be mindful that you will be charged according to the actual number of clicks or impressions. This may cause the bidding to exceed your allocated daily budget.
You can refer to the following for more information on budgets: About daily budget
- Go to Registering media (image/video).
(Last updated: October 19, 2020)
You can enable In-Stream Video ad format during ad group setting by ticking "enable" tick box.
In-stream Video ad format is available for “Manual bidding” option for bidding amount configuration only.
Eligible Campaign Objectives
1. Video View
2. Website Visit
3. Website Conversion
4. App Install
5. App Engagement
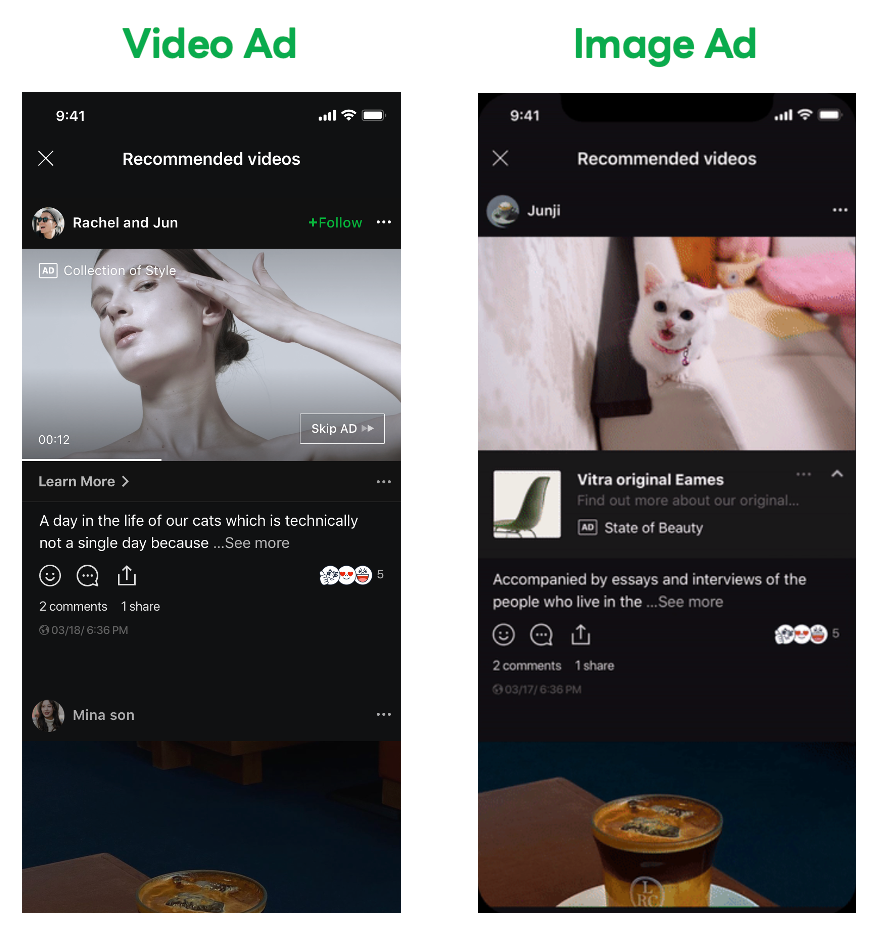
In-Stream Video ad will show as a mid-roll in video content on VOOM.
Video Ad Format:
Ad will show on a video content length longer than 120 seconds, and ad will show after 60 seconds from video content play.
User can "skip ad" after 6 seconds. Ad shorter than 6 seconds is non-skippable.
Image Ad Format:
Ad will show on a video content length longer than 30 seconds, and ad will show after 5 seconds from video content play.
User can hide ad by pressing fold button.
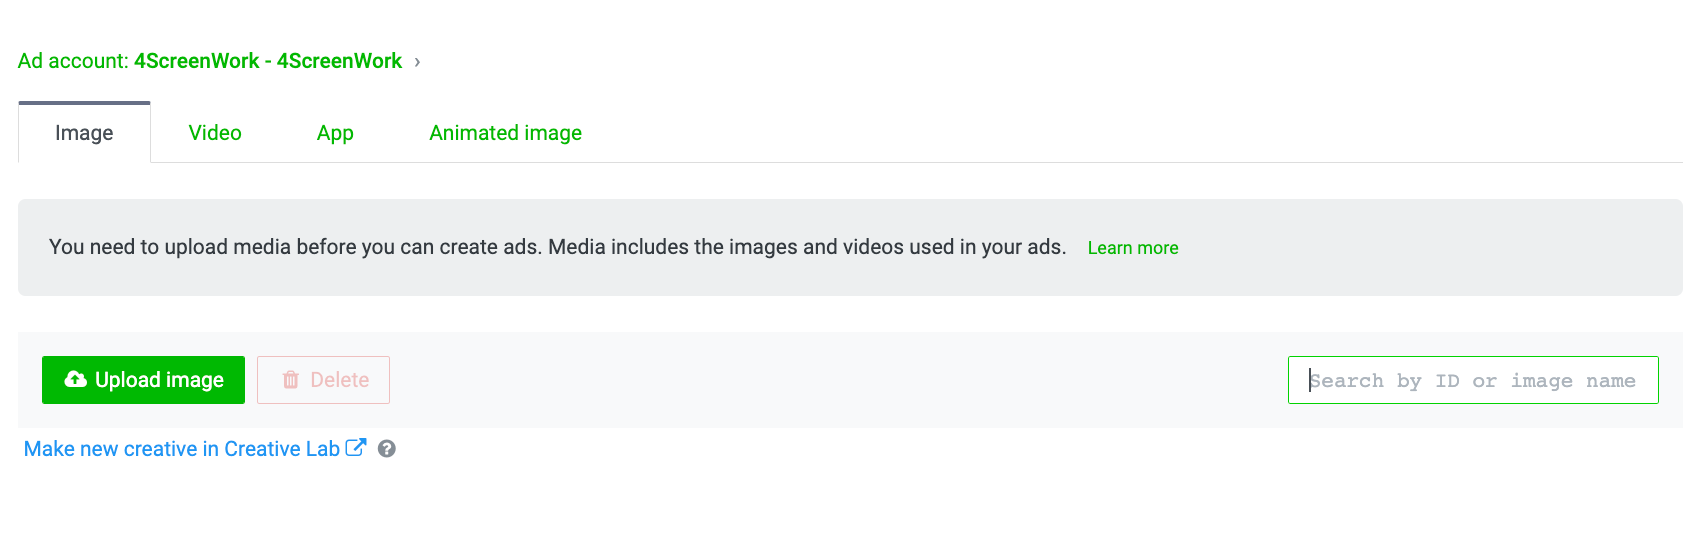
Registering media (image/video)
You are required to register your media before delivering ads.
* “Media” refers to any image or video displayed in an actual ad.
* After registering, your media will undergo a content review process.
To register your media (image/video):
1. Click on the “≡” icon. > Go to “Shared library.” > Then click “Media.”

2. Click on the “Image” or “Video” tab to upload your media file.
Please refer to the following for file upload requirements; for example, the size of the video and image: Guidelines.
Please refer to the following for more information about application registration for promoting your application: Registering media (application)
(Last updated: October 19, 2020)
Registering media (application)
To promote your application, you are first required to register it.
To register your application:
1. Click on the “≡” icon. > Go to “Shared library.” > Then click “Media.”

2. Click on the “App” tab. > Then click “+ Add app.”
%2001-EN-change.png)
3. Select the desired platform (operating system), enter the application name, and add the application’s App Store or Google Play URL.
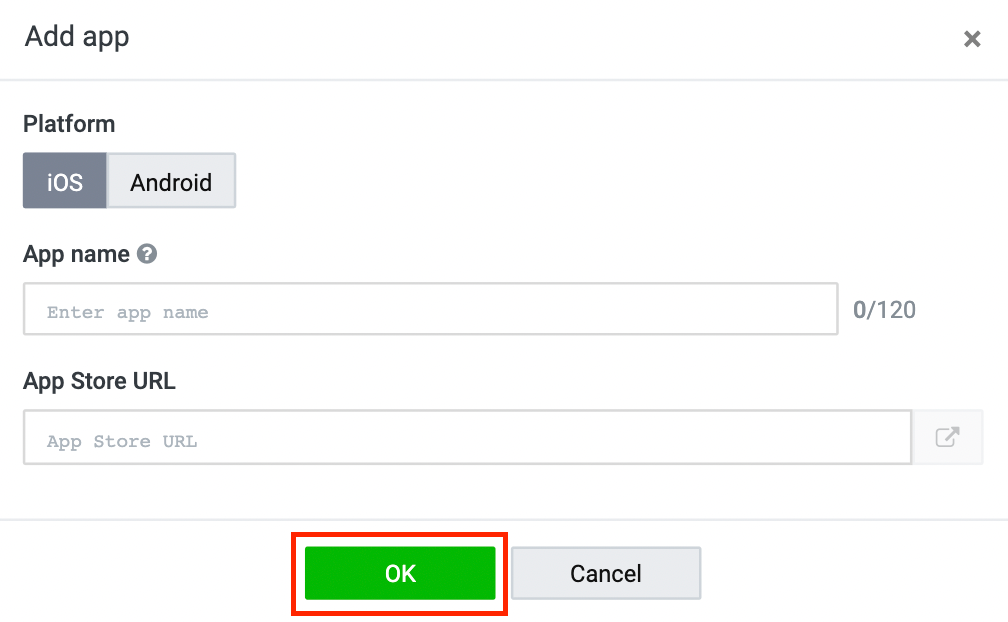
4. Click “OK.”
After a complete application registration, please register App media ID and ad account ID (shown on LINE Ads) on the SDK manager.
For information on SDK linking and tracking methods, please refer to Tracking app conversions.
(Last updated: October 19, 2020)
Creating ads
You have to link your media information, advertising messages, URLs, and other content relating to the ad group by using the ad creation screen before you can publish an ad.
You can open the ad creation screen by choosing either of the 2 options as follows:
Open right after an ad group has been created.
The ad creation screen will appear upon completion of all the required items on that screen and clicked “Save.”
Open from the homepage
1. Click on the “Ad account” tab on the homepage. > Select the ad account name from which you would like to deliver an ad.
2. Click on the “Ad” tab on the Ad Manager screen. > Click “+ New ad.”
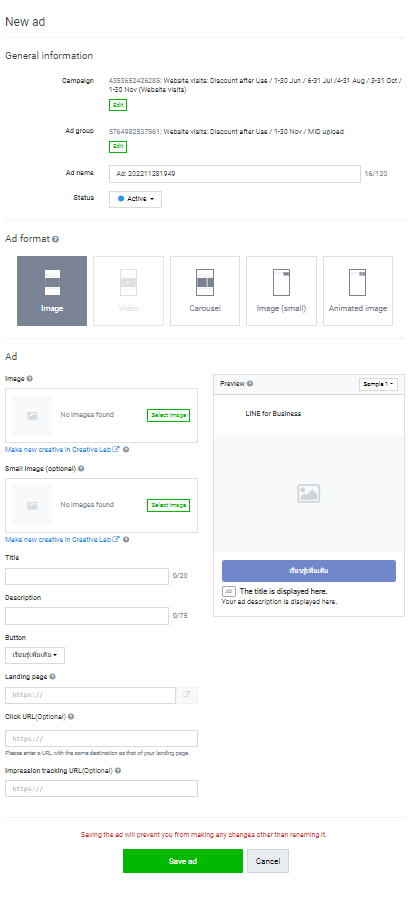
The following are the details of each setting on the new ad screen.
General information
- Campaign
Please select the ad group campaign for which you want to create an ad.
* If you open the ad creation screen by clicking on the “Save” button on the ad group creation screen, the system will use the ad group campaign you have just created by default.
If you want to select another campaign, please click on the “Edit” button.
- Ad group
Please select the ad group for which you want to create an ad.
* If you have not selected a campaign, you will not be able to select an ad group.
If you open the ad creation screen by clicking on the “Save” button on the ad group creation screen, the system will use the ad group you have just created by default.
If you want to select another ad group, please click on the “Edit” button.
- Ad name
This is the ad name that will be displayed on the ad list.
- Status
Please select Active or Pause.
Ad format
If you use CPM for your payment method, you are able to choose whether to display your ad in the image, video, or carousel format.
If you use the CPC for your payment method, you can choose whether to display your ad in the image or carousel format.
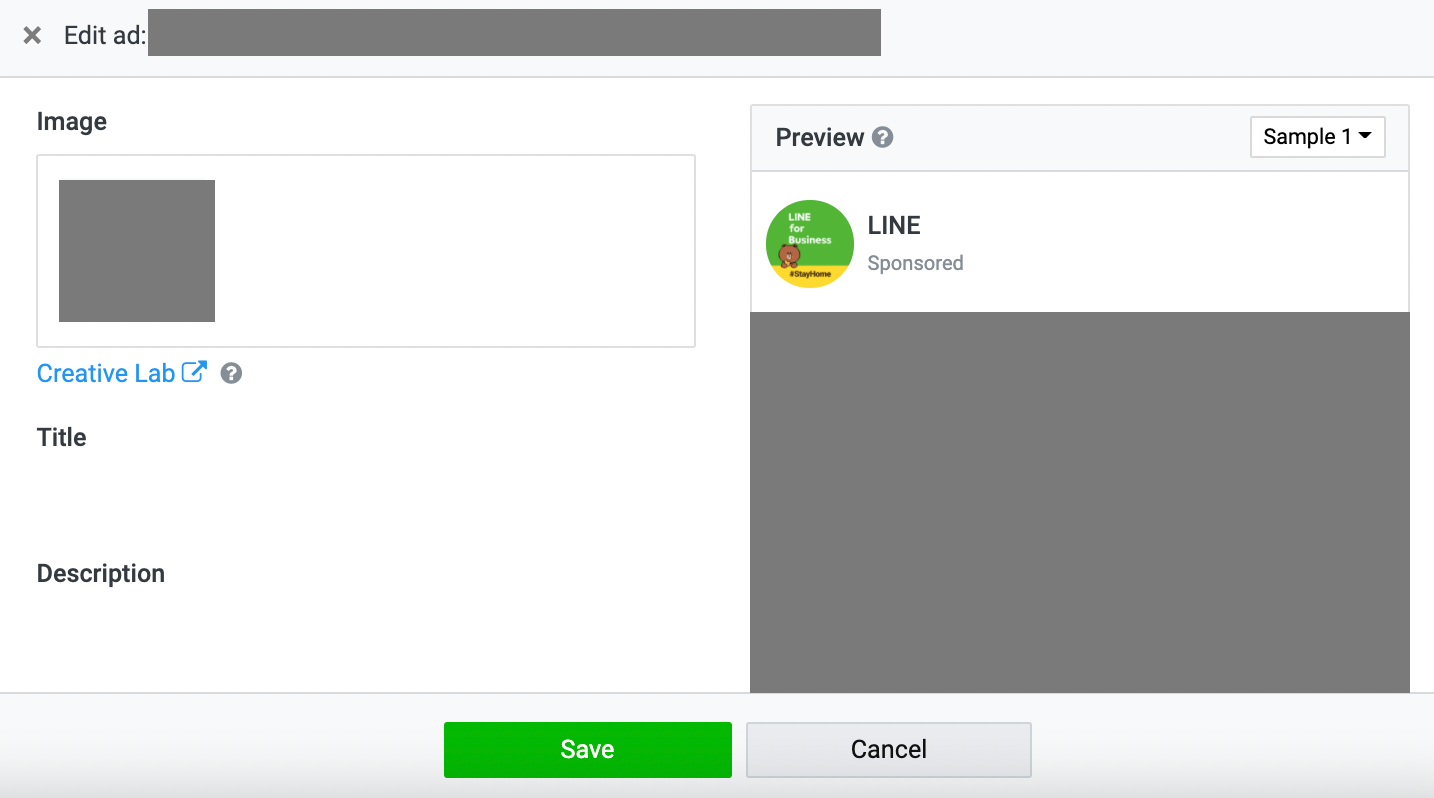
Ad
- Image
Select the image you have uploaded for media registration.
* You can also upload a new image in this section.
Name: Maximum length cannot exceed 20 characters.
Description: Maximum length cannot exceed 75 characters.
Button: Please select the action button that best serves your purpose.
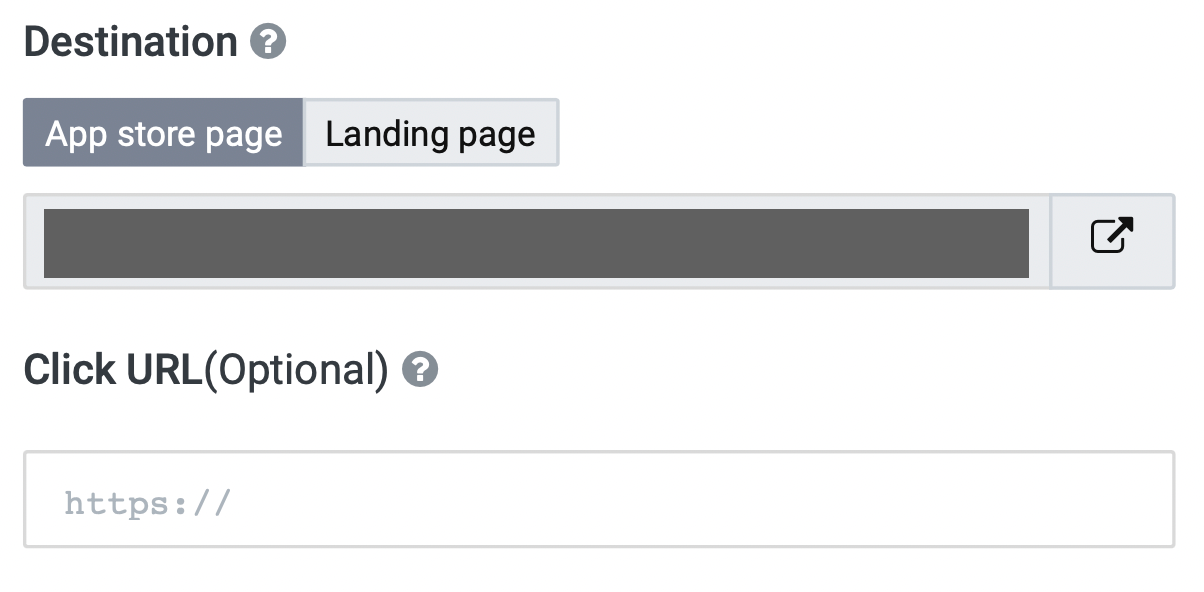
Landing Page: Please add the URL that you would like to be visible on your ad.
* For the app landing page, please add a Store URL.
Click URL (optional): If you want performance tracking in place, please add the redirect URL to track your ad performance.
* After you have finished creating your ad, the review team will review the elements of the ad that you have just registered.
* Your ad may not pass the review if the URL of the landing page has tracking parameters added.
* The actual ad display may differ from the ad preview seen on the preview pane.
* If you want to deliver an ad that allows the audience to interact with your application, you can use a Deep Link as your Click URL and set the link to be accessible to both the audience that has already installed the app on their device and those who have not.
* The review team will review the ad elements you have registered.
- Go to How to start running ads.
(Last updated: October 19, 2020)
Case 1. Uploading 1 Default Image and 1 Optional Image
Suitable for advertisers who want to design an image that fits their advertising area (big and small area). When you upload 2 images in 1 advertisement, the display logic of your advertisement will be as follows:
1.1 Image to be displayed in big area
- Displayed in Home Tab, LINE VOOM, LINE Today, LINE Wallet
- 1080x1080, 1200x628
1.2 Image to be displayed in a small area (Optional)
- Displayed in Chat list, LINE OpenChat
- 1080x1080, 1200x628, 600x400

Other conditions
- For the image ad format
- You can upload just 1 default image and skip optional image as usual (Please refer to more information in case 2)
- You cannot upload only optional image under image ad format
- In case of uploading a 600x400 image in the image for a small area display, the long title 1 & 2 are required (In case of uploading other image sizes, long titles will not be required)
- Able to check ad preview by the size of advertisement area (big and small area)
- Able to download ad reports by image area.
Case 2. Selecting to upload only the main image 1080x1080, 1200x628
- Ad image is displayed in all placements, both in the large and small area. Please check for further details here.
- No change in ad display logic.
Case 3. Selecting to upload only a 600x400 image
- Ad image is displayed on a specific placement: Home tab, Chat list, and LINE OpenChat. Please check for further details here.
- No change in ad display logic.
(Last updated: June 8, 2022)
How to start running ads
Before you start running ads, please ensure that all the settings below are correct and complete.
Are all campaign settings configured correctly?
See how you can check and edit the settings here.
Are all ad group settings configured correctly?
See how you can check and edit the settings here.
Are all ad settings configured correctly?
See how you can check and edit the settings here.
Has the review process for the ad been completed?
See how you can check the review status of the ad here.
The ad will start to display after you have checked all the settings above and updated the status of the campaign, ad group, and ad to “Active.”
* In cases where you have already set a starting date and time in the campaign setting page, and the status are all set to Active, the ad will automatically display on the previously defined date and time.

(Last updated: October 19, 2020)
Delivering ads with demographic targeting
The LINE Ads offers you a variety of targeting methods for delivering ads.
You can change the targeting settings in your ad group.
Please see more information on changing the targeting settings here.
You can set ad targeting based on the following data.
* The audience data below are “attributes” derived from the analysis of user demographic data registered by users of LINE-related services. The data include gender, age group, region, as well as user activities, such as sticker purchase history and LINE Official Accounts added as friends (excluding OS).
Region
You can target ads to specific locations in each region.
* You can target ads to users based on where they live, their workplace, or where they have recently visited.
Age
You can target ads to users based on specified age groups (from 20 to 65 years old).
For example: 20-24 years old, 30-34 years old, 35-39 years old, 40-44 years old, 45-49 years old, and 50-65 years old.
Gender
You can target ads to users based on gender.
Interests
You can target ads to users based on their interests, divided into 18 different categories.
OS
You can target ads to users based on their device operating system, including Android and iOS, or even specific OS versions.
(Last updated: June 1, 2022)
Delivering ads using audiences
Creating audiences is another option you can use for targeting. An audience can be created based on user data, including past website visits and app activities, along with friends added to your LINE Official Account and customer information, which helps you find LINE users who are previous customers; you can incorporate all of these data and information into ad delivery.
How you can create an audience from the admin panel on the LINE Ads
1. Click on the “Ad account” tab on the homepage. > Select the ad account name for which you want to create an audience.
2. Click the “≡” icon in the upper left of the Ad Manager screen. > Go to “Shared library.” > Click “Audience.”
3. Click “+ New audience” above the list of your audience.
4. Select the type of audience you want to create. > Fill out each item in the field. > Click “Save.”
Audience types that can be created from the admin panel on the LINE Ads
- Web Traffic Audience
You can create an audience from website visitors based on the tracking data from the LINE Tags inserted on the website. The events that occurred on the website, such as purchase events, can be used for creating an audience as well.
- Mobile App Audience
This type of audience can be created from in-app events; for example, a user opening the app and in-app purchase.
- IDFA/AAID uploads
You can create an audience from the available IDFA/AAID data. After the data have been uploaded, you can then add and update your audience from the customization screen.
- Phone number uploads
You can create an audience by using available phone numbers. After the phone numbers have been uploaded, you can then add and update your audience from the customization screen.
- Email address uploads
You can create an audience by using available email addresses. After the email addresses have been uploaded, you can then add and update your audience from the customization screen.
- LINE Official Account Audience
You can create this type of audience from users who are active friends or blocked users of your LINE Official Account.
- Lookalike Audience
Extend your audience reach by finding users similar to your existing audiences. You can manually define the level of similarity from 1-15% or simply use the automatic setting.
- Video View Audience
You can create an audience from the users viewing a particular video by selecting users’ video interaction rate.
- Image Click Audience
You can create audience from audience who click image ad format creatives under selected campaign ID. This excludes video ad format creatives.
Cross targeting
Cross targeting is part of the cross-platform data sharing plan that LINE has been trying to push forward. This feature utilizes the data obtained from LINE Official Account and LINE POINT AD in ad targeting through the LINE Ads. Cross-platform data connectivity enables you to reach your audience with more relevant messages.
The audience that falls within the defined parameters and has been configured to allow data sharing will appear on the admin panel of the LINE Ads.
Audience sharing
If you configure the audience sharing setting as “Public,” you will be able to share the audience data created on the admin panel of the LINE Ads and use it on your LINE Official Account, which has been linked to the ad account, or on Messaging API associated with your LINE Official Account — both basic and premium IDs. You can change the settings by following the steps below.
1. Click “Change settings” on the audience list page.
2. Select the Public or Private option. >Click “Save.”
However, the system will not share the following information even though the sharing setting has been set to Allow: IDFA/AAID uploads, phone number uploads, email address uploads, LINE Official Account audience, and lookalike audience.
It may take a while for a shared audience to be visible on other platforms.
(Last updated: December 8, 2021)
Your “ad” will undergo a review process within 48 hours after submitted.
You can check the review status of your ad by following the steps below:
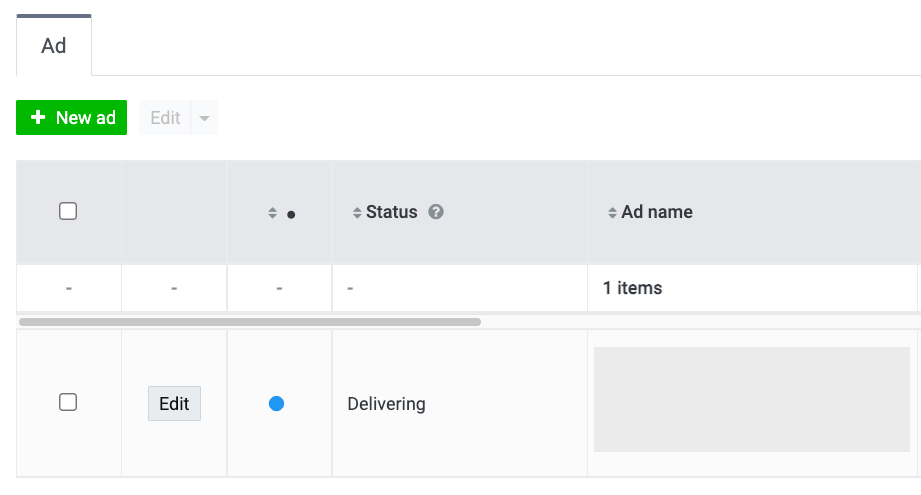
1. Click on the “Ad” tab on the Ad Manager page to see the full ad list.
2. Hover the mouse cursor over the icon in the “Status” field.
In the “Review status,” you will see each status type as follows:
Under review
This means your ad is still in the review process. You can create other ads but cannot deliver the ad that is currently under review.

Delivering
This means the review process is complete, your ad is approved and is delivering.
Rejected
This means the review process is complete, but your ad is not approved. As a result, this ad cannot be delivered. You will see the reason your ad has been rejected when you hover the mouse cursor over the icon .
*Please create ad new with the adjustment of rejected detail.

Note:
- You can check ad status only in “Ad” tab
- Approved ad may or may not deliver, depending on your set up “Active” or “Paused”. For more information, click here.
- “Media” such as image and video files won't be reviewed if you haven't created any ads for it. Please create ad and check ad status.
(Last updated: December 8, 2021)
Resubmitting for review
If your ad has been rejected due to a landing page issue, once you have edited the ad content, you can resubmit a request for review without redelivering the ad.
* If your media has been rejected, please register the media again.
* In cases where the name or description of the media has been rejected, another review process will start automatically after you have resubmitted the media.
To resubmit an ad for review:
1. Click on the “≡” icon. > Go to “Shared library.” > Click “Resubmit landing page for review.”
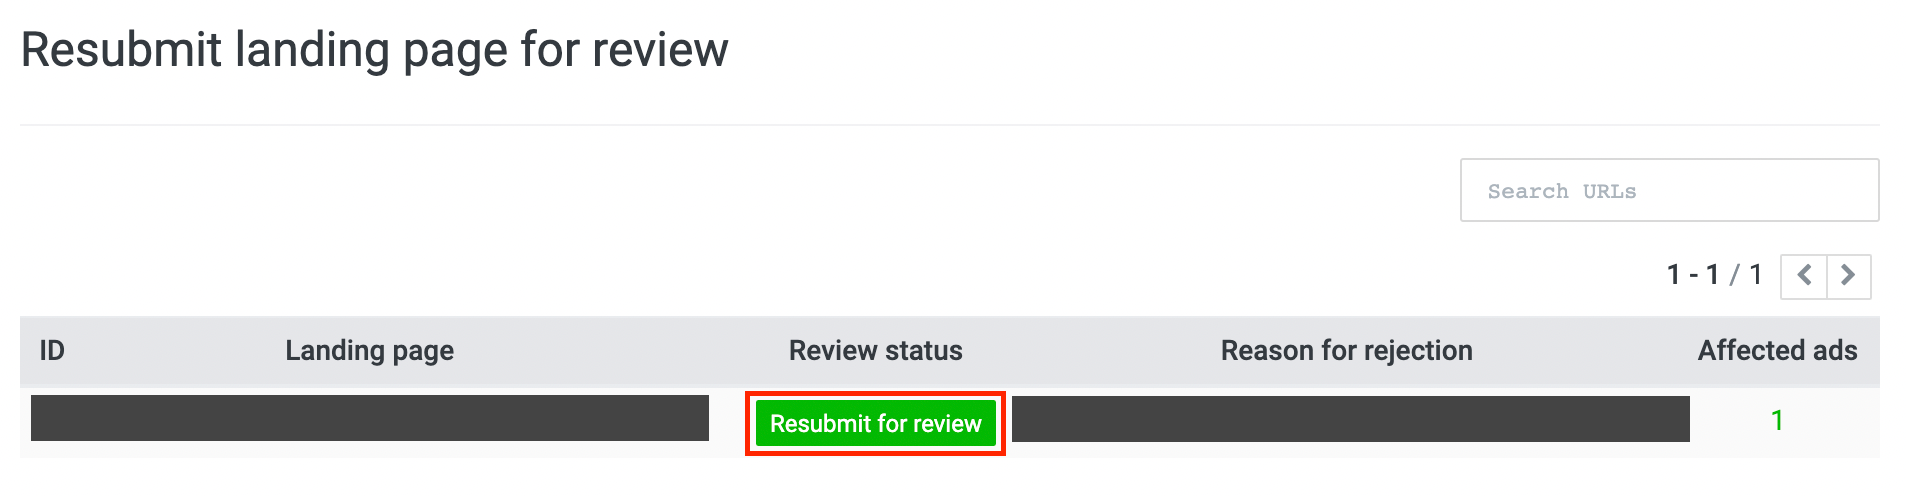
2. Find the URL that has already been fixed. > Click on the “Resubmit for review” button in the review status column.
3. You can add a comment on any changes made in your ads in “Leave comment for reviewer” and then click “OK.”
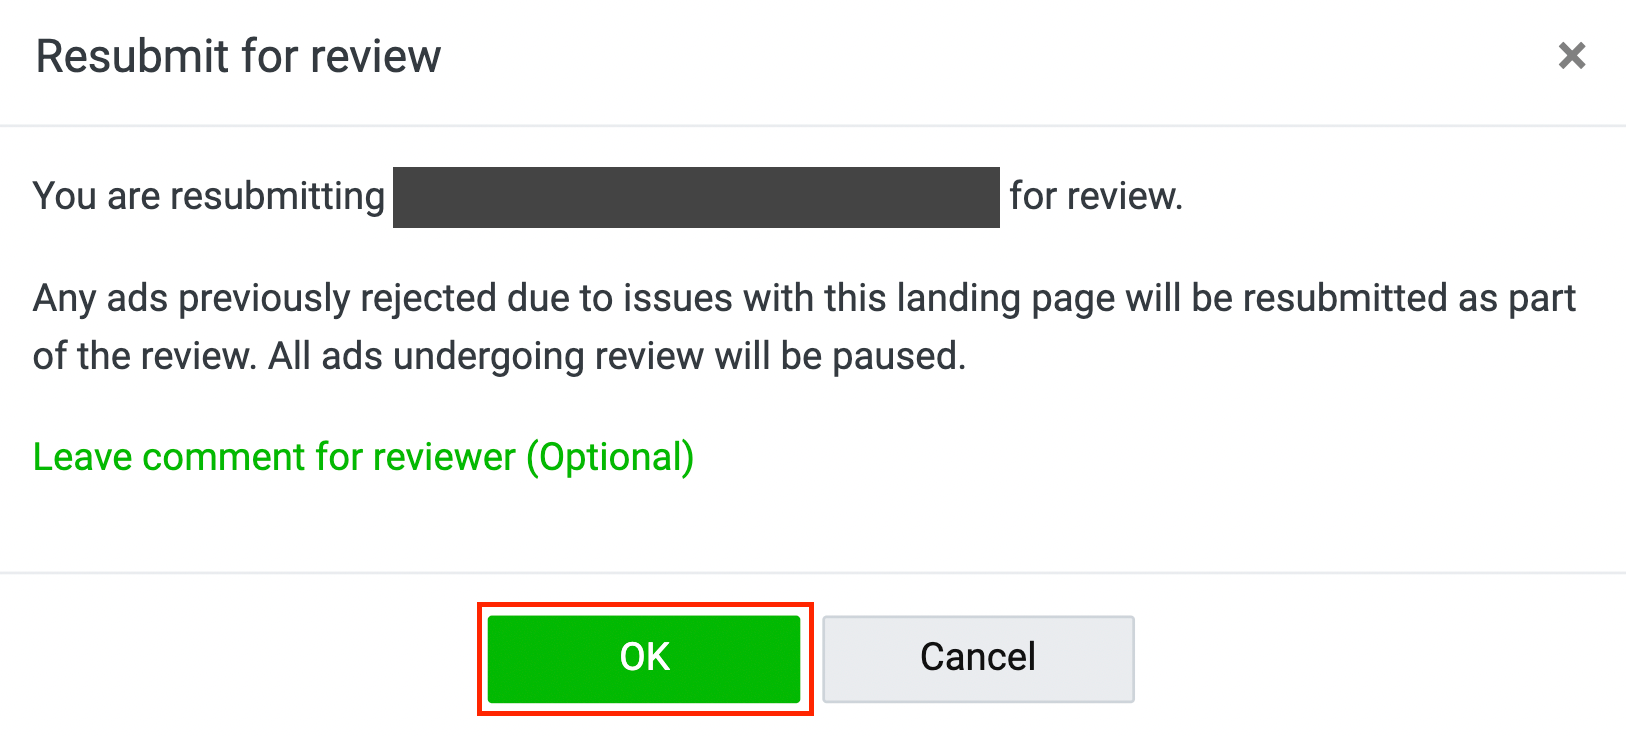
* “Affected ads” refers to the number of ads linked to each landing page. The affected ads will open when clicked.
(Last updated: October 19, 2020)
Exporting ad display settings in bulk
You can export an information set for your campaigns, ad groups, and ads from each respective screen.
To export only certain elements, please check the boxes in front of the desired elements and then click on the “Download” button in the top right corner of the screen.

(Last updated: February 25, 2021)
To set a spending limit for your campaign, there are 2 options available: “Unlimited” and “Set spending limit”
1. “Unlimited” means campaign can be distributed continuously without spending limit
2. “Set spending limit” means campaign will be paused once the specified budget is reached. 2 options can be chosen: “Monthly” and “In total.” The former lets you preset a spending limit allowed per month, while the latter allows budget allocation covering the entire campaign period.
The amount charged for each option differs; you are advised to see the following examples and advice before proceeding with the budget settings.
Here’s an example of “Monthly” spending limit.
You have scheduled your campaign period to last from September 1 to October 10 and set a spending limit at 10,000 baht per month.
If you change the spending limit to 15,000 baht on September 10, the system will start using the recently changed amount as the default monthly spending limit from that day onward.
This means your spending limits for September is 15,000 baht and for October is another 15,000 baht.
If you wish to adjust your spending limit for October only, please create a new campaign for your ads or adjust the spending limit after you have already entered the month of October.
Note:
- Under certain circumstances, you may be billed for the overbudget amount after the campaign has ended, but it will be subtracted later in your billing.
- In addition, if you change the end date of your campaign to no more than 25 hours from now, charges incurred after the campaign has ended may be included in your billing.
- The campaign budget you set does not guarantee the maximum budget you will be charged on the billing date, so it is possible that the actual spending may exceed it. The excess amount will be charged as follows
1. If your campaign budget setting does not exceed 1,000 yen (approximately 220 baht, depending on the exchange rate on the billing date), this will be considered as 1,000 yen, and if actual expenses exceed 200% of 1,000 yen, that excess amount will not be charged. (If your campaign budget is set to 1,000 yen or less, the maximum amount charged is 2,000 yen.)
Example :
If you set the campaign budget at 1,000 yen and the actual expenses are 2,100 yen, the actual 2,000 yen will be charged and 100 yen will not be charged.
2. If your campaign budget setting is more than 1,000 yen (approximately 220 baht, depending on the exchange rate on the billing date), actual expenses that exceed the campaign budget setting will be charged no more than 200% of your preset campaign budget. (Amount exceeding 200% of your preset daily budget will be deducted by the system.)
Example :
If you set the campaign budget at 5,000 yen and the actual cost is 12,000 yen, the actual 10,000 yen will be charged and 2,000 yen will not be charged.
Budget setting
You can set a daily budget for each ad group based on the approximate maximum spending amount per day.
The allowed minimum daily budget may vary depending on campaign objectives and selected bidding amount.
The actual spending amount may exceed the preset daily budget in some cases, and the overbudget amount will be charged.
Remark:
The daily budget you set is not the maximum you will be charged on the billing date, so it is possible that the actual spending may exceed it. The excess amount will be charged as follows:
1. If your daily budget setting does not exceed 1,000 yen (approximately 220 baht, depending on the exchange rate on the billing date), this will be considered as 1,000 yen and if actual expenses exceed 200% of 1,000 yen, that excess amount will not be charged. (If your daily budget is set to 1,000 yen or less, the maximum amount charged is 2,000 yen.)
Example :
If you set a daily budget at 1,000 yen and the actual expenses are 2,100 yen, the actual 2,000 yen will be charged and 100 yen will not be charged.
2. If your daily budget setting is more than 1,000 yen (approximately 220 baht, depending on the exchange rate on the billing date), actual expenses that exceed the daily budget setting will be charged no more than 200% of your preset daily budget. (Amount exceeding 200% of your preset daily budget will be deducted by the system.)
Example :
If you set a daily budget at 5,000 yen and the actual expenses are 12,000 yen, the actual 10,000 yen will be charged and 2,000 yen will not be charged.
Bidding methods and bidding amounts
You can choose between “Manual bidding” and “Auto-bidding” as your bidding method.
Manual bidding
The operator can manually enter the maximum CPC or CPM.
Auto-bidding
This is a feature that allows the system to automatically adjust bidding amounts to match your campaign and ad delivery objectives.
It is recommended that you use auto-bidding on your LINE Ads.
The available settings depend on the campaign objectives that you have determined.
If you choose the auto-bidding option, the ad group on the admin panel will show a status message that reads “Learning.”
We suggest not making frequent changes while this status still appears so that the system can finish the learning process.
The system starts the learning process to optimize auto-bidding for each ad group, one by one.
It takes around 40 events per ad group until the learning process can be completed.
The number of events has a greater influence on performance improvement than the ad distribution period.
If the number of events required for the learning process is insufficient, the system will retrieve and incorporate the data from other ad accounts within the same group or from other similar ads into the auto-bidding.
(Last updated: October 19, 2020)
When choosing automatic bidding, there are 4 bidding strategies you can set. You can choose the option that matches your objectives.
1. Bid Amount Cap
Control your cost per result. Bidding occurs from the lowest price up to under your specified max cost per result. Best fit when you want to keep a lowest cost per result. However, daily budget may be underspent as we strive mainly for keeping the cost below your specified max cost per result.
Example: Setting a Max CPC of 5 THB per click, your cost per result will be below 5 THB.
2. Event Cost Cap
Maximize results while also can spend your budget. Bidding occurs from the lowest price up to a little above your specified max cost per result. Best fit when you want to control your cost per result while maximizing results and budget spent.
Example: Setting a Max CPC of 5 THB per click, your cost per result may be around 6 THB.
3. Target Event Cost
Keep bidding at your specified cost per result. Bidding does not begin from the lowest price like other strategies, but the closest price to your target, which can be a lower or higher price. Best fit when you have your goal in mind.
Example: Setting a target CPC of 5 THB per click, your cost per result may be around 4.50-5.50 THB.
4. No Limit
Maximize your daily budget without specifying max cost per result. Bidding occurs from the lowest price up to no limit. Best fit for spend-based campaign of highest delivery and budget usage, especially when you have a short campaign period. You don’t have to specify max cost per result like other strategies.
Remark:
- System aims to optimize your campaign according to your chosen bidding strategy, but it is not guaranteed. You may see costs varied from your specified condition during the learning phase, which becomes more stabilize later.
(Last updated: October 1, 2021)
Checking and changing campaign settings
You can check and change your campaign settings by following the steps below:
1. Click on the “Ad account” tab on the homepage. > Select the ad account name for which you want to check and change the settings.
2. Click on the “Campaign” tab on the Ad Manager screen. > Click “Edit” or the icon of the campaign you want to check.
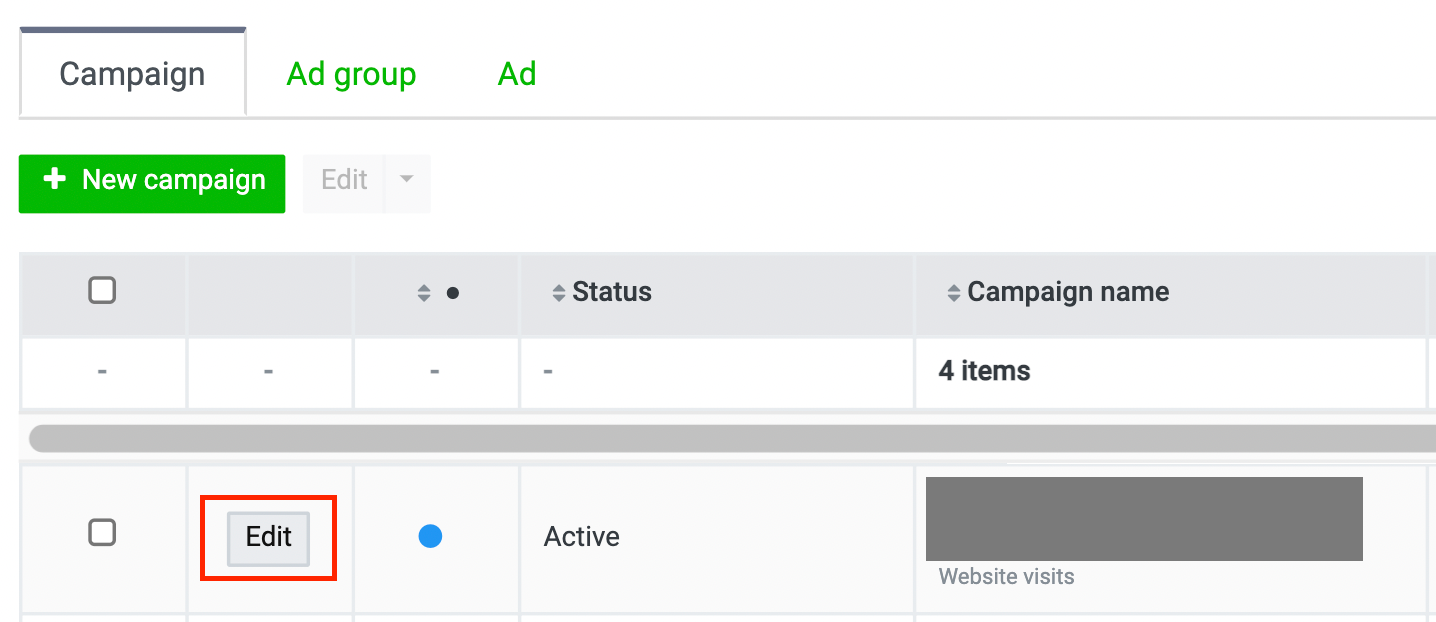
3. Check the settings in the pop-up, make the necessary changes, and click “Save.”
* Some settings cannot be edited.
(Last updated: October 19, 2020)
Checking and changing ad group settings
You can check and change your ad group settings by following the steps below:
To check and change the ad group settings:
1. Click on the “Ad account” tab on the homepage. > Select the ad account name for which you want to check and change the settings.
2. Click on the “Ad group” tab on the Ad Manager screen. > Click “Edit” or the icon of the ad group you want to check.

3. Check the settings in the pop-up, make the necessary changes, and click “Save.”
* Some settings cannot be edited.
(Last updated: October 19, 2020)
Checking and changing ad settings
You can check and change your ad settings by following the steps below:
1. Click on the “Ad account” tab on the homepage. > Select the ad account name for which you want to check and change the settings.
2. Click on the “Ad” tab on the Ad Manager screen. > Click on the “Edit” button for the ad you want to check.

3. Check the settings in the pop-up, make the necessary changes, and click “Save.”
* You can edit only the name and status of the ad.
* You are required to register the ad again if you wish to make changes to the title and description.
(Last updated: October 19, 2020)
How to insert LINE Tags
To measure ad performance through the LINE Ads, you have to insert LINE Tags on the pages where you want to track conversions.
LINE Tags consist of 3 types of codes: base code, conversion code, and custom event code.
LINE Tags can be obtained from the Admin panel of the LINE Ads by following the steps below:
1. Click on the “Ad Account” tab on the homepage. > Select the account name where you want to track conversions.
2. Click on the “≡” icon in the upper left of the Ad Manager screen. > Go to the “Shared library” menu. > Click “Tracking (LINE Tags).”
3. Check the codes that appear on the screen one by one.
You can insert the base code, custom event code, and conversion code on the advertiser’s website as desired.
Please refer to the followings to see how you can insert each type of code:
- Inserting tags (conversion code)
- Inserting tags (custom event code)
Tracking (LINE Tags) page description
- Status
You can check a tag status from here.
Name: Refers to tag name.
For the event code, the event name set earlier will appear when the tag is triggered.
Status: A tag’s functional status is displayed here.
If the tag is inserted properly, the system will display the status as “Active.”
If the tag remains inactive for 7 days, the status will read “Inactive.”
Last contact: This shows the date and time the tag was last triggered.
- Type of code
Please copy the code that best suits your purpose for use on the website.
- Custom audience
This will lead you to the audience creation page, where you can create an audience for retargeting and a lookalike audience; for example.
LINE Tags can gather audience data that can be of use for other purposes, such as ad retargeting.
- Tracking method
If a third-party cookie is unusable, you may use the first-party cookie or Local Storage instead.
Note:
- If the status still remains Inactive after a LINE Tag has been inserted, this may indicate failed insertion. Please recheck to confirm that the tag was inserted properly.
- Cross-domain tracking that uses first-party cookies requires additional adjustments to the base code. You can find further details here.
(Last updated: October 19, 2020)
Inserting tags (base codes)
Tags are tracking codes that must be installed on desired websites for user measurement. Please find tag installation detail below.
Basic methods of installation
You have to place LINE Tag’s base codes into the website’s header code.
Please insert the base code inside the <head>...</head> tag of the website, or use the tag manager to insert the code.

* Clicking on the “Copy” button on the base code pane will help you to copy the base code correctly.
* Please check the real code in LINE Ads Manager.
Cross-domain tracking
To track conversions across domains with first-party cookies, add-on domain is required to be added for every inserted base code.
Enable “Cross-domain tracking with first-party cookies” and insert your target domain. System will display adjusted base code, in which you can then copy and use for installation.
Example: sharedCookieDomain: 'abc.com' (Please change domain as appropriate for real implementation)
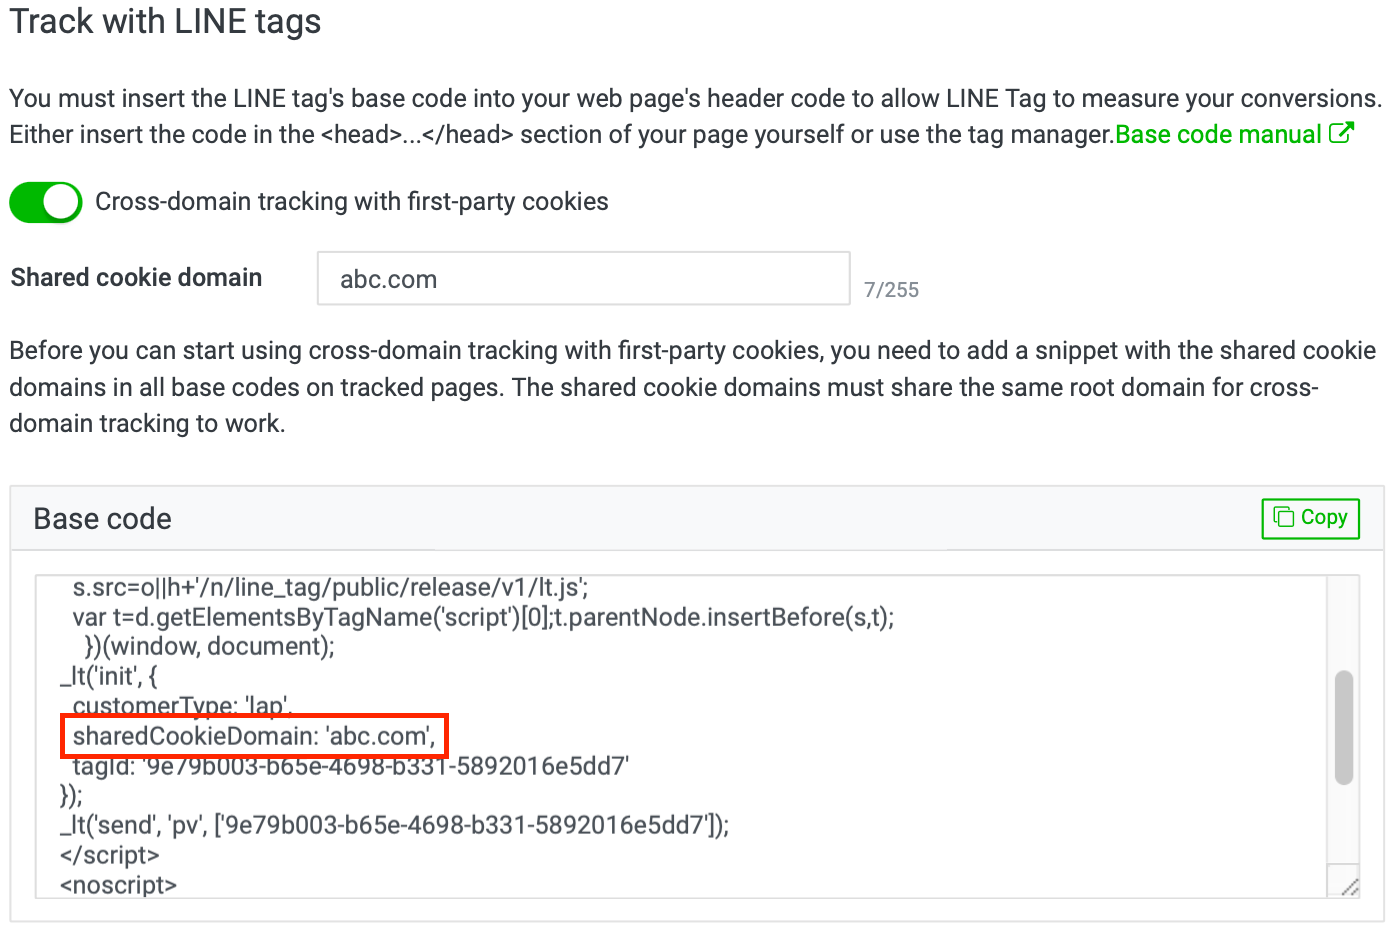
Cross-domain tracking supports different subdomains only; it cannot function on different domains.
Note:
- If the domains are completely different from one another, you will be unable to use cross-domain tracking. However, with third-party cookies in place, conversion tracking can be functioned.
- Even if the add-on code has been added, it will sometimes be unable to track conversions. This may be the result of expired first-party cookies. Please beware of the implementation.
Advanced matching utilization
A function to match first party data including phone number and email address with hashed data via LINE Tag. The data will be sent to LINE to strengthen ad display effectiveness, conversion tracking accuracy, and collected audience.
(Last updated: April 1, 2021)
Inserting tags (conversion codes)
Please insert a conversion code together with the base code as a set on the page that serves as a conversion point.
It is recommended that you insert the conversion code right below the base code; however, if the base code is set to fire first, the conversion code can still track performances normally even though the base code and the conversion code are inserted far apart.
Note:
- The base code must always be set to fire before the conversion code.
- The number of tags that you can insert within the same URL is unlimited, but only 1 LINE Tag base code, generated from the ad account, is allowed within the same URL.
- Entering a line break or an extra blank space by mistake may cause a tag to work improperly; please be careful when copying any codes.
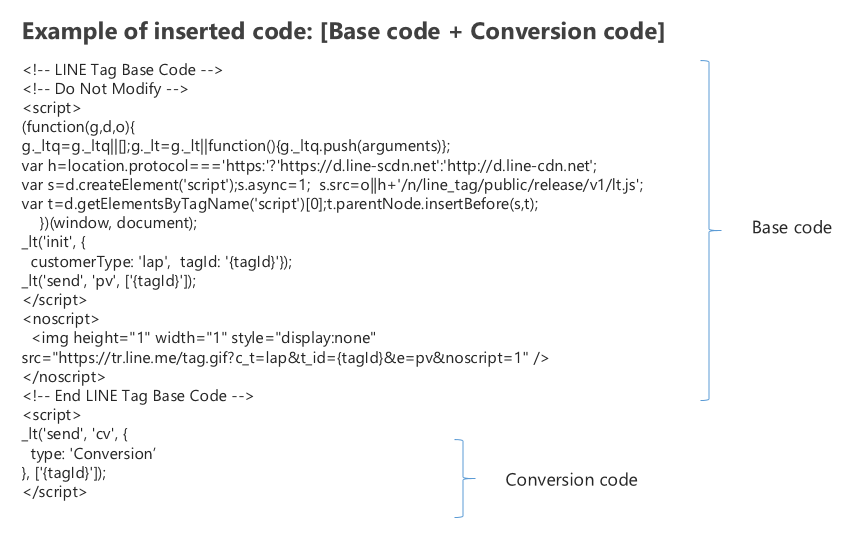
(Last updated: October 19, 2020)
The standard event code is an event defined in LINE Ads and can be used to measure event results, create website traffic audience, and optimize campaign performance. The standard event code must be installed as a set along with the base code.
Standard Event Code:
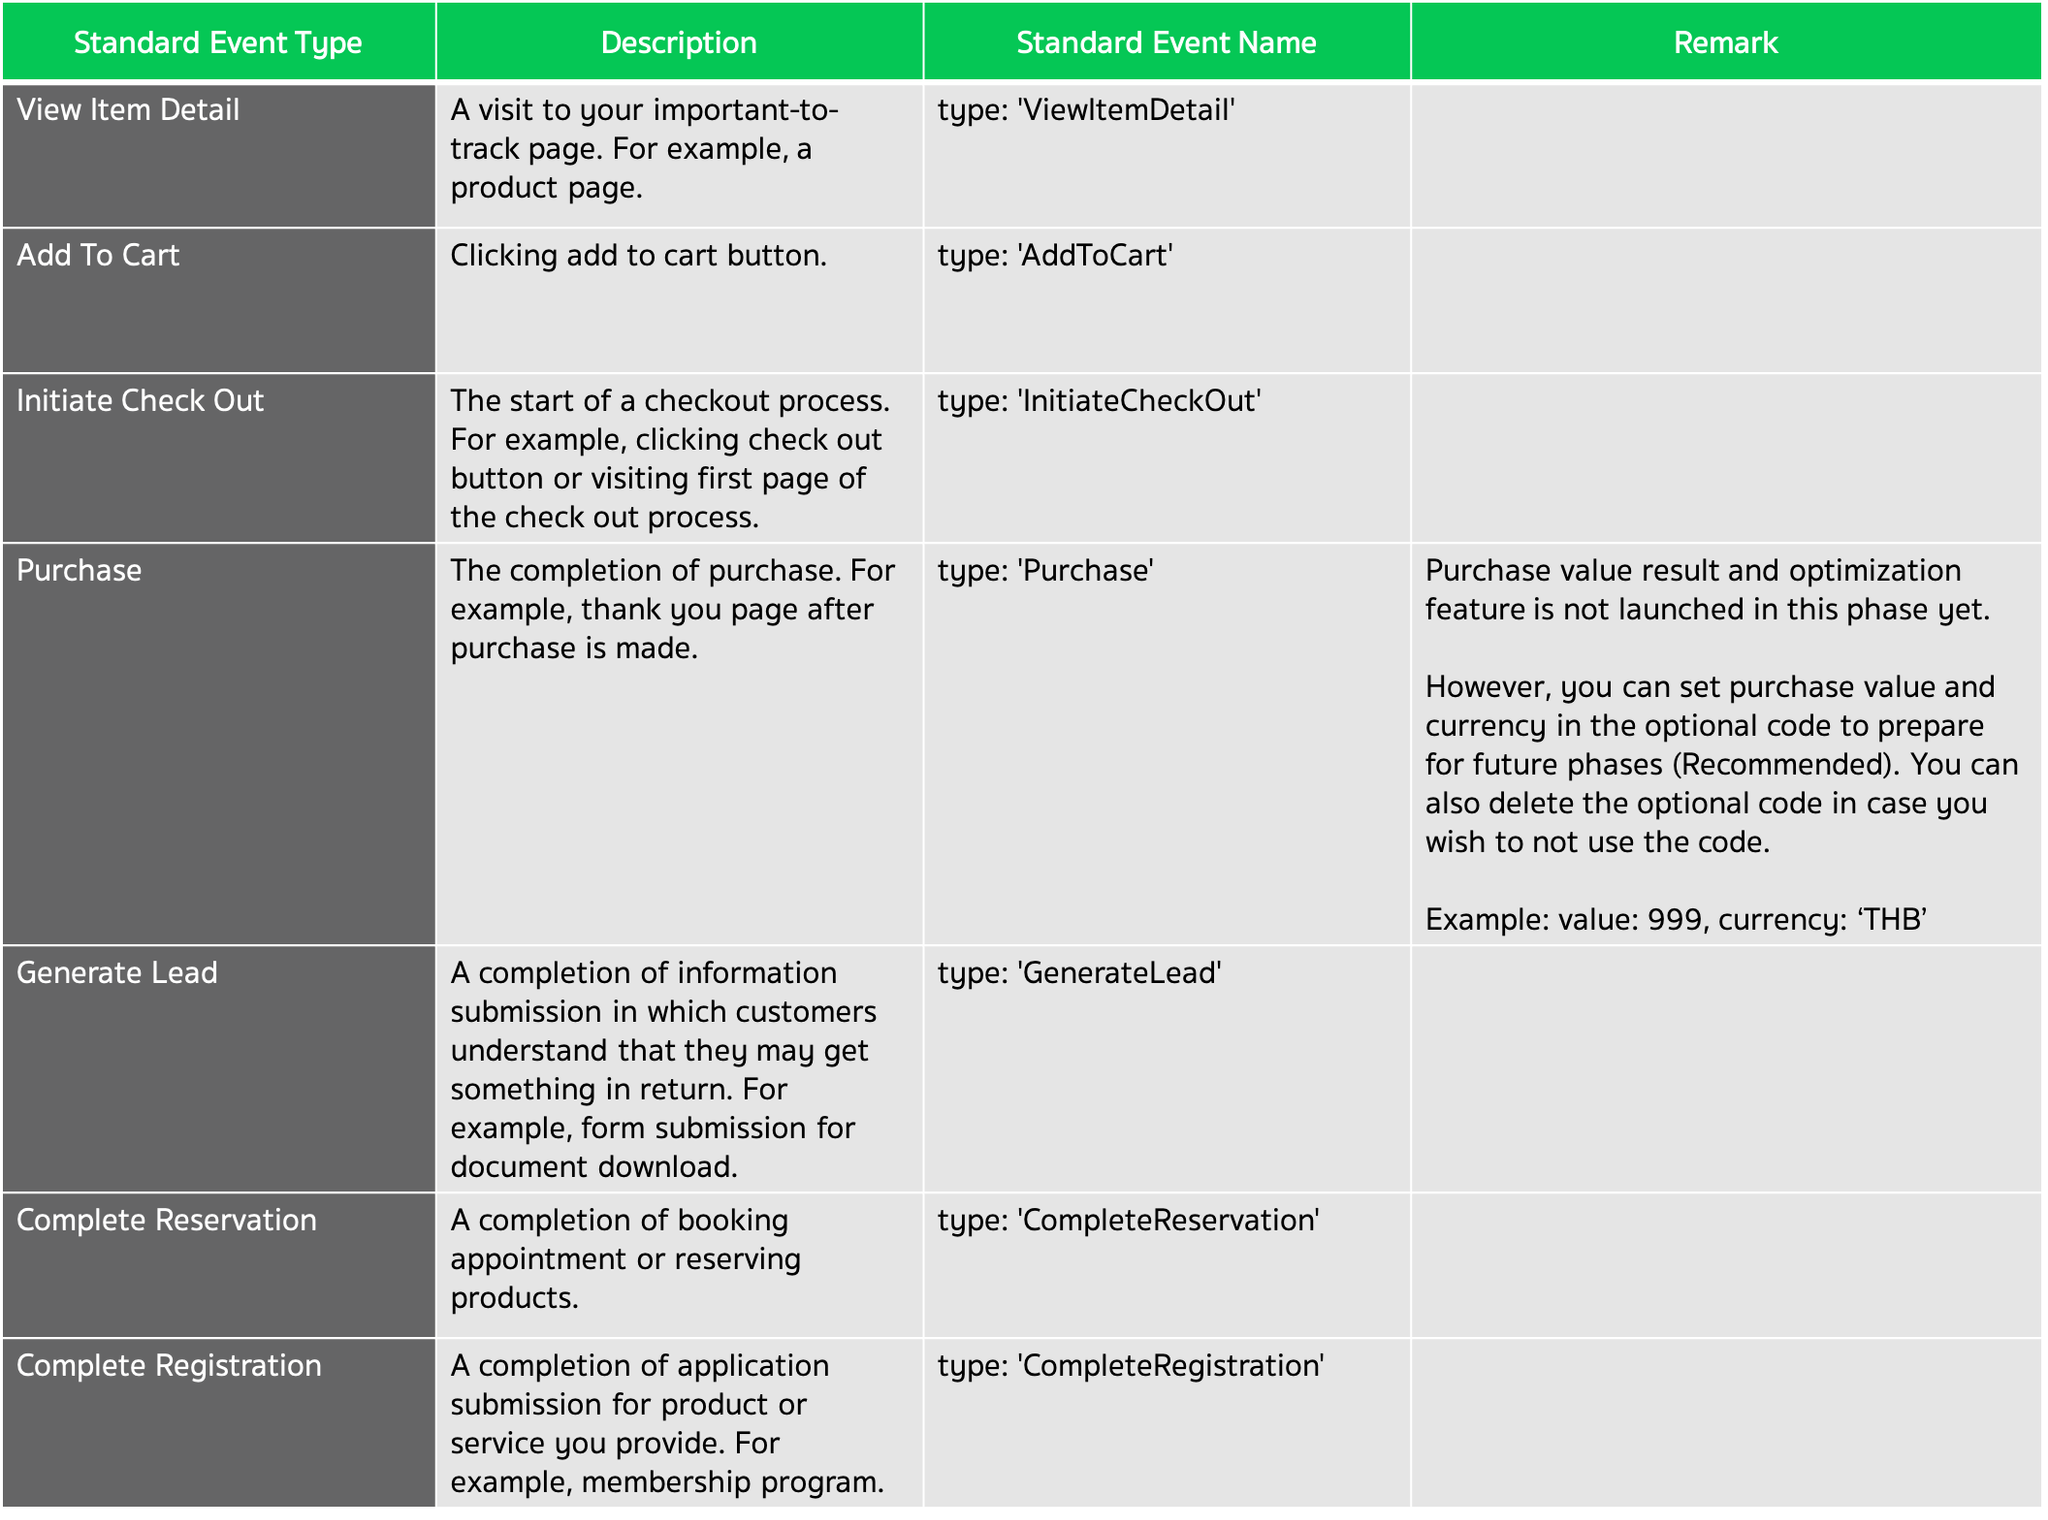
Setting method:
You can select standard event code types from the ad manager screen.
Example 1: Select "View Product Detail" and copy the code to install on your website.
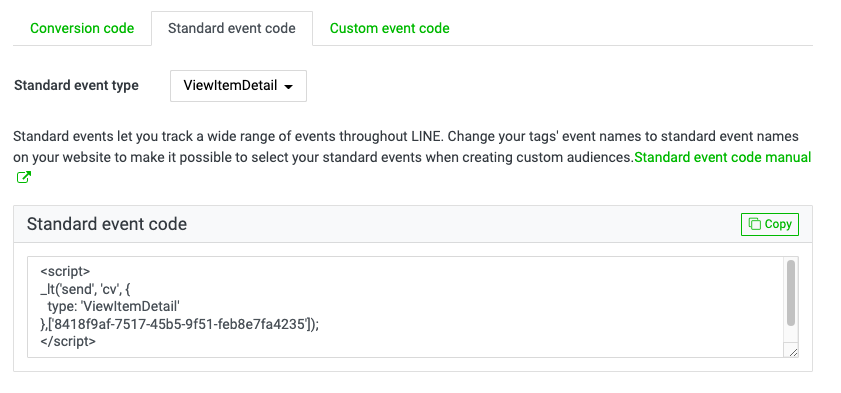
Example 2: Select “Purchase", copy the code, adjust the code description for price and currency, and install the modified code on your website.
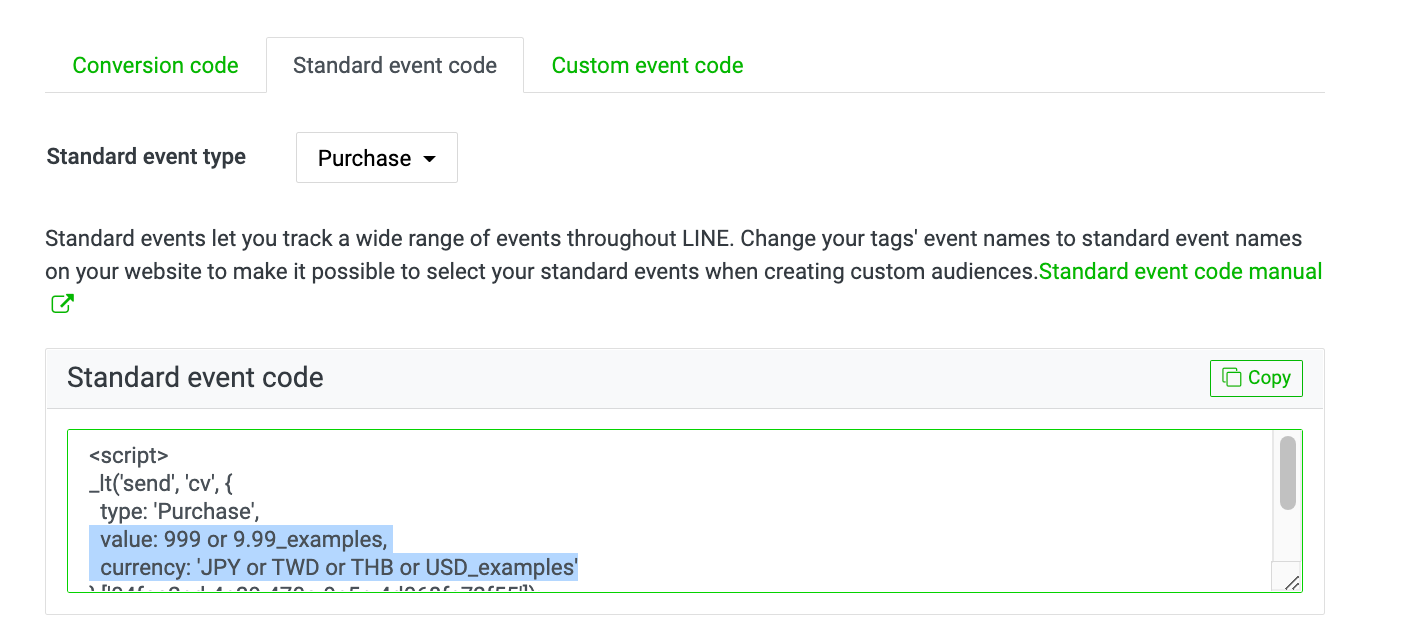
Installation method:
- It is recommended that you insert the custom event code right below the base code; however, if the base code is set to fire first, the custom event code can still track performances normally even though the base code and the custom event code are inserted far apart.
- In addition, you can insert a base code, conversion code, custom event code, standard event code together. If you use all more than 1 code type, please insert a base code only once on each page.
- After installation on website, please check the tag status at "Tracking (LINE Tag)".
Check result:
- Go to Ad Manager, click “Columns” > Click “Choose columns” > Select desired Standard Event result > Click "Apply".
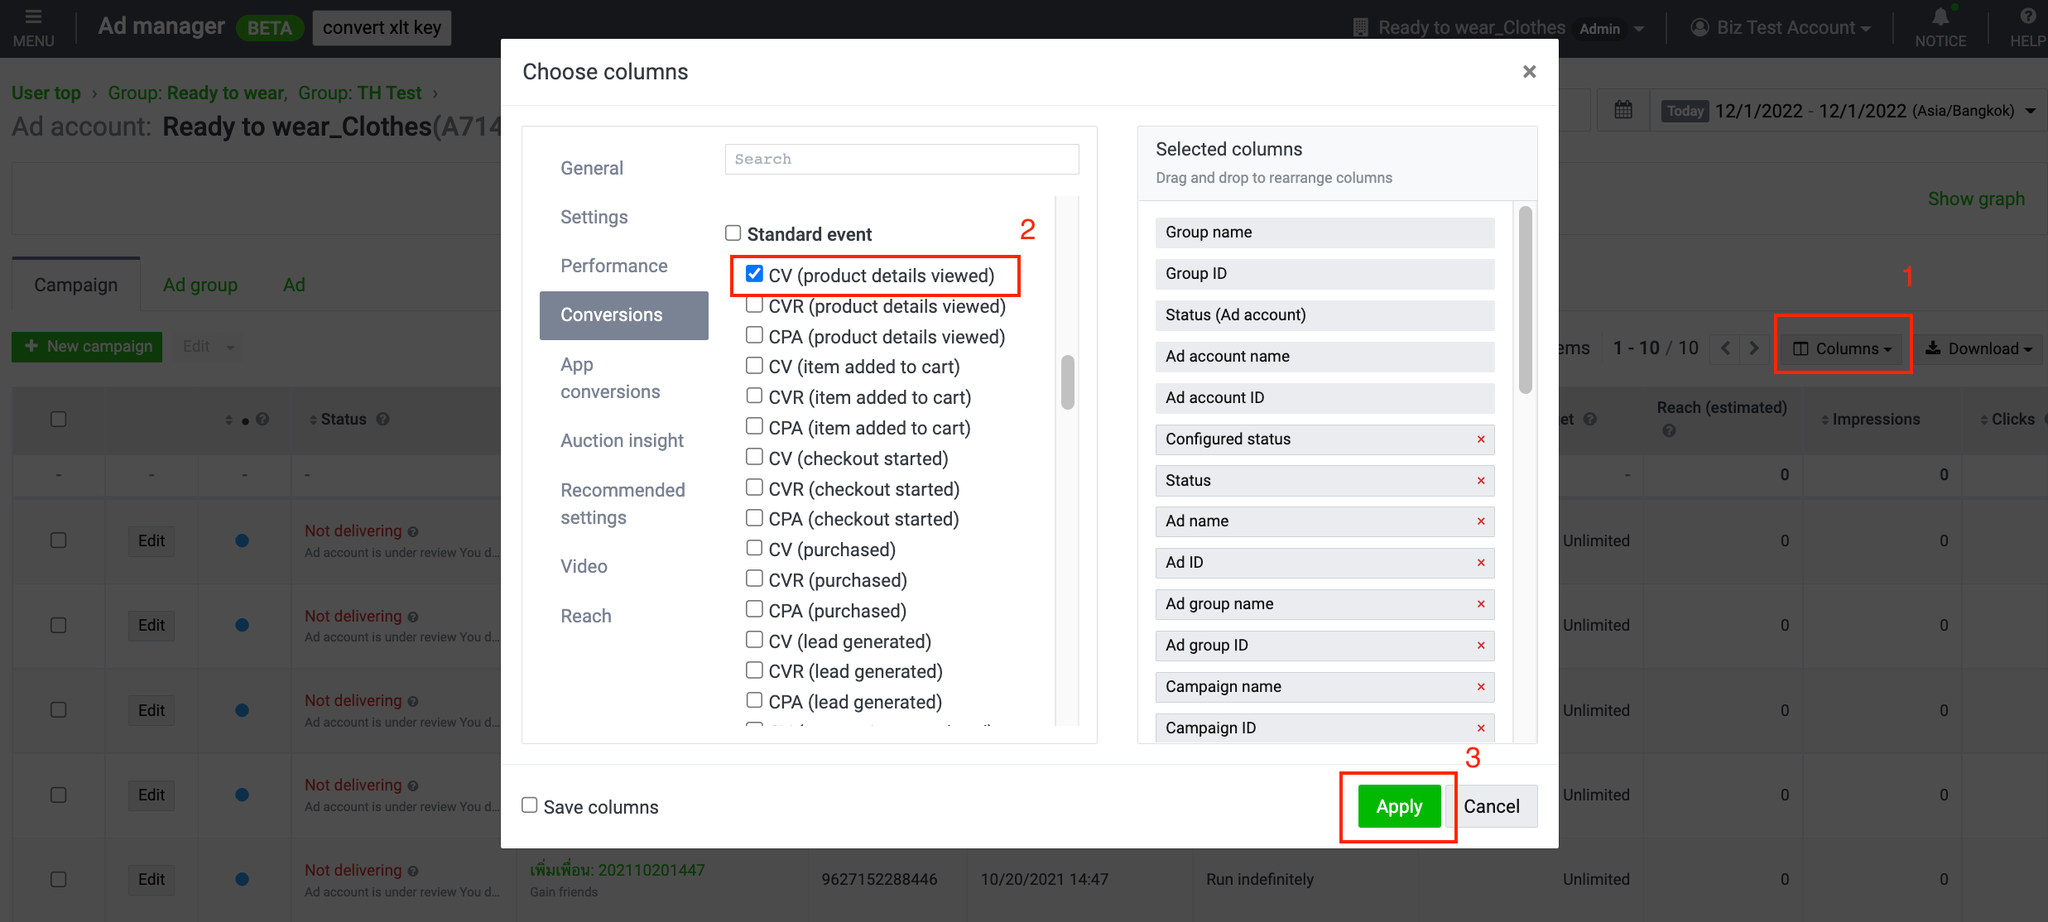
Note:
- The base code must always be set to fire before the Standard Event code.
- The number of tags that you can insert within the same URL is unlimited, but only 1 LINE Tag base code, generated from the ad account, is allowed within the same URL.
- Entering a line break or an extra blank space by mistake may cause a tag to work improperly; please be careful when copying any codes.
- In case of using the name tag name for Stand event code and Custom event code, result will be doubled. It is recommended that if you already install Custom event code with the exact same name to Standard event code, there is no need to edit or remove existing code. The code can be used as Standard event code.
- There is no need to create custom conversions to use standard event codes.
(Last update: December 8, 2022)
Inserting tags (custom event codes)
You can use a custom event code if you wish to create an audience or track ad performances based on events triggered by website visitors on a particular page. Please insert a custom event code together with the base code as a set.
Installation method
It is recommended that you insert the custom event code right below the base code; however, if the base code is set to fire first, the custom event code can still track performances normally even though the base code and the custom event code are inserted far apart.
In addition, you can insert a base code, conversion code, and custom event code together.
If you use all the above 3 codes together, please insert a base code only once on each page.
* Please check the real code in LINE Ads Manager.
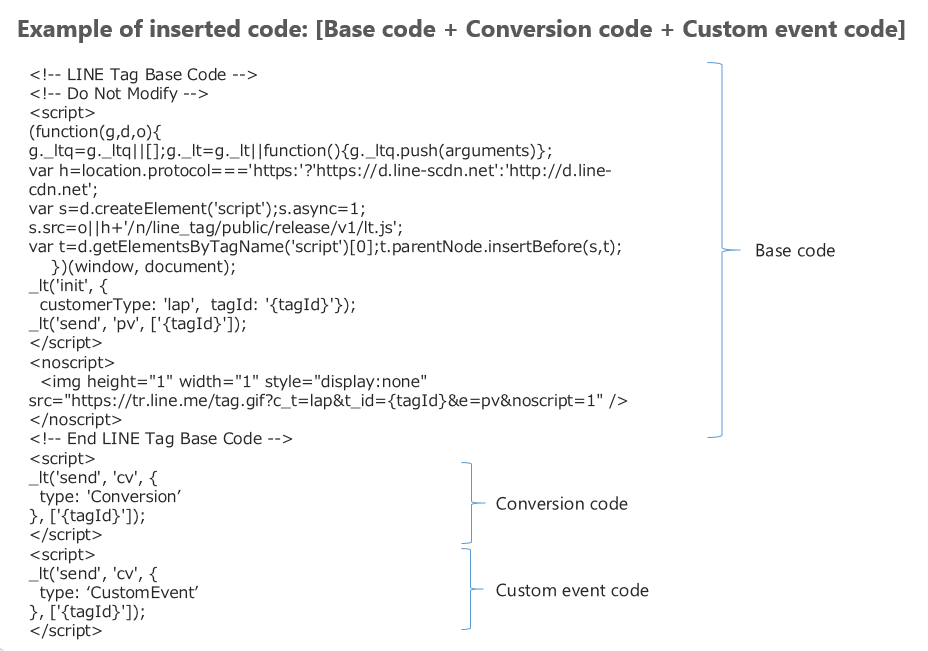
Event name “CustomEvent”
The “CustomEvent” part within the custom event code is the name that appears on the Admin panel.
You can set the event name by entering up to 20 alphanumeric characters, without blank space.
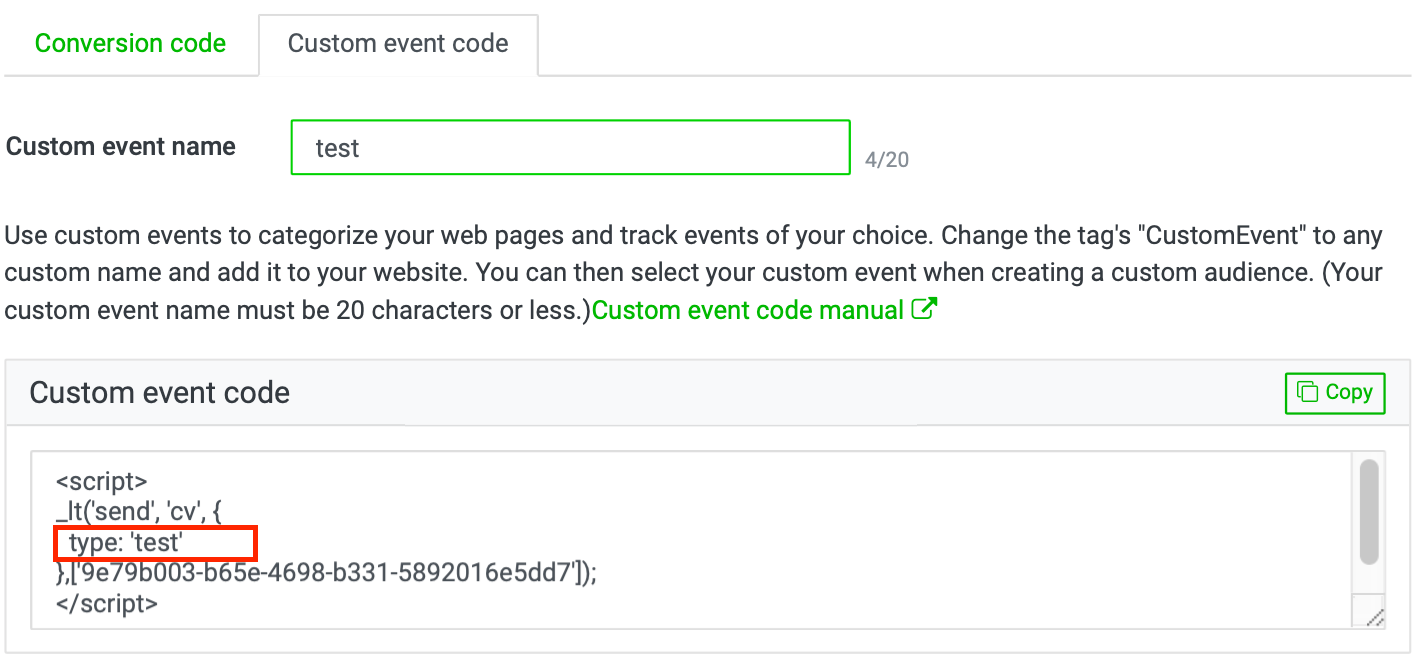
Note:
- The number of tags that you can insert within the same URL is unlimited, but only 1 LINE Tag base code, generated from the ad account, is allowed within the same URL.
- Entering a line break or an extra blank space by mistake may cause a tag to work improperly; please be careful when inserting any tags (especially when copying and pasting codes).
(Last updated: April 1, 2021)
Inserting image tags
If it is difficult to insert a JavaScript tag into a page, you can use an image tag instead.
An image tag is placed inside the <noscript> ... </noscript> tag of the base code. Please use only the code of the image tag for tag insertion.
Performance tracking can be achieved by using a custom conversion.
When creating a custom conversion, please specify the URL of the page with the image tag inserted.
* Please be mindful; you cannot use an image tag solely to track performance.
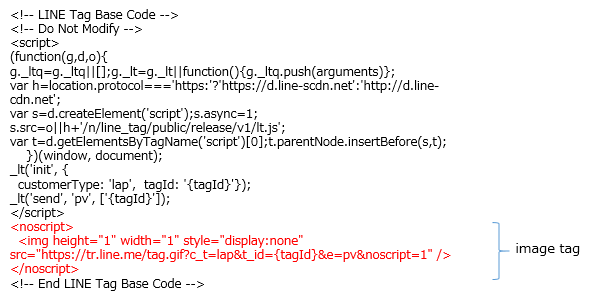
(Last updated: October 19, 2020)
Passing cookies using URL parameters allows measurement across domains with different root domains.
When a user transitions from a landing page to a CV generation page, a 1st Party Cookie is given as a URL parameter to enable measurement across different domains.
![]()
Please add the following settings in bold to the base code of LINE Tag.
As is:
_lt('init', {
customerType: 'lap',
sharedCookieDomain: 'abc.com',
tagId: 'tag_id'
});
To be:
_lt('init', {
customerType: 'lap',
sharedCookieDomain: 'abc.com',
tagId: 'tag_id',
autoLink: ['abc.com','xyz.com']
});
*Please enter all of the domains for which you have installed LINE Tags in the autoLink settings.
Remark:
- This function is effective only for page transitions that occur from an anchor tag (a tag). (This function does not work for page transitions generated by JavaScript, etc.)
- This function may not work due to conflicts with other scripts on the page.
- Please check with the page administrator or developer before installing this function, and test it to make sure it functions properly.
- First party cookies must be allowed, so please make sure that [Use first-party cookies and local storage] is enabled.
![]()
LINE Tag Helper is an extension of "Chrome Browser". After installed, you can view the LINE Tag status via LINE Tag Helper on your desktop or laptop to:
Check if LINE Tag works normally on the web page.
Record the problems when LINE Tag is running, and store all the records that trigger LINE Tag during the operation of the web page, which can provide web engineers as a reference for troubleshooting.
※ Caution: "LINE Tag Helper" is an inspection tool, so the installation of LINE Tag must be completed before using LINE Tag Helper for post-installation inspection.
How to install LINE Tag Helper
1. Open the Chrome browser window, search for "Chrome Extensions" and click "Chrome Online App Store". Then, search for "LINE Tag Helper" on the upper left corner.
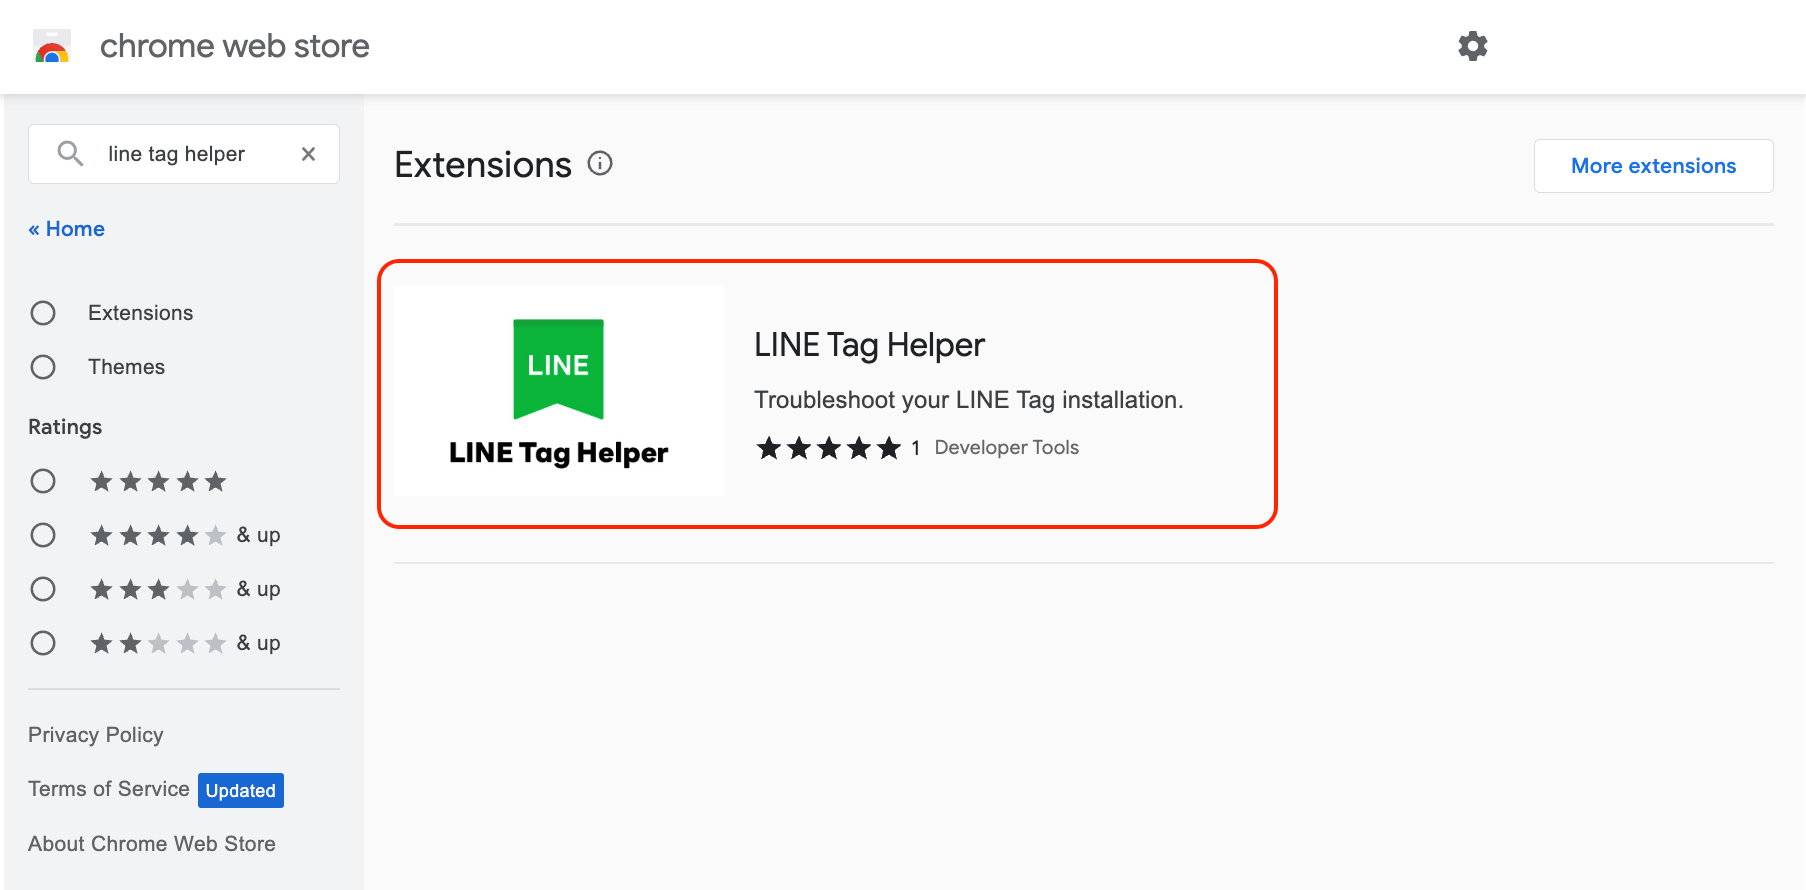
2. Click "Add to Chrome" on the main screen to start installing the extension. Then, click the pop-up "Add Extension" to successfully complete the installation of LINE Tag Helper.
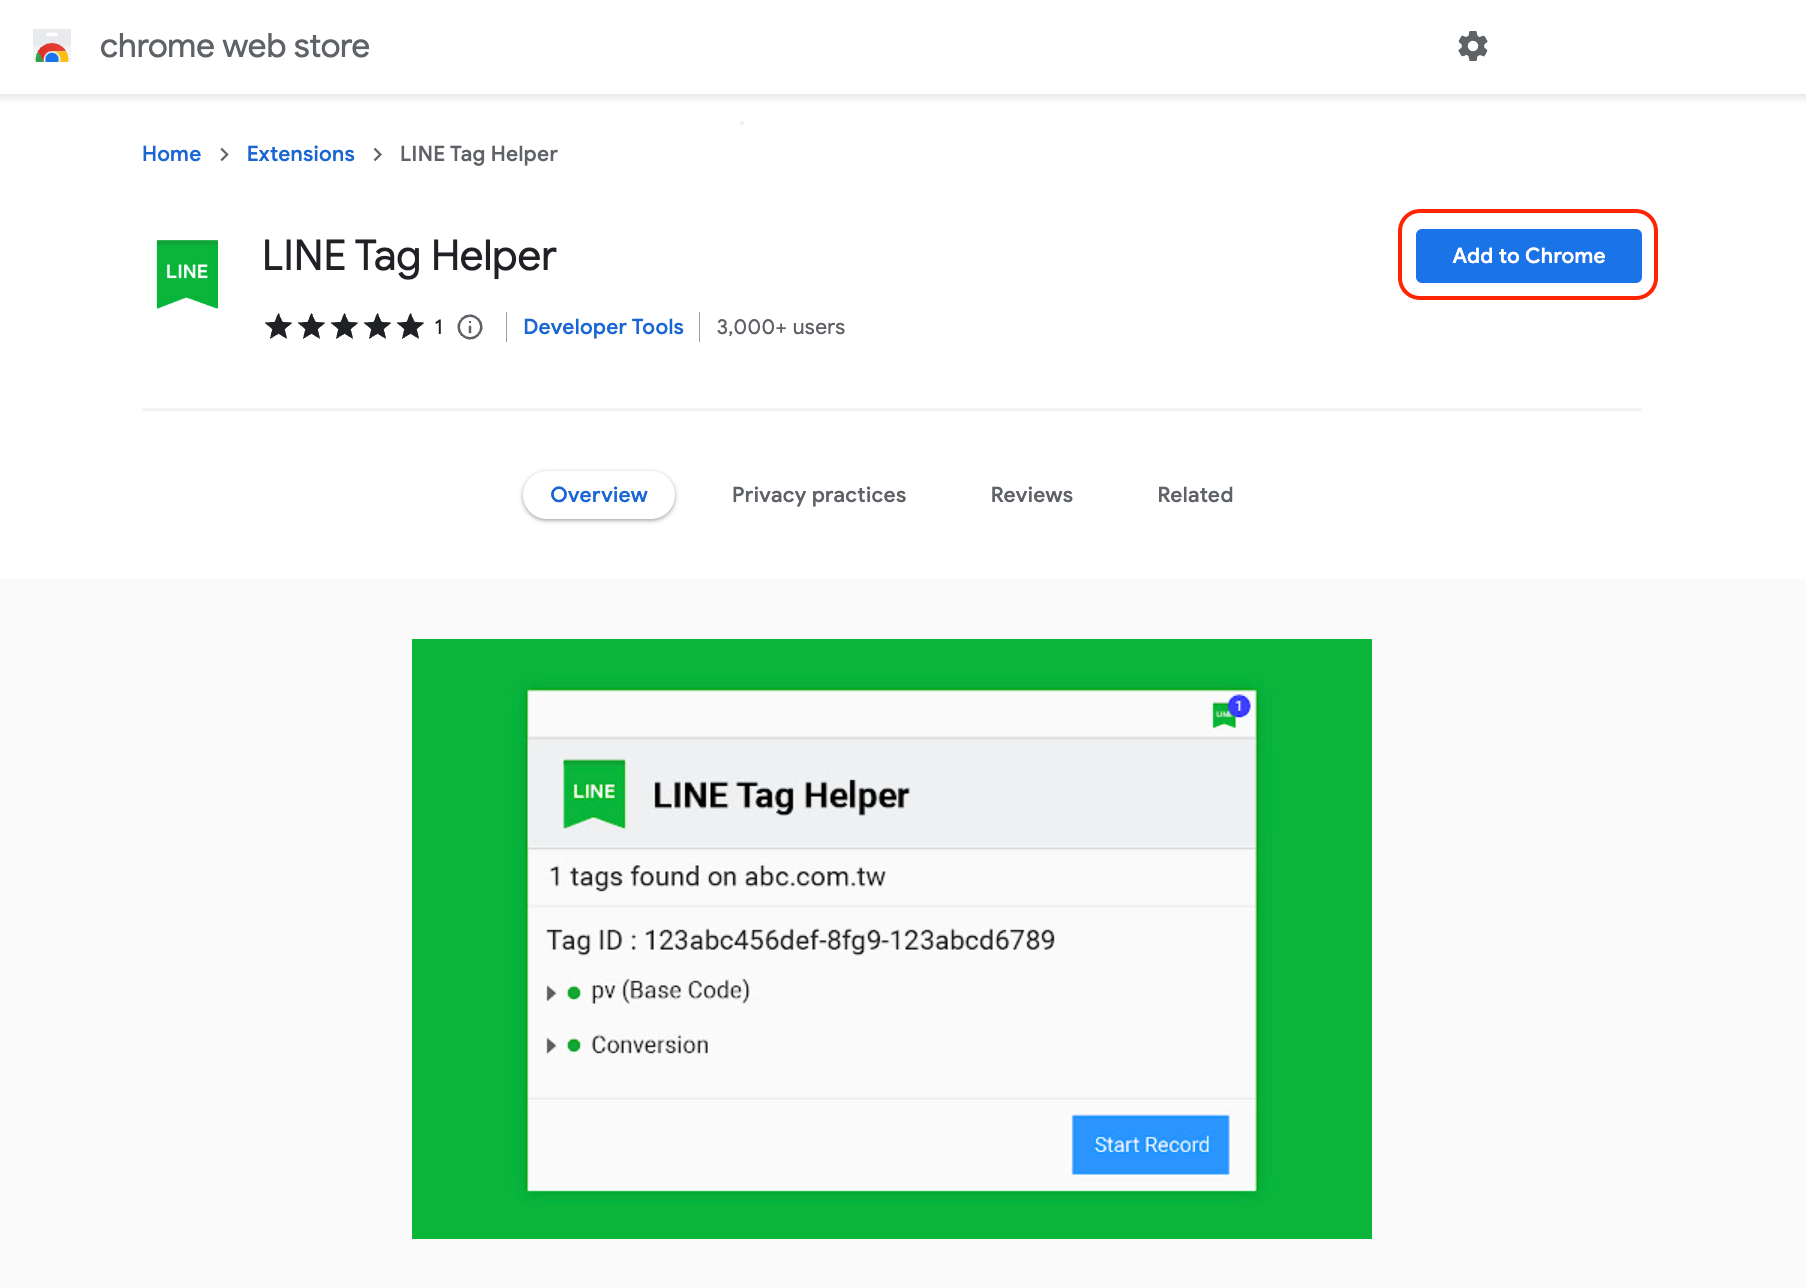
3. Click on the small icon in the "Extended Functions" list in the upper right corner to find LINE Tag Helper. Then, Choose "Fixed" to permanently place the LINE Tag Helper on the browser, making it more convenient for you to use.

(Last updated: February 14, 2023)
How to use LINE Tag Helper
After the installation is complete, you can use LINE Tag Helper to record "web page loads" for LINE Tag Inspection.
1. Open the webpage to check whether LINE Tag is installed correctly. After the webpage is loaded, click at LINE Tag Helper.
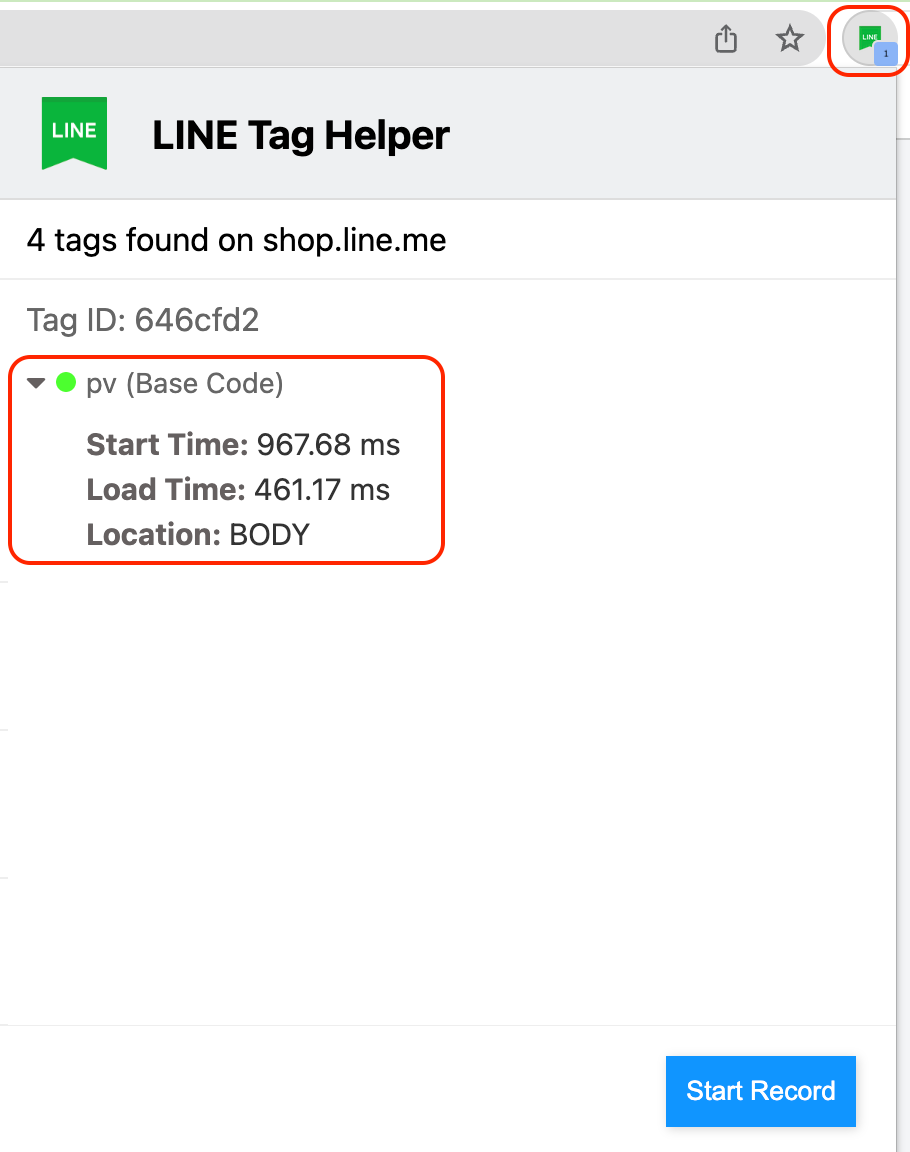
※ Caution:
1). Each LINE Ads account has an independent set of LINE Tag. Each set of LINE Tags includes "Base Code" "Conversion Code" “Standard Event Code” and "Custom Event Code" with the same LINE Tag ID under the same ad account, so it is called "one set".
2). If you find more than one set of LINE Tag in the webpage in LINE Tag Helper, it means that there are LINE Tag codes generated by installing different ad accounts in this webpage. You can check which set of LINE Tag the ad account you want to use corresponds to, and confirm whether other sets of LINE Tag need to be removed.
2. Click the inverted triangle icon (▸) and expand the detailed information to view the same set of LINE Tag and their respective triggering situations.
※ Caution: The complete information display can be viewed in order:
"Start Time" indicates when the Tag is triggered.
"Load Time" means the time it takes to finish loading the Tag after the Tag is triggered.
"Location" shows where the Tag is set in the webpage, which may be the head section or body section of the webpage. If you use a third-party code management tool to install LINE Tag, it may display "Third Party".
3. The "light" in front of the tag name, if it shows a "green light", it means that the LINE Tag has been triggered; if it shows a "red light", it means that there is a problem with the installation of the LINE Tag and needs further adjustment; and if it shows a "yellow light", it means that the LINE Tag is not implemented with standard installation.
※ Caution:
The common problem of displaying "red light" may be that the code has not been pasted completely or the code has been changed. Therefore, we recommend that you directly use the "copy" method to copy the entire code to the webpage when installing the code to reduce the chance of error.
Common problems that show a "yellow light" may be that the custom event name is longer than 20 characters or using disallowed characters for the custom event name.
When you need to ask a webpage engineer to help check the installation problem of LINE Tag, you can use the recording function of LINE Tag Helper to fully record the triggering situation of each tracking code during the operation of the webpage as a reference.
(Last updated: February 14, 2023)
Creating Audiences
You can create an audience by following the steps below:
1. Click on “Ad Account” on the homepage. > Select the account name for which you want to create an audience.
2. Click on the “≡” icon in the upper left of the Ad Manager page. > Go to “Shared library.” > Click “Audience.”
3. Click “+ New audience” above the list of your audiences.
4. Select the type of audience you want to create. > Fill out each item in the field. > Click “Save.”
Please see below for information on the available settings for each type of audience.
Web traffic audience
- Audience name
This is the name of the audience, which appears on your audience list.
You can set a name for your audience as desired (you can edit the audience name later).
- The ‘People who’ setting
Everyone who visited the website: This option refers to users who visited all website pages with LINE Tags inserted.
People who visited a specific page: This option refers to users who visited all pages that have LINE Tags inserted with a specific URL rule.
You can specify your target page by adding a single URL or keyword, or you may use the OR/AND rule to add multiple values.
* Broad keywords or URLs using an asterisk (*) wildcard to substitute certain characters in a string, or entering only the first character of the string, is not allowed.
<Specifying a target page using multiple rules>
URL_A and URL_ B
- Using the OR rule: Able to track users who followed either URL_A or URL_B.
- Using the AND rule: User tracking is unachievable.
(This rule cannot be set to “Track users who followed both URL_A and URL_ B.”)
Keyword_A and keyword_ B
- Using the OR rule: Able to track users who followed a URL that contains either keyword_A or keyword_ B.
- Using the AND rule: Able to track users who followed a URL that contains both keyword_A and keyword_ B.
People who visited an event page: This option refers to users who visited pages that have LINE Tag custom event codes inserted.
Once the inserted event code has been triggered, you will be able to select that event from the drop-down list.
To specify a particular page from all pages that have custom event codes inserted, please set URL rules under the URL requirements setting.
This setting functions the same way as for the “People who visited a specific page” setting.
Mobile app audience
* Please click “Media” to register your application and link it to the SDK first.
Set an audience name as desired and select the application that you have already registered.
The event registered on the SDK will appear on the drop-down list. After that, select the event you want to set as your audience.
You can set different parameters based on each event.
Note:
- If an event has not been triggered, the system will not show it on the drop-down list. As a result, you cannot select that event.
- Once an event is triggered, the event name stays undeletable for 180 days, so please be careful when proceeding with this process.
- If an event still does not appear on the drop-down list even though you have already configured its settings on the SDK, it may mean that an error occurred in the linking process or that the event settings on the SDK side are incorrect.
IDFA/AAID upload
You can upload your own IDFA / AAID to create an audience.
Please fill in each item to create an audience.
-Audience name
Display name in an audience list. You can set audience name as desired. (Can be edited afterwards)
-File name
Please select and upload file
File upload requirements
- Be sure to insert the IDFA/AAID as the first line, not the header name.
(You can upload IDFA/AAID using the same file.)
- Only 1 IDFA/AAID is allowed for each line.
- Multiple IDFA/AAID entries separated by delimiters such as comma (,) are not allowed.
- The maximum file upload size is 60 MB.
- The system only supports CSV and TXT file formats.
Add audience method
You can add or overwrite audience data with the following steps.
“Add” refers to the upload of new set of audience
“Overwrite” refers to the replace of existing audience with new version of audience.
In case you use automatic bidding configuration, the overwrite of audience may affect the system learning phase.
Method: Go to Audience > + New audience > Upload IDFA/ AAID > Upload file in accordance to the steps above
Or go to Audience > Click existing audience > Click “Overwrite” and upload file in accordance to the steps above
LINE Official Account audience
You can create this type of audience by setting a name for your audience as desired and then select the “Valid friends” or “Friends blocking the account” option.
* Valid friends will include your Target Reach.
* You can create the audience from LINE IDs that link to your account only.
* The number of users in the audience will not match your account's total number of friends because the system does not include users who have deleted your account from their friends list and users in the audience who have not logged in to LINE for a long period of time.
* It may take around 2-3 days before you can put the LINE Official Account audience to use.
Lookalike audience
Please select a source audience and audience size (from 1-15%).
* It may take around 24 hours before you can put the Lookalike audience to use.
* Lookalike audiences do not include the source audience.
* You can create up to 10 Lookalike audiences.
Video view audience
You can create an audience from the users viewing a particular video by selecting users’ video interaction rate.
· People who clicked the video
· People who viewed the video
· Viewed more than 3 seconds
· Viewed 25% of the video
· Viewed 50% of the video
· Viewed 75% of the video
· Viewed 95% of the video
· Viewed the video to the end
Note:
· You can set up to 30 days validity period. In case the selected video has been paused longer than validity period, audience status will become not ready.
Image click audience
You can create an audience from selecting campaign ID.
Note:
· You can create audience from audience who click image ad format creatives under selected campaign ID. This excludes video ad format creatives.
(Last updated: December 8, 2021)
What is conversion tracking?
Conversion tracking is a feature that allows you to measure your ad performance by tracking the number of conversions resulting from the actions of website visitors, such as ad clicks on the LINE Ads; this enables you to see how effective your delivered ads actually are.
There are 2 types of conversion tracking: website conversions and app conversions.
Please see the following for more information:
- Tracking website conversions
(Last updated: October 19, 2020)
Tracking website conversions
Website conversions is a measure of conversions on a website.
You have to insert LINE Tags in order to track the conversions of your website.
* Please see how you can insert LINE Tags here.
There are 2 types of website conversion tracking: tracking by conversion codes and tracking by custom conversions.
Tracking by conversion code
You need to insert conversion codes at the conversion point.
* Please see how you can insert conversion codes here.
When users click on ads displayed on the LINE Ads and then enter the website that has inserted conversion codes, the system will trigger LINE Tags to track the number of conversions.
The system will also examine the cookie data to see whether website visitors have clicked on the ad. If users enter the website that has inserted conversion codes after clicking on LINE ads, during the tracking period (30 days for conversion codes), it will be counted as a conversion.
* The results of conversion tracking will be updated in the CV column of the Ad Manager dashboard.
* You can set an attribution period for custom conversions from 1 to 180 days.
* The results may not always be accurate. This depends on device versions and sometimes on the expiration dates of cookie data.
Custom conversion tracking
Custom conversion works effectively for the following purposes:
- Inserting conversion codes somewhere other than the conversion point.
- Tracking conversions based on URLs or custom events.
- Flexibility in attribution period adjustments.
To create custom conversions step by step:
1. Click on the “Ad Account” tab on the homepage. > Select the account name for which you want to create custom conversions.
2. Click on the “≡” icon on the upper left of the Ad Manager page. > Go to “Reports and figures.” > Click “Conversions.”
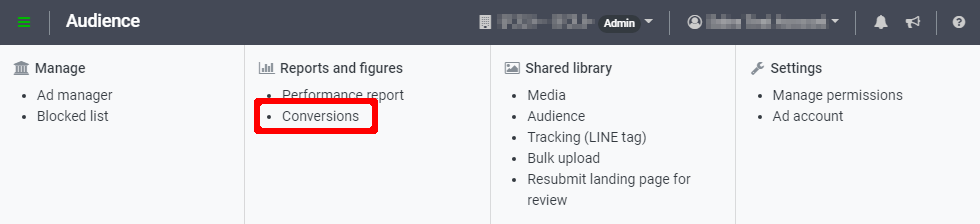
3. Click “+ New custom conversion” under the Custom Conversions menu. > Fill out each item in the field, and finally, click “Save.”
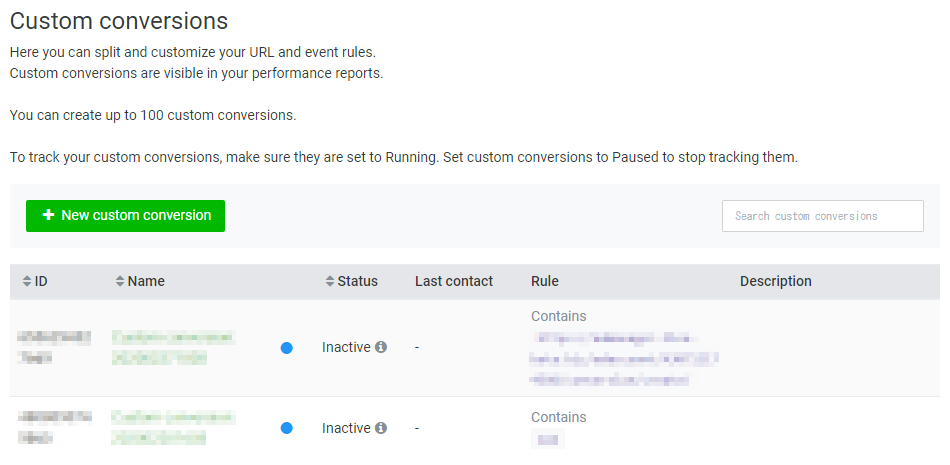

* The “Last contact” field shows the date and time of when the conversions were last tracked.
* You can set an attribution period from 1 to 180 days.
Specifying URLs:
You may specify single URL or keyword or use the OR/AND rule to add multiple values.
(Broad keywords or URLs using an asterisk (*) wildcard to substitute certain characters in a string, or entering only the first character of the string, is not allowed.)
<Tracking by using conversion rules>
URL_A and URL_ B
- Using the OR rule: Able to track either URL_A or URL_B.
- Using the AND rule: Tracking is unachievable.
(Conversion rule cannot be set as “Track the number of users who visit both URL_A and URL_ B.”)
Keyword_A and keyword_ B
- Using the OR rule: Able to track URLs that contain either keyword_A or keyword_ B.
- Using the AND rule: Able to track URLs that contain both keyword_A and keyword_ B.
Event rules:
The system will display the names of any active event codes on the drop-down list (only when a custom event code has already been inserted).
Please select the event that you want to be counted as a conversion.
* The event rule “Conversion” refers to a conversion code.
Note:
- Custom conversion status will be active when the event has been triggered from LINE campaign
- You can view tracking results for custom conversions in the performance report.
- Normally, conversions are valid for 30 days. If you want the validity period to last from 1 to 180 days, please select the “Conversion” option and then set the length of time you want.
- Attribution period of 30 days is required for the custom conversion to be available for Optimize custom conversion in the ad group level.
- You can create up to 100 custom conversions. Once created, you cannot edit the conversion data except for the name and description of the conversions. These conversions cannot be deleted. If a conversion is no longer used, please update its status to “Pause.”
- Since the system does not show real-time updates, even if you have already changed the status to “Pause,” you will see that the status still reads “Active.”
(Last updated: October 1, 2021)
Custom conversion works effectively for the following purposes:
- Inserting conversion codes somewhere other than the conversion point.
- Tracking conversions based on URLs or custom events.
- Flexibility in attribution period adjustments.
To create custom conversions step by step:
1. Click on the “Ad Account” tab on the homepage. > Select the account name for which you want to create custom conversions.
2. Click on the “≡” icon on the upper left of the Ad Manager page. > Go to “Reports and figures.” > Click “Conversions.”

3. Click “+ New custom conversion” under the Custom Conversions menu. > Fill out each item in the field, and finally, click “Save.”

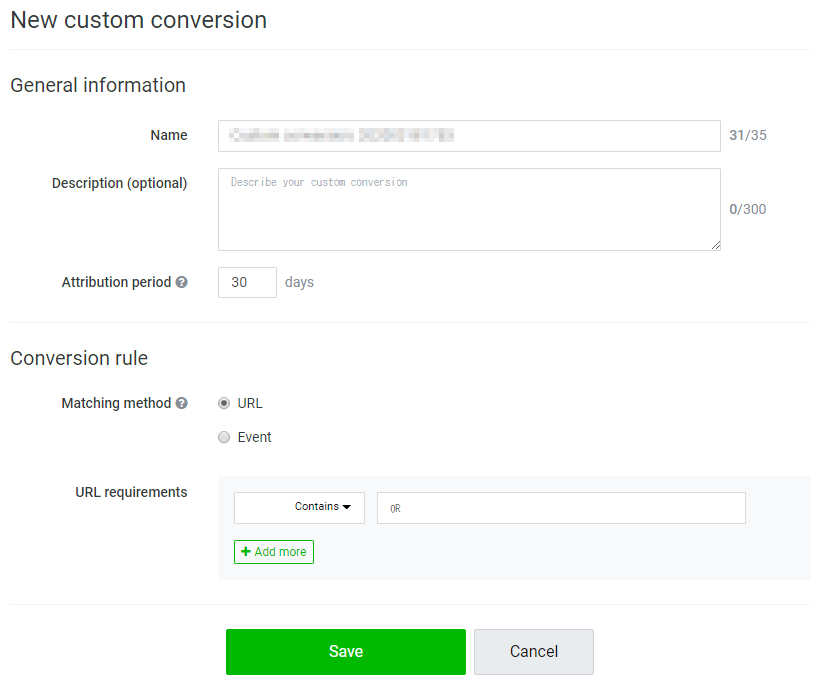
* The “Last contact” field shows the date and time of when the conversions were last tracked.
* You can set an attribution period from 1 to 180 days.
Specifying URLs:
You may specify single URL or keyword or use the OR/AND rule to add multiple values.
(Broad keywords or URLs using an asterisk (*) wildcard to substitute certain characters in a string, or entering only the first character of the string, is not allowed.)
<Tracking by using conversion rules>
URL_A and URL_ B
- Using the OR rule: Able to track either URL_A or URL_B.
- Using the AND rule: Tracking is unachievable.
(Conversion rule cannot be set as “Track the number of users who visit both URL_A and URL_ B.”)
Keyword_A and keyword_ B
- Using the OR rule: Able to track URLs that contain either keyword_A or keyword_ B.
- Using the AND rule: Able to track URLs that contain both keyword_A and keyword_ B.
Event rules:
The system will display the names of any active event codes on the drop-down list (only when a custom event code has already been inserted).
Please select the event that you want to be counted as a conversion.
* The event rule “Conversion” refers to a conversion code.
Note:
- Custom conversion status will be active when the event has been triggered from LINE campaign
- You can view tracking results for custom conversions in the performance report.
- Normally, conversions are valid for 30 days. If you want the validity period to last from 1 to 180 days, please select the “Conversion” option and then set the length of time you want.
- Attribution period of 30 days is required for the custom conversion to be available for Optimize custom conversion in the ad group level.
- You can create up to 100 custom conversions. Once created, you cannot edit the conversion data except for the name and description of the conversions. These conversions cannot be deleted. If a conversion is no longer used, please update its status to “Pause.”
- Since the system does not show real-time updates, even if you have already changed the status to “Pause,” you will see that the status still reads “Active.”
(Last updated: October 1, 2021)
Tracking events, for example the number of app installs and the number of times the app has been opened, requires the SDK tracking that is linked to your LINE Ads.
The available linked SDKs include Appflyers, Adjust, and Kochava, which allow you to track 11 types of events such as app installs or app launches. Please register your application on the admin panel of the LINE Ads and then complete the setup on the SDK admin panel using ad account ID and app ID.
To set up app conversion tracking step by step:
1. Click on the “Ad account” tab on the homepage. > Select the ad account name for which you want to track app conversions.
2. Click on the “≡” icon in the upper left of the Ad Manager screen. > Go to “Shared library.” > Click “Media.””

3. Click on the “App” tab and then select “+ Add app.” > Select the desired platform and then enter the application name and App Store/Google Play URL.
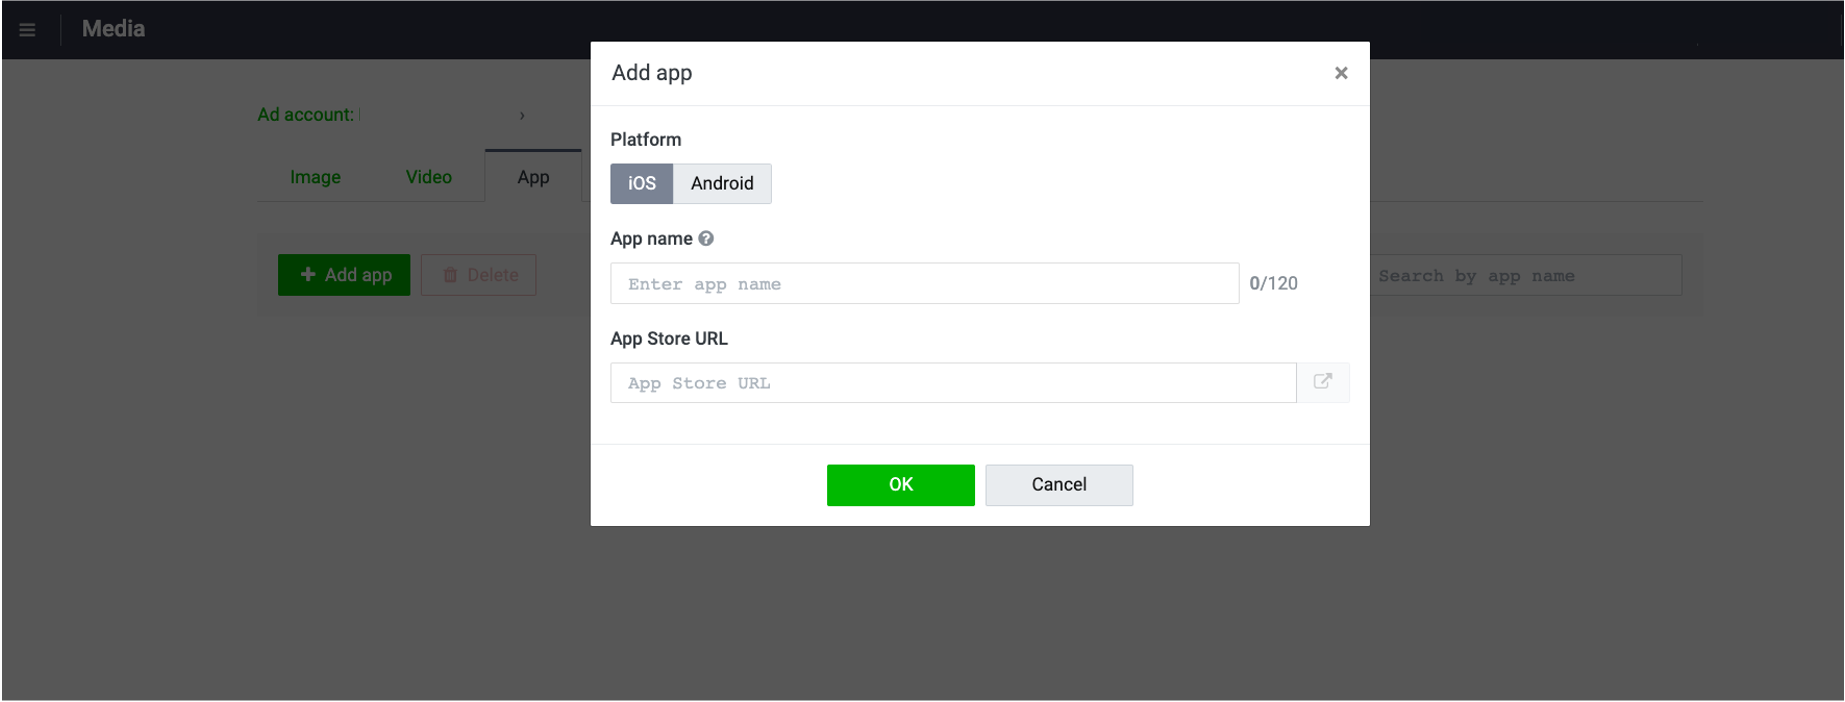
4. After a complete application registration, please register ad account ID and app ID (shown on LINE Ads) on the SDK manager.
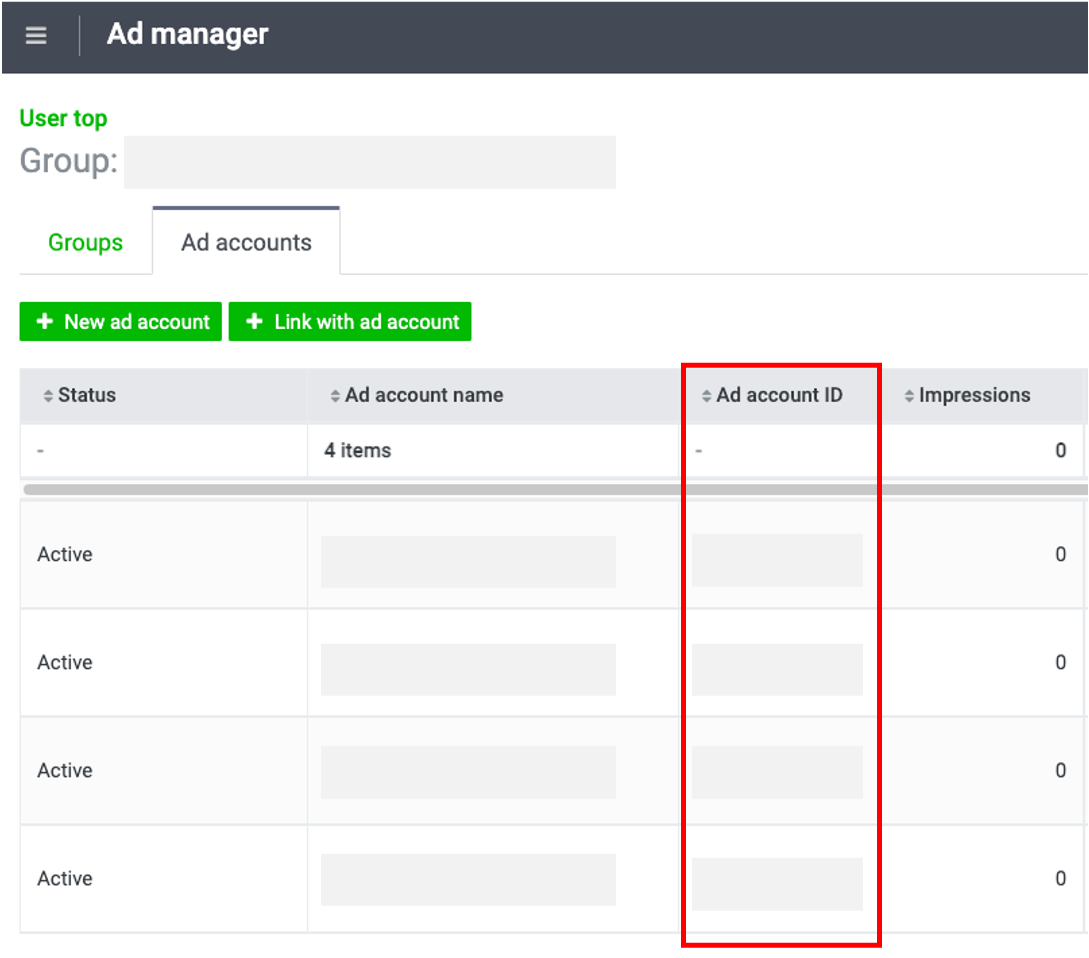
4. After a complete application registration, please register App media ID and ad account ID (shown on LINE Ads) on the SDK manager.
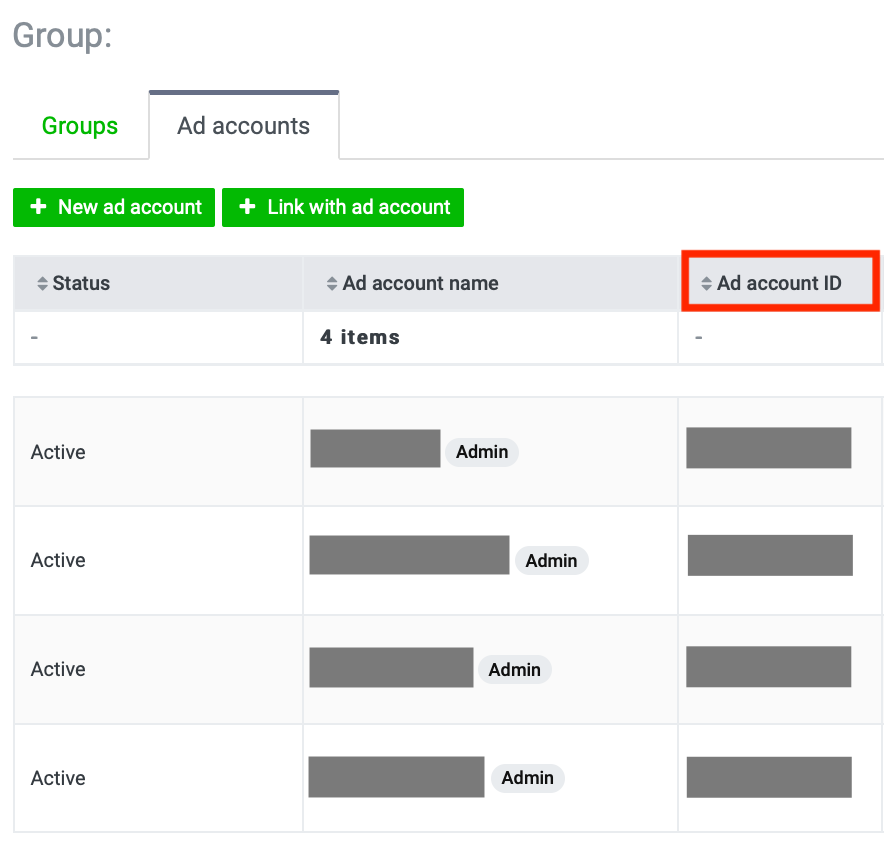
App ID:
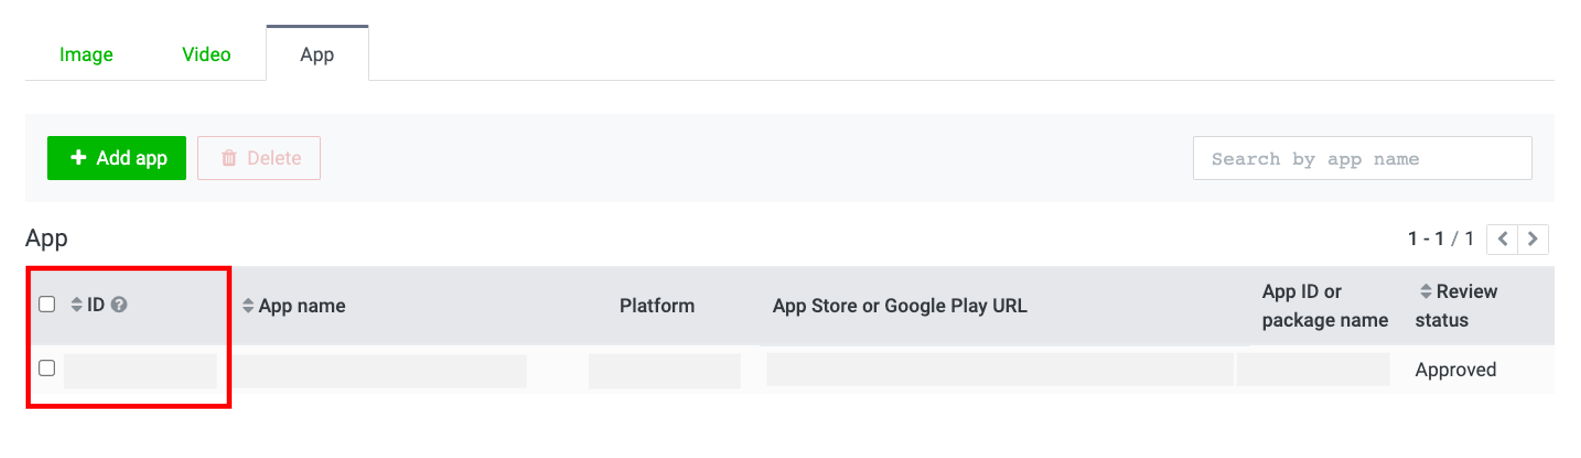
5. Enter the tracking URL obtained from the SDK Manager screen on your LINE Ads in order to specify the destination website.
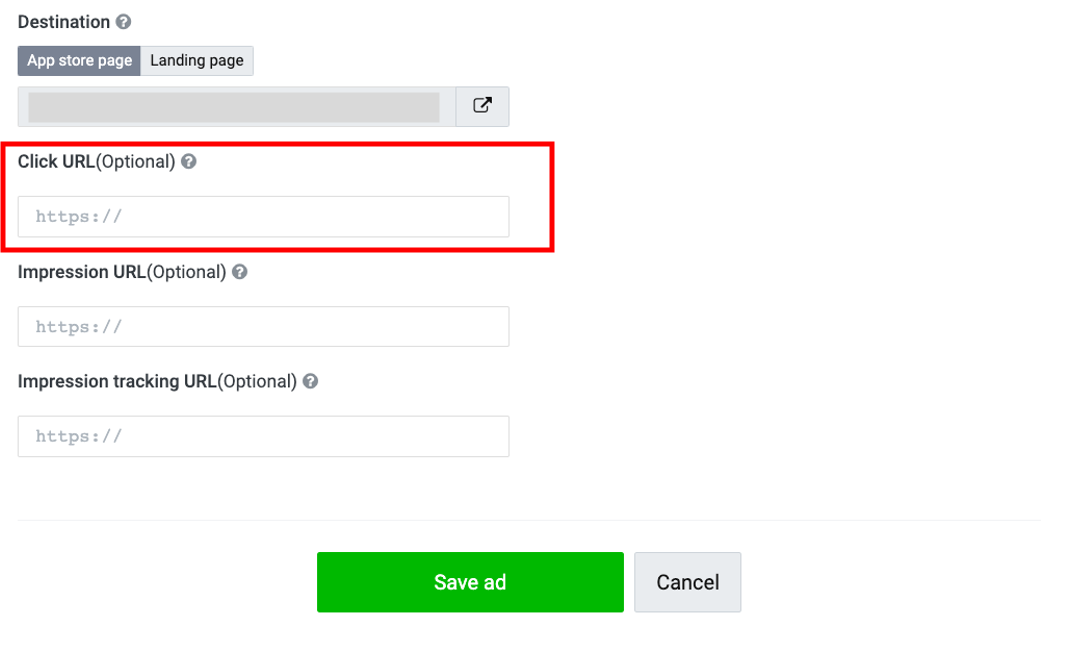
FAQs:
- Which part of the SDK Manager screen do I enter the ID obtained from the LINE Ads admin panel?
- What SDKs can I link to my LINE Ads?
(Last updated: October 1, 2021)
Due to Apple's regulation, LINE cannot measure App Install campaign result from iOS 14 or higher user that opted out the app tracking.
SKAdNetwork will solve this issue. Advertiser can enable SKAdNetwork Measurement Feature by following these steps;
Setting Method
1. Create App Install Campaign
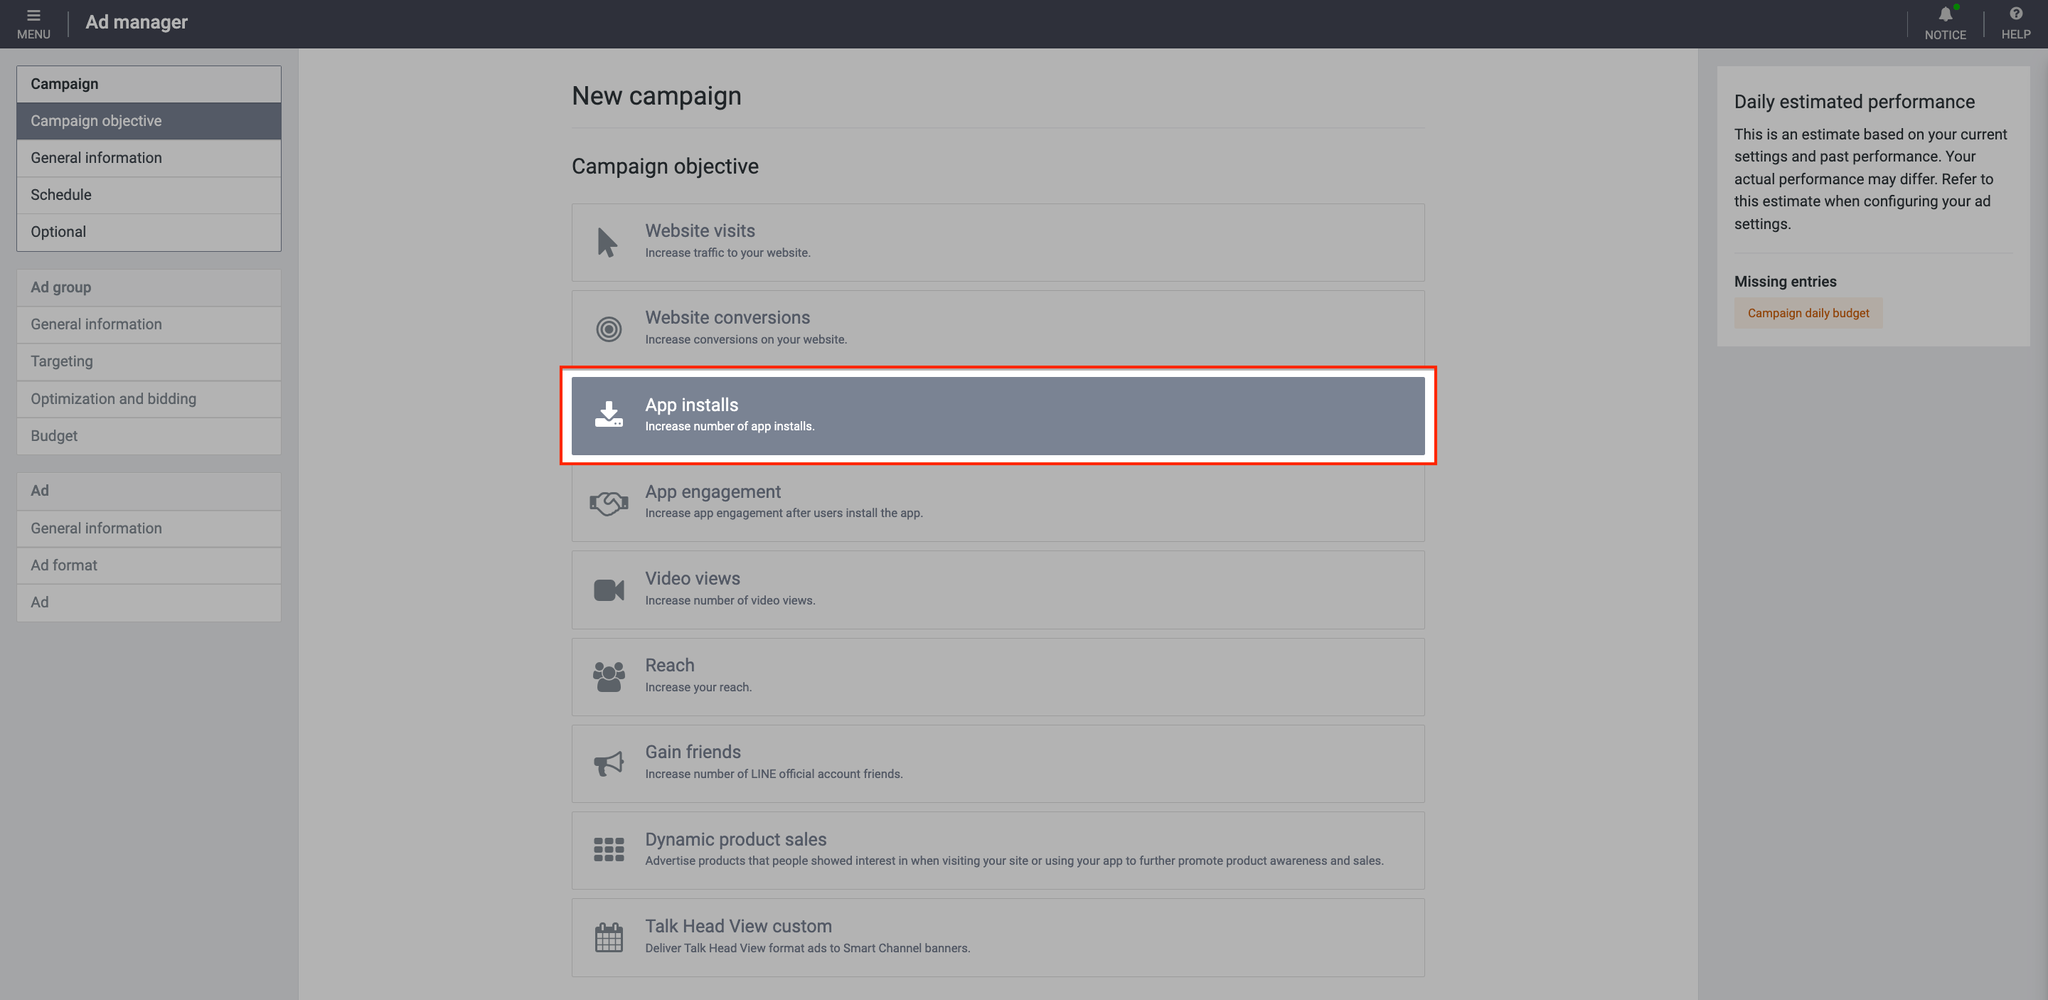
2. In iOS App Ad group level, enable SKAdNetwork Measurement and Save the Ad group
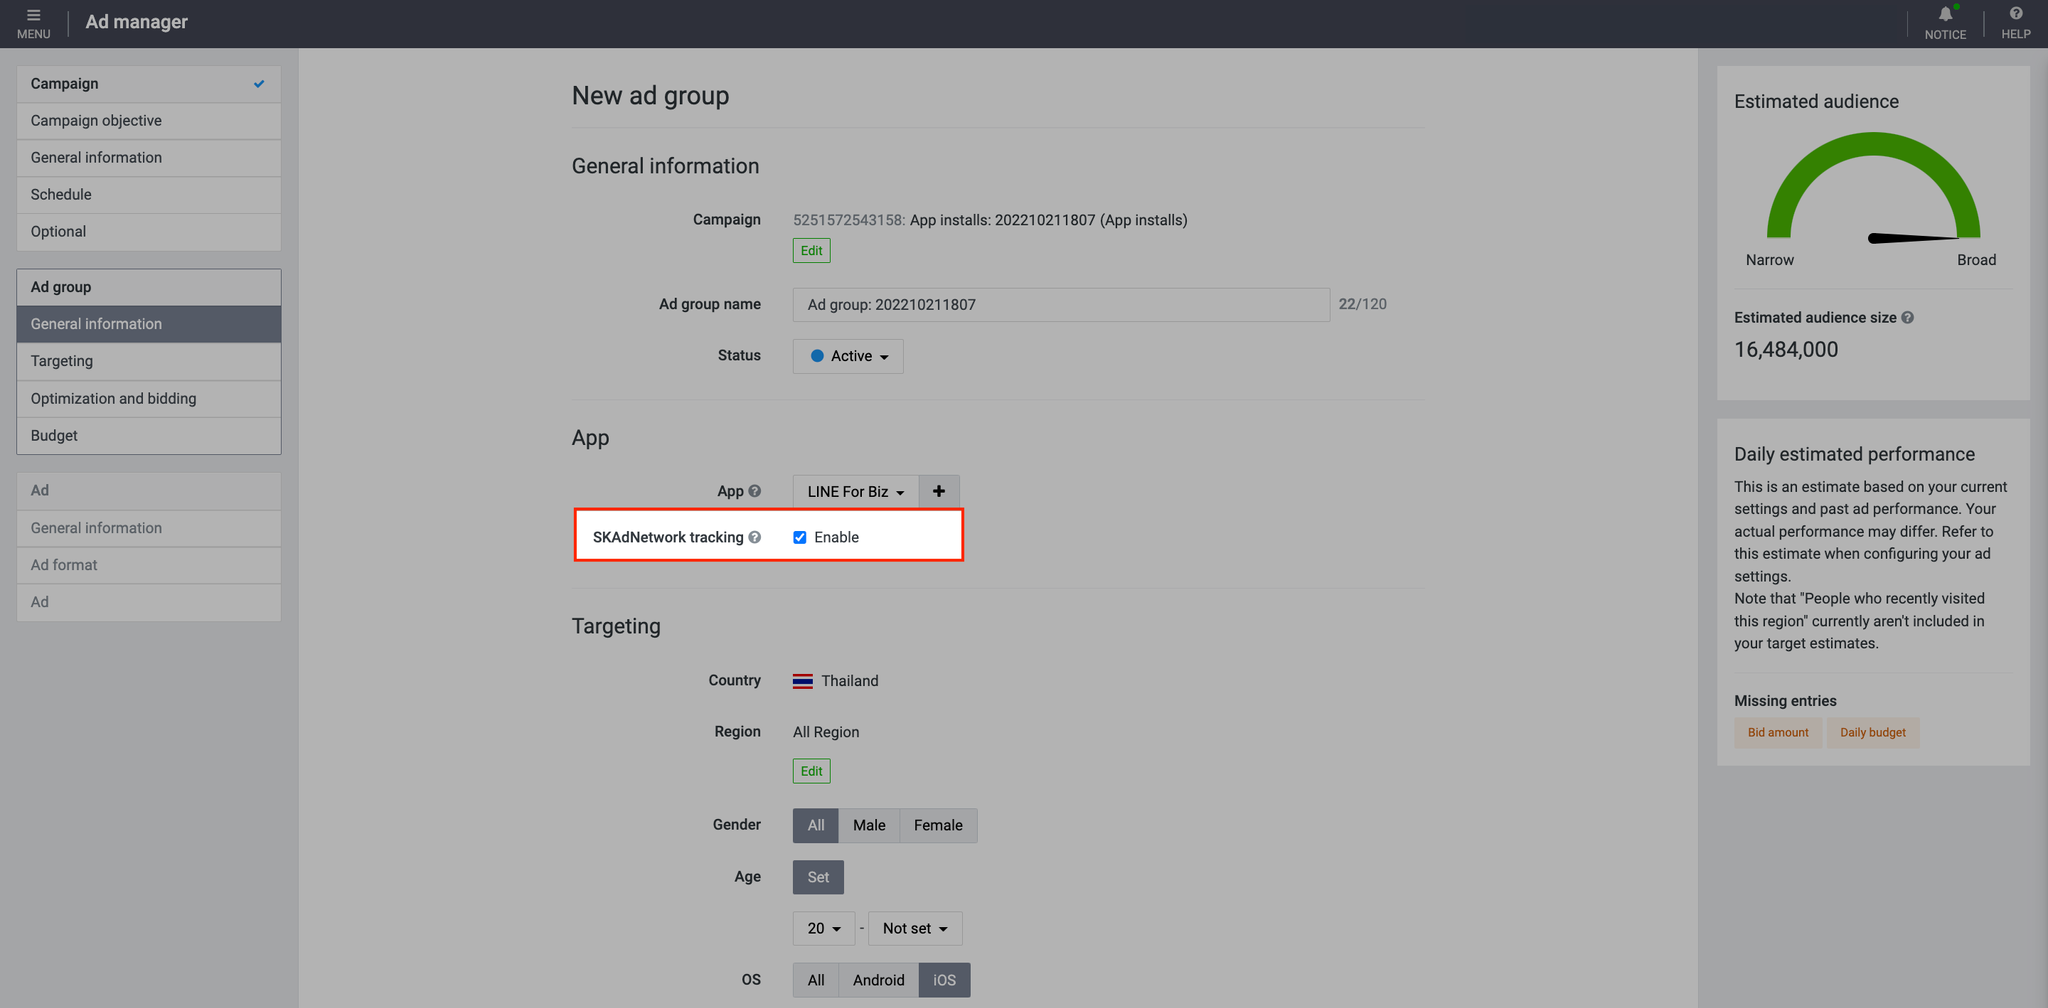
Report
1. Click "columns" and click "Choose columns"
2. Add SKAdNetwork columns on the dashboard.
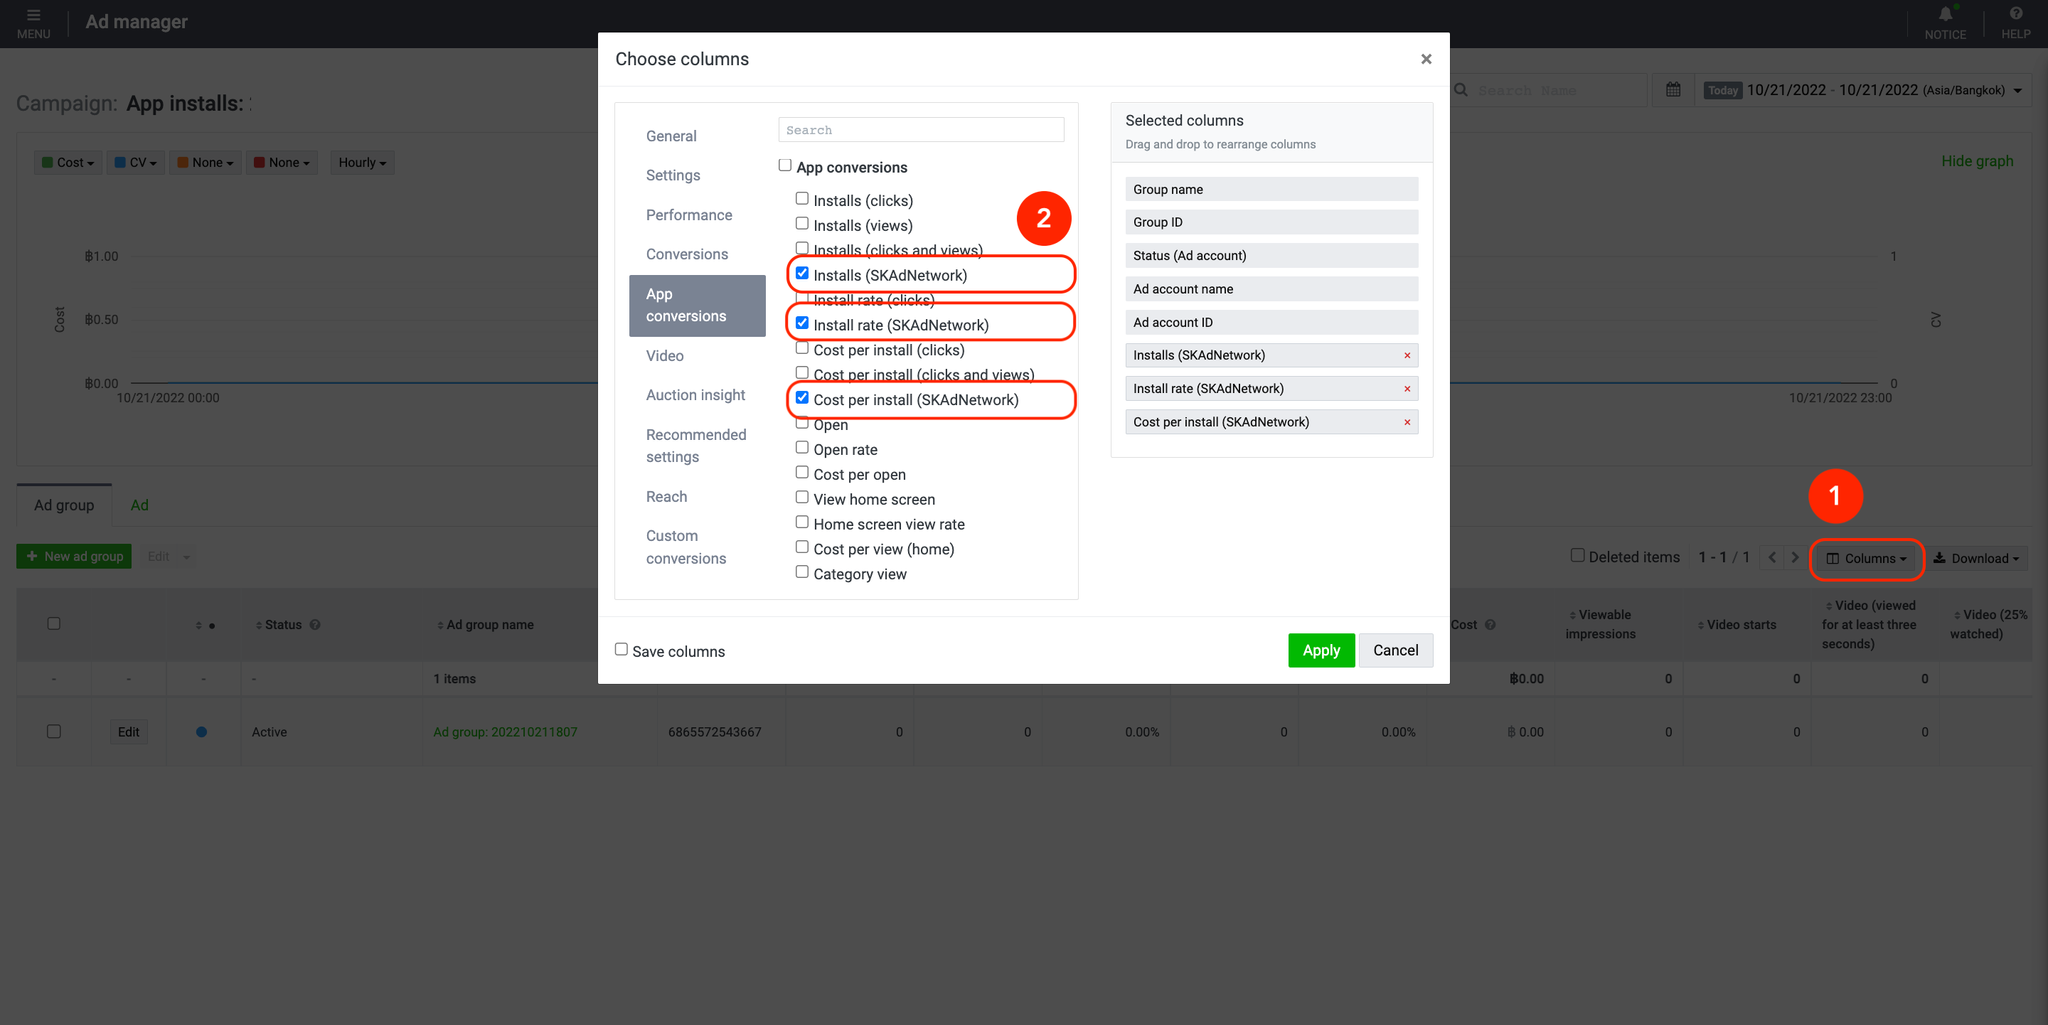
Remark
- Campaign Objective: App Install
- SKAdNetwork measurement settings are available when iOS apps are selected in the ad group
- Number of accounts: unlimited
- Number of ad groups: up to 25 per app across ad accounts
SKAdNetwork Mobile Measurement Partner (MMP) Postback Linkage Function
After advertiser enables the SKAdNetwork Measurement Function, you will be able to check the SKAdNetwork results of multiple media on the measurement partner management screen by following these steps.
Setting Method on LINE Ads
- Please set the link destination URL issued on the measurement partner management screen to the advertisement set in the ad group using SKAdNetwork measurement.
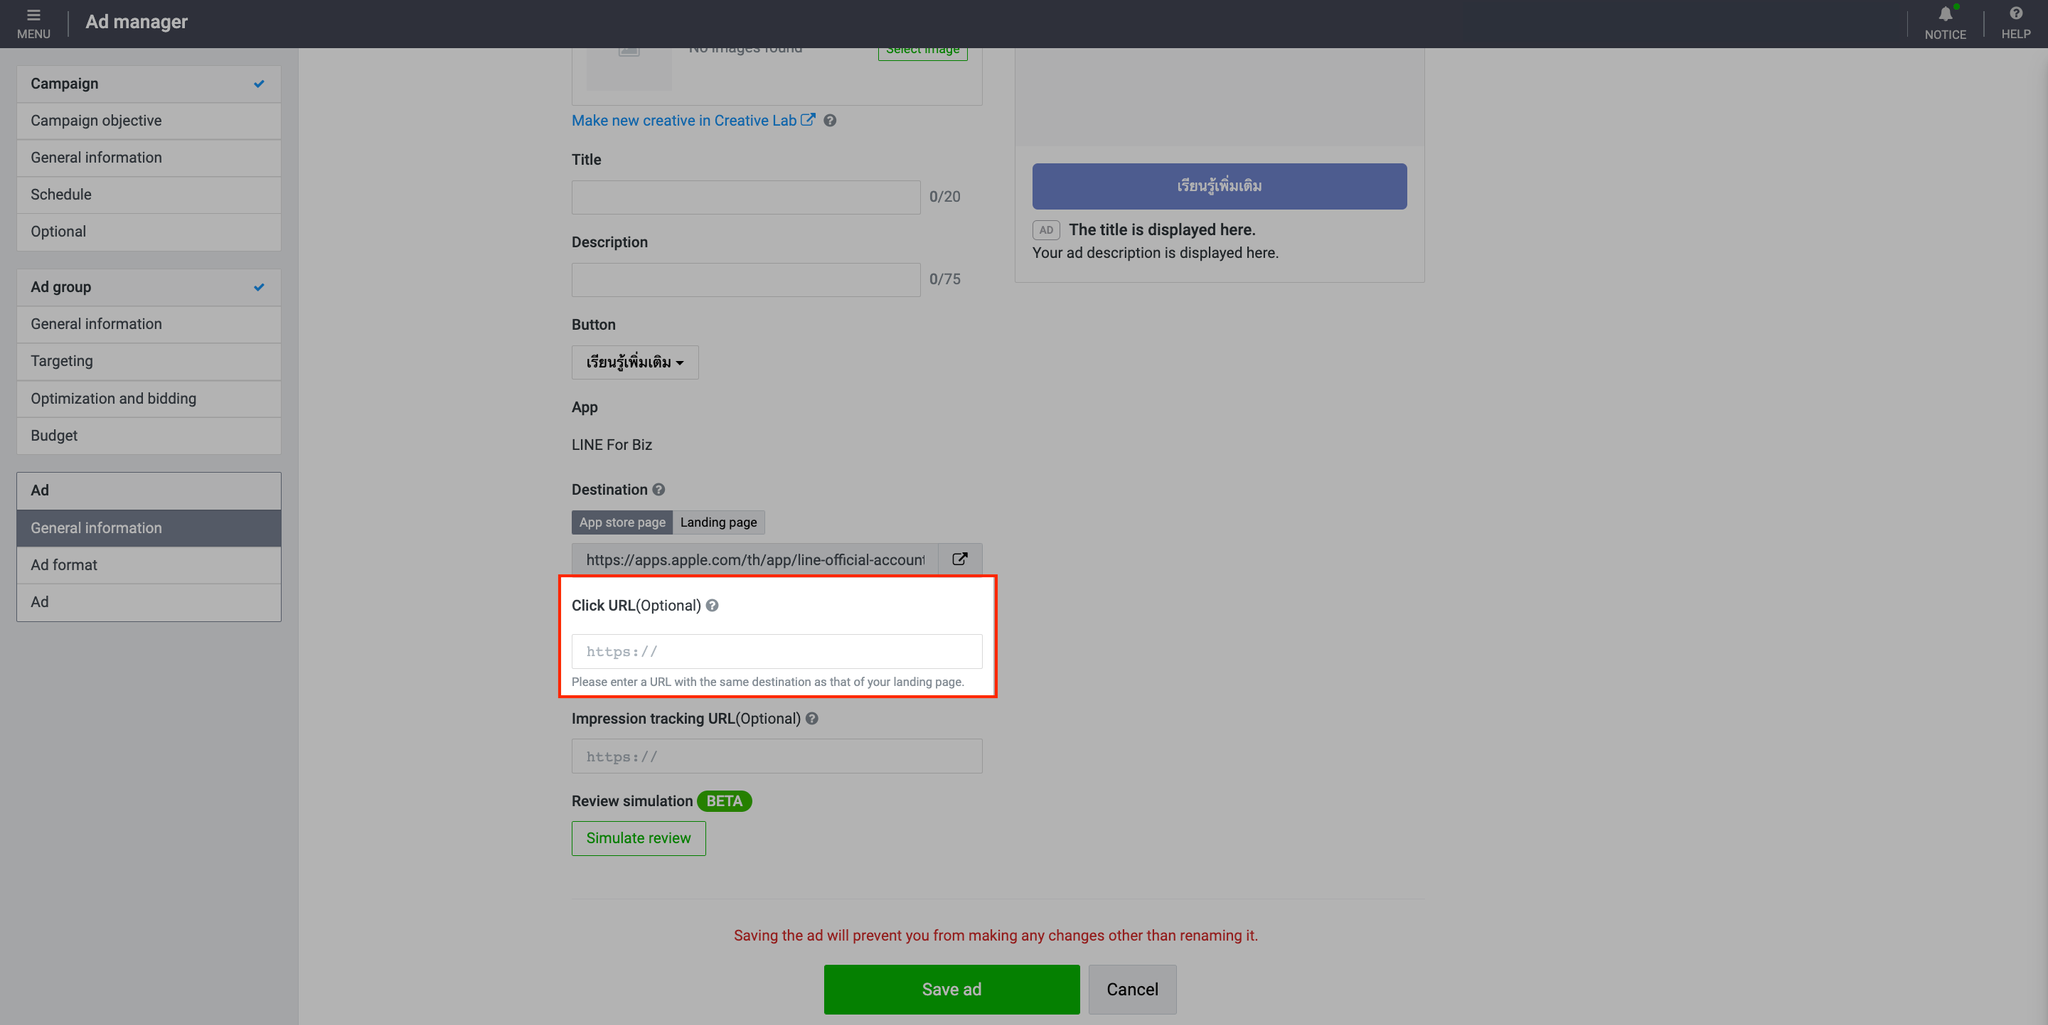
Remark
- Only Adjust and AppsFlyer are supported. (Other MMPs are not supported)
- There is no function ON/OFF for postbacks to measurement partners, and postbacks will start according to distribution if the link destination URL is set.
- The display of postback data on the measurement partner management screen complies with the measurement partner specifications. Please - contact your measurement partner for details.
(Last updated: October 26, 2022)
How to navigate the dashboard
You can monitor ad results from graphs and various components on the dashboard of your LINE Ads admin panel.
How to use graphs
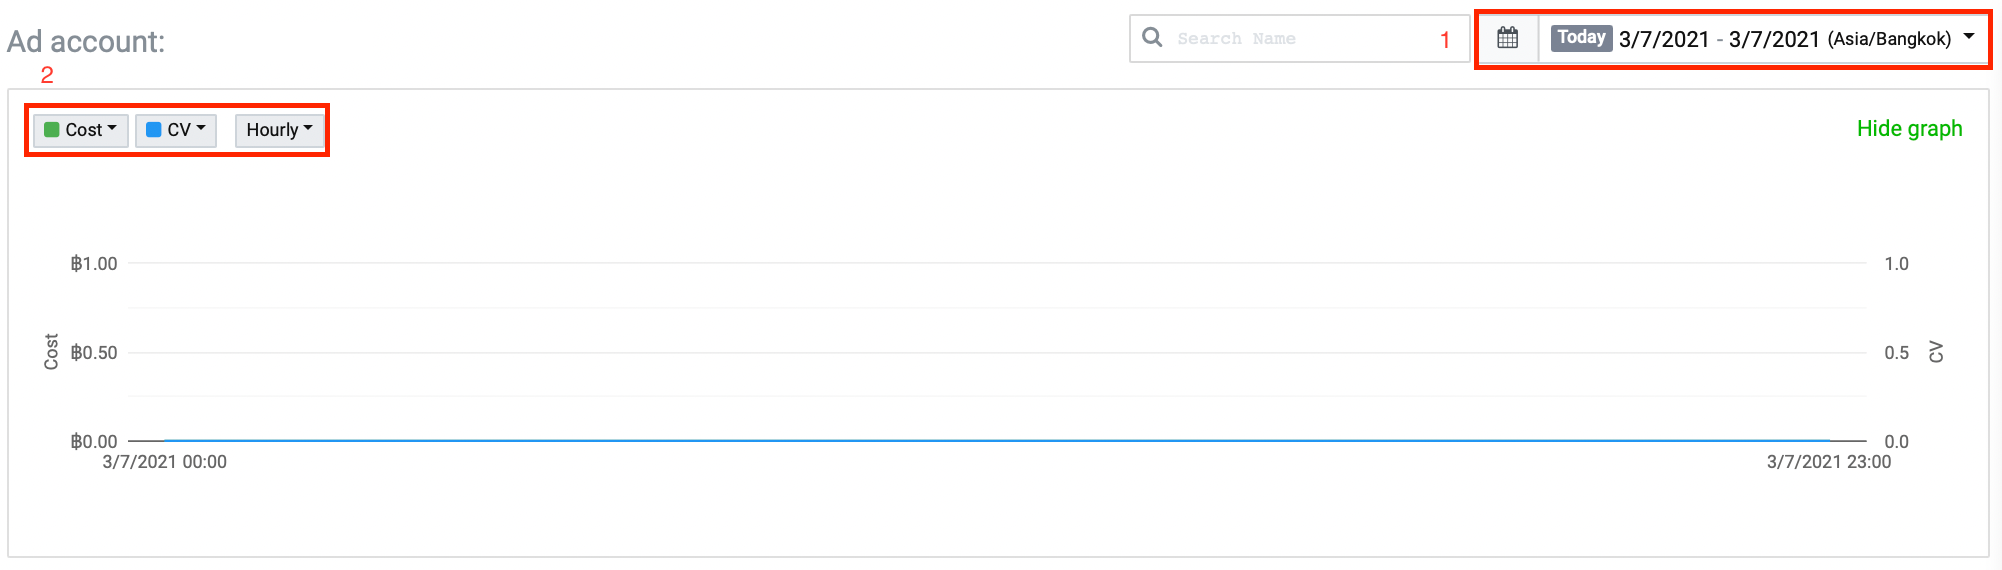
- Duration
Select the time at the top right to see how your ads have performed during that particular period of time.
* You can select to see your ad results by month, week, day, or hour (a specific hour of a single day only).
- Index
You can select up to 2 indices from the options in the upper left of the field.
How to use each dashboard element
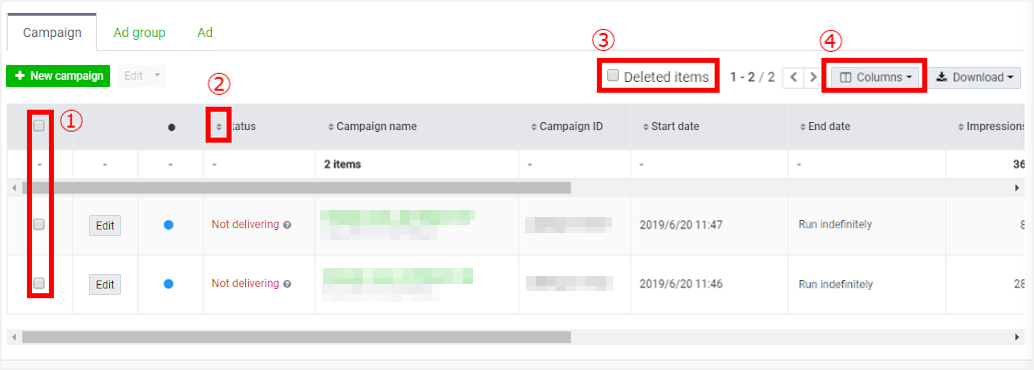
- Check boxes
You can select checkboxes to edit or delete components in bulk.
- Component items
You can change the sort order of component items.
- Deleted items
The system will shows deleted items only.
- Columns
You can choose to display the data in whichever column you want.
(Last updated: October 19, 2020)
Downloading reports
You can view your ad results by downloading performance reports.
The results of your custom conversions can also be included in this report.
To download a performance report:
1. Click on the “Ad account” tab on the homepage. > Select the ad account from which you want to download the performance report.
2. Click on the “≡” icon in the upper left of the Ad Manager screen. > Go to “Reports and figures.” > Click “Performance report.”
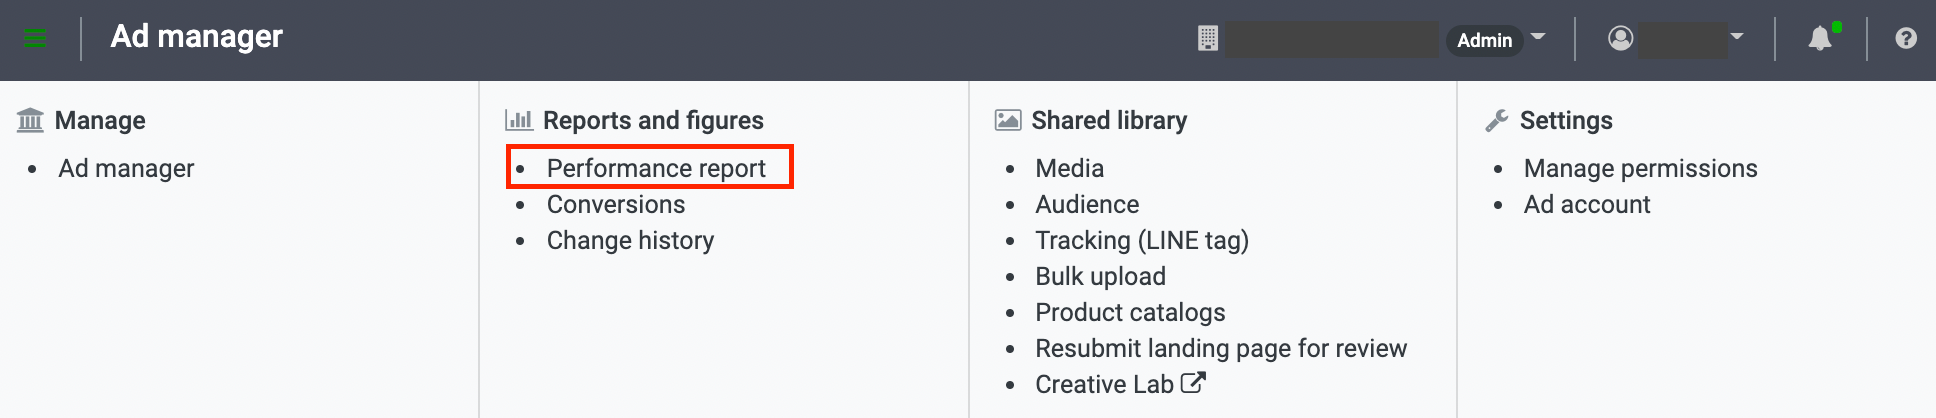
3. Click “+ New report” and then select the desired reporting period, components, report interval, reporting unit, and level. > Click “Create.”
* If you wish to include deleted items in the performance report, please also check the “Include deleted items” checkbox.
* If the report status still shows “Not ready,” please click on the Update button in the upper right of the screen.
* Reports created within the past 1 week will appear on the list.
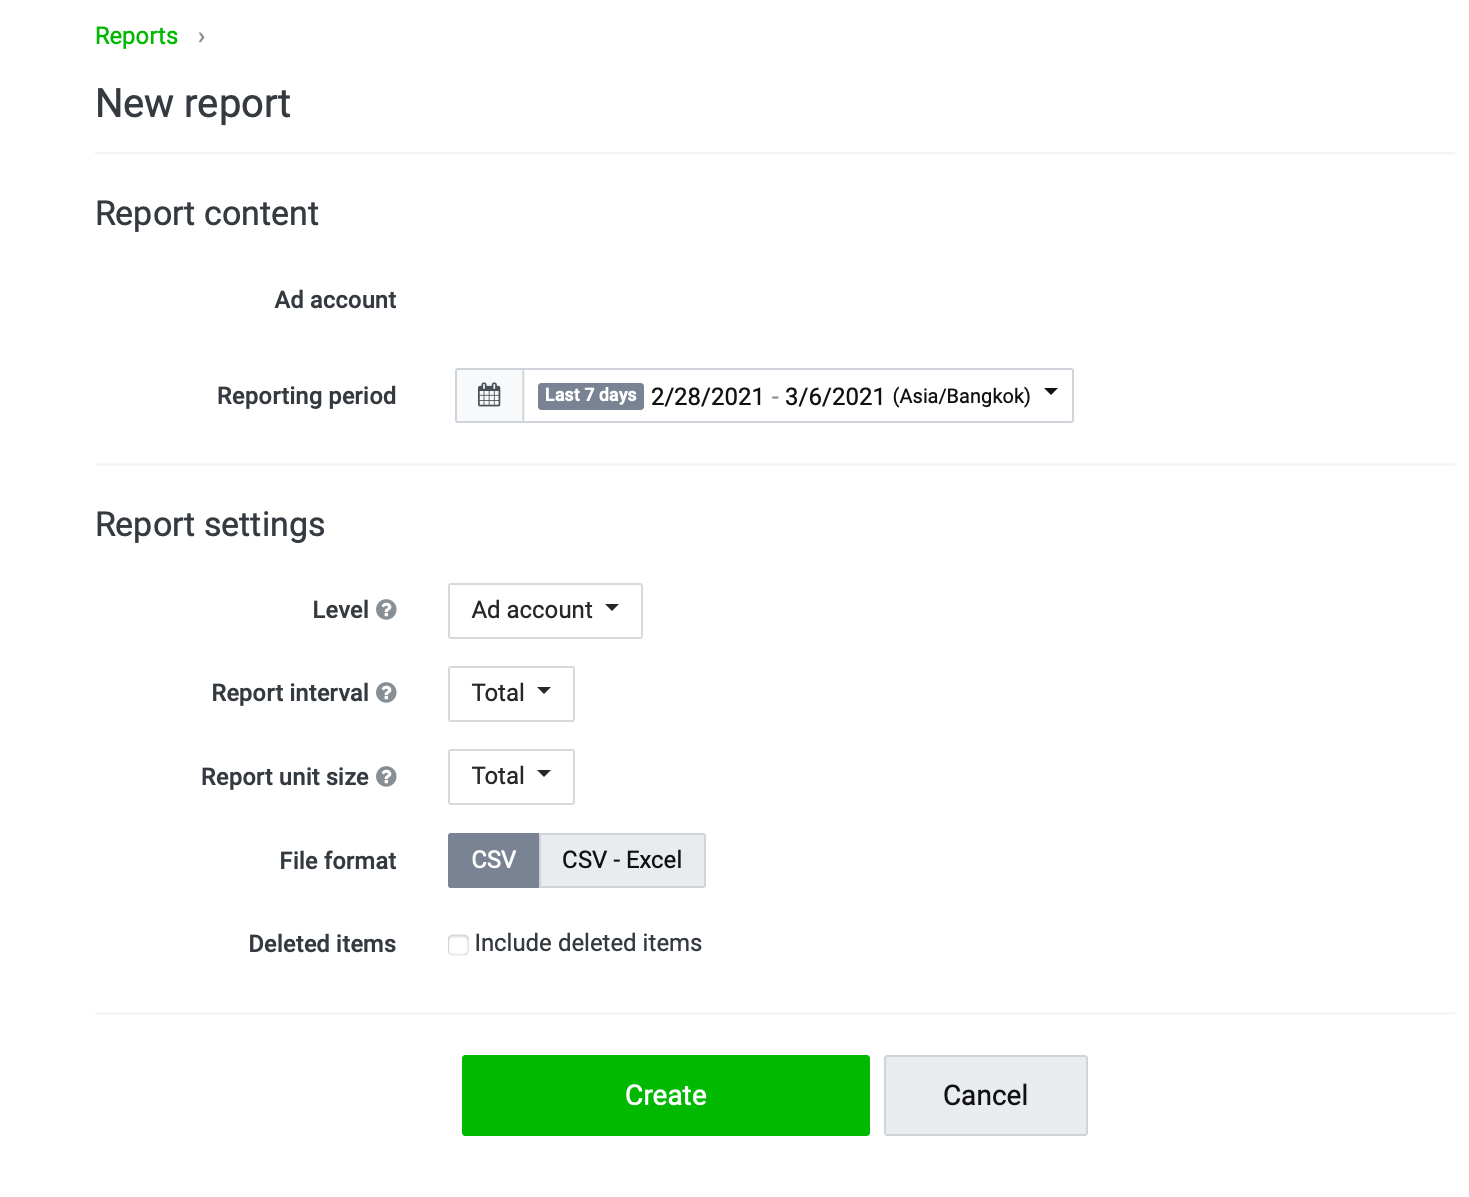
Report items
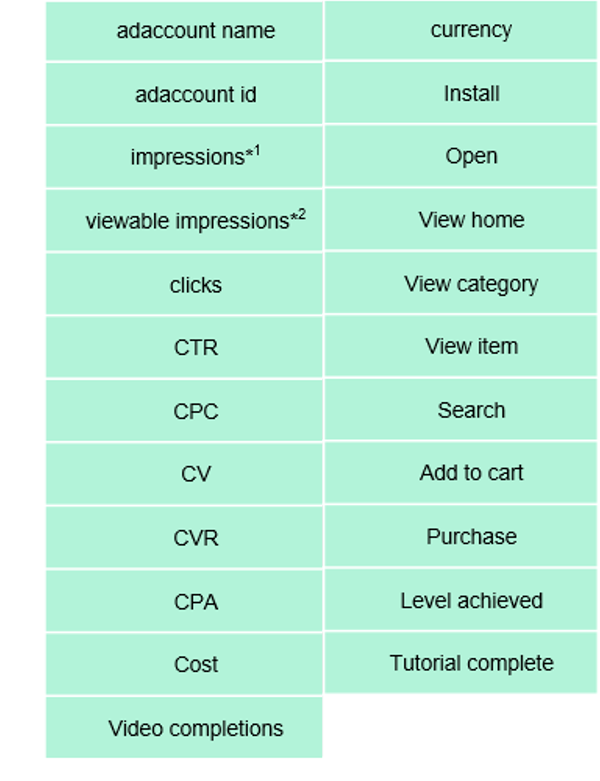
* 1. Impressions: Displaying a creative image of 1 pixel or more counts as 1 impression.
* 2. Viewable impressions: An impression is counted as viewable when at least 50% of the ad area is visible with an ad exposure time of at least 1 second for an image ad and 2 seconds for a video ad.
* The number of users counted by the system may differ when reports are created based on different interest categories. This can affect the number of impressions and clicks; the results in the report can differ from those that appear on the Admin panel as well.
* The report may also include users located outside of Thailand when creating the report based on location. Location-based data are processed according to the location where LINE is being used. If the users whose accounts associated with LINE “Thailand” are traveling abroad at the time, the system will then aggregate the data according to the user’s current country (current location). As a result, the names of those countries appear on the report.
* The system updates the “Reporting unit” once per day; the data from the day before will be updated at 8:00 AM (Thailand time) of the following day.
Note:
- Apart from the above report items, you can add additional custom conversion or custom event items to your report in the settings.
- If you create a report based on location, the data connecting with countries other than Thailand may also be included in the report.
The system processes location data collected in LINE accounts. If a user relocates overseas during the time the report has been updated, the user data incorporated in the report will be counted as a foreign account.
- Location view allows you to see the data by specific location down to the district level; however, the system aggregates only consented location data from users, the resulting value of a specific area may consequently be inconsistent with the number in total (updated daily).
- If you create a report based on user interests, the system will not take the diversity of users into account (if 1 user has multiple interests). In consequence, the total result of each category can be discrepant.
- The system will update the data once per day only when you select the “Reporting unit” option.
If you wish to check the data of the current date, you have to view the report after 8:00 AM of the next day.
* You can select 5 items for the “Reporting unit,” which include OS, gender, age, area (location), and interests.
(Last updated: October 19, 2020)
This is the setting that lets the system automatically adjust bidding amounts to achieve your ad delivery objectives. For example, bidding amounts are adjusted to within your budget according to the determined maximum CPC.
(Last updated: June 14, 2019)
Auto-bidding optimization is applied to ad groups.
(Last updated: June 14, 2019)
The system will have to start the relearning process because changes in audience targeting and bidding amounts affect the bidding environment.
At the beginning of the relearning process, the system may lower the amount of ad deliveries to prevent a sudden increase in the number of ads delivered.
* Learning means the process where the system is learning and calculating the best bidding amount in order to effectively meet the ad objectives through maximizing conversions or app installs.
(Last updated: June 14, 2019)
When auto-bidding optimization is in the learning process, it means that the system is learning and calculating the best bidding amount in order to effectively reach the ad objectives through maximizing conversions or app installs. For this reason, it is very likely that your ad will be delivered with improved performance after the learning process is completed.
(Last updated: June 14, 2019)
If you want your ad deliveries to produce better results after optimization is completed, we recommend delivering ads by targeting a broad audience to expand your ad reach.
In addition, if you do not want an ad to be visible to a certain audience, you can modify the audience configuration in the settings; this will not make any difference in the automatic optimization.
(Last updated: June 14, 2019)
This is a setting that helps to maximize as many clicks as possible to win bids below the maximum CPC that you have set by allowing the system to calculate the ideal CPC within the budget set for your ad group.
(Last updated: June 14, 2019)
It requires approximately 40 clicks per ad group to complete the learning process.
The number of clicks has a greater influence on performance optimization than the ad distribution period.
(Last updated: June 14, 2019)
This is a setting that helps to maximize as many conversions as possible to win bids below the maximum CPA that you have set by allowing the system to calculate the ideal CPC within the budget set for your ad group.
(Last updated: June 14, 2019)
It requires approximately 40 conversions per ad group to complete the learning process.
The number of conversions has a greater influence on performance optimization than the ad distribution period.
(Last updated: June 14, 2019)
Changing the placement of a conversion code can affect optimization because the existing automatic optimization is still proceeding with the calculation using old conversion data. After the code placement has been changed, the system will start a relearning process by collecting a new set of data.
To avoid such circumstances, we recommend creating a new ad group altogether and then configuring the settings to automatically optimize conversions.
(Last updated: June 14, 2019)
This is a setting that helps to maximize as many app installs as possible to win bids below the maximum CPA that you have set by allowing the system to calculate the ideal CPA within the budget set for your ad group.
(Last updated: June 14, 2019)
It requires approximately 40 app installs per ad group to complete the learning process.
The number of app installs has a greater influence on performance optimization than the ad distribution period.
(Last updated: June 14, 2019)
When you change the bidding amount configuration of the ad group that is on display from manual to automatic, the system will use the obtained past performance data to optimize the bidding.
Moreover, if you change to auto-bidding with broad audience targeting after you have already bid for ads manually with specifically set targeting for the same ad group, optimization may have to rely on the past performance data until the new learning process is complete.
If it is determined that the ad group does have enough past performance data (insufficient number of clicks or conversions) or that the obtained performance data is deficient (the obtained data is not suitable to use in the learning process for auto-bidding optimization), the system needs to start a relearning process. In this instance, however, the relearning takes nearly the same amount of time as when creating a new ad group.
(Last updated: June 14, 2019)
The system will retrieve and incorporate the data within the ad account that the ad group is associated with or from other similar ads that are visible to the general audience into the auto-bidding optimization.
(Last updated: June 14, 2019)
What is campaign budget optimization?
• Campaign Budget Optimization (CBO) is a feature that helps to automatically split daily budgets to well performed ad groups and optimize budget usage.
• Higher budget will be allocated to well performed ad groups.
• Control the overall and daily budget at the campaign level.
• You no longer have to manually set a daily budget at the ad group level.
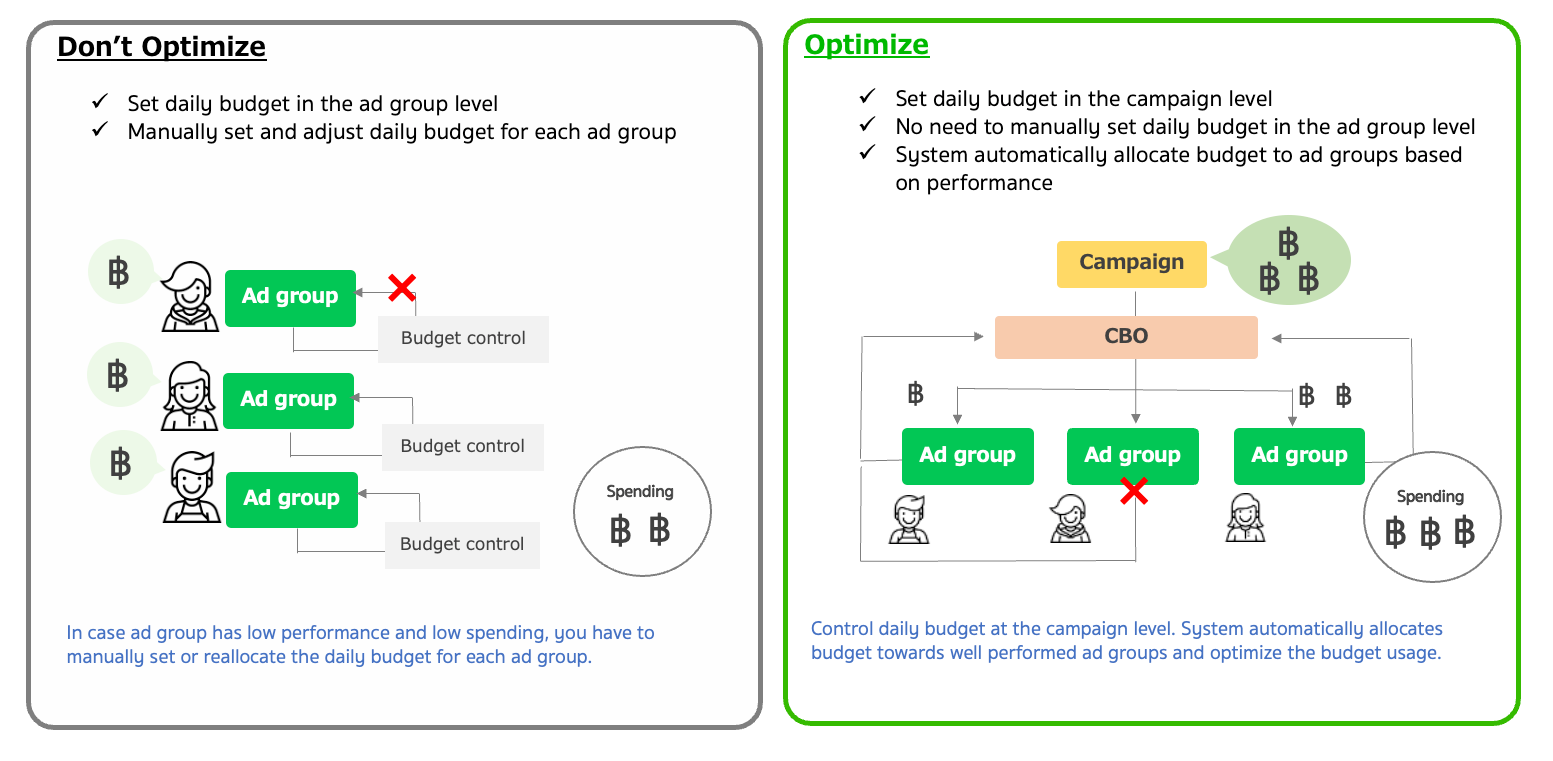
How to use CBO?
· You can choose to “Don’t optimize” or “Optimize” under campaign budget optimization feature at the campaign level.
- By selecting “Don’t optimize”, you can manually control a daily budget at the ad group level.
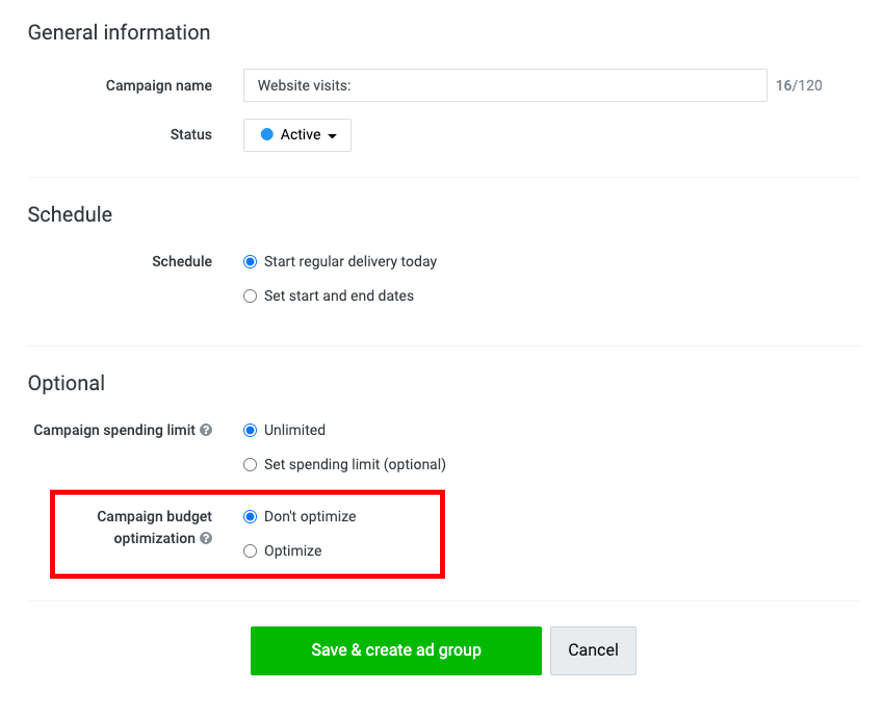
· By selecting “Optimize”, you can control a daily budget at the campaign level. You no longer have to manually set ad groups’ daily budget.
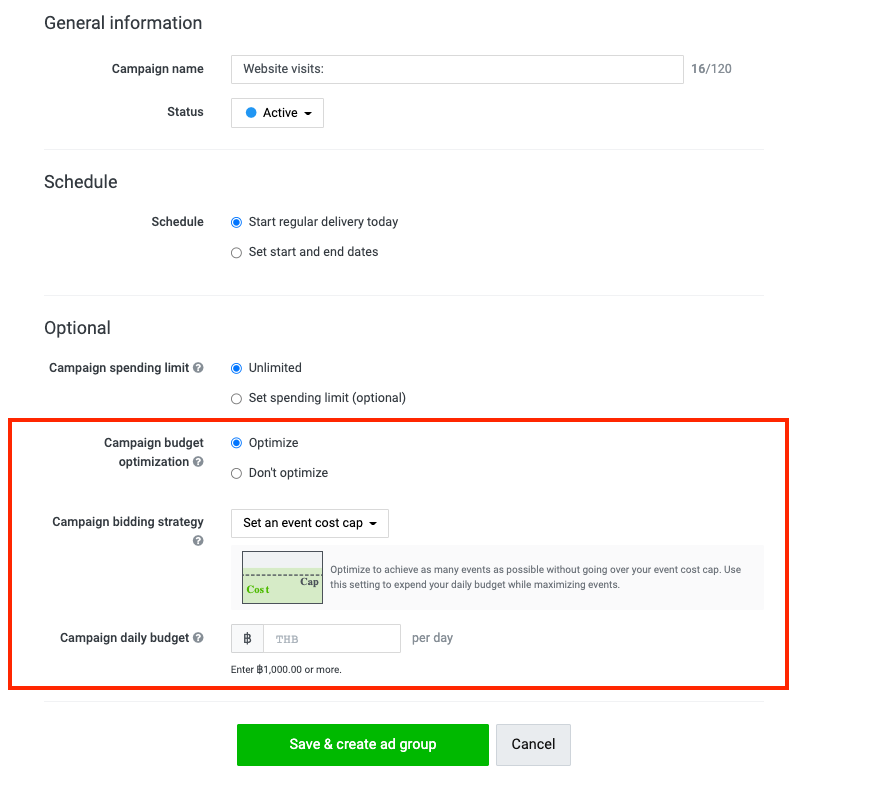
Recommendation
Schedule
• The campaign duration should not be too short. It should be at least 7 days in order for effective learning.
Ad groups
• You shouldn't create just one ad group as the CBO feature helps spitting budget across different ad groups. At least 3-7 ad groups should be used under the campaign.
Campaign spending and bidding
• Bidding strategy and daily budget should not be adjusted too frequent as it effects system’s learning phase.
Suitable for
• When there is a difficulty in setting and adjusting daily budget for each ad group.
• When you need help with optimizing the budget in each ad group based on the performance.
• When you're unsure of the budget you should set in each ad group during the beginning of campaign.
Conditions
• All ad groups under CBO must use automatic bidding and has the same bidding strategy.
• Daily budgets cannot be set at the ad group level.
• Support for up to 100 ad groups.
• Minimum daily budget per campaign is 1,000 THB.
• Compatible with all objectives, except Reach & Frequency.
• CBO cannot be inactivated, from “Optimize” to “Don’t optimize”, within the first 2 hours of ad launching.
• To update the CBO status from “Don’t optimize” to “Optimize”, existing ad groups with manual bidding will be paused. You should always apply automatic bids to all ad groups under the CBO campaign.
• There is a chance of daily budget exceeding. All cost will be charged as normal in accordance with campaign spending limit setting: unlimited or set spending limit.
• It is recommended to set a campaign spending limit.
(Last updated: March 14, 2022)
You can check the auction insights in the ad group level and take further adjustment in order to increase your advertisement display opportunity.
Calculation: 100% of total number of ad display opportunity = Impression share + Lost impression share (by budget) + Lost impression share (by rank)
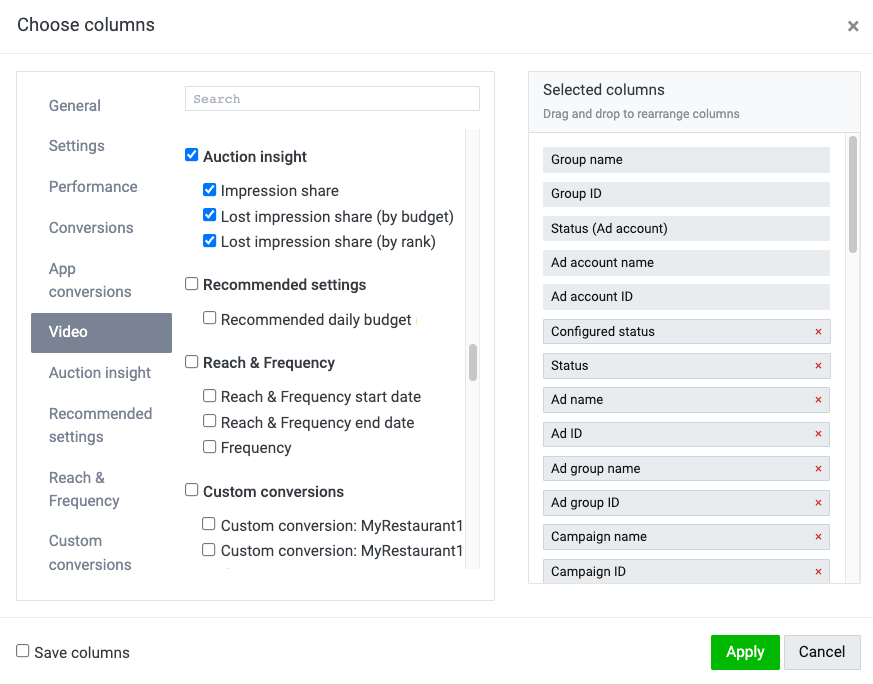
1. Impression share
The percentage of impressions actually displayed out of the total number of ad display opportunities.
2. Lost impression share (by budget)
The percentage of the total number of ad display opportunities that ads could not displayed due to lack of budget.
Action to take: When high lost impression share (by budget) occurs, it is recommended to increase daily budget to improve display opportunity.
3. Lost impression share (by rank)
This is the percentage of the total number of ad display opportunities that ads could not displayed because the ad rank was low and the auction competition was lost.
Rank is a ranking list of ads* that are candidates for distribution among the impressions that can be distributed. Ranks consist of bids and ad predictions such as CTR and conversion rates.
* If there are multiple ads in the ad group, one ad with the highest rank will be selected and compete with the ads of other candidates.
Action to take: When high lost impression share (by rank) occurs, it is recommended to increase bidding and improve creatives’ CTR and CVR to win the auction.
Conditions:
· It will be displayed in units of ad groups. It does not appear at the granularity of the campaign or ad.
· It will be displayed in the ad manager and will not be reflected in the download report.
· Not displayed if you are using the Reach & Frequency campaign.
· Data may not be displayed if there are few delivery opportunities.
· Changing your ad group settings can make a big difference to your metrics.
· The numbers are updated several times a day.
· Data before the release date (2021/6/7) cannot be acquired.
(Last updated: December 8, 2021)
A feature that allows you to check the "recommended daily budget" on the management screen to eliminate the loss of advertisement display opportunities caused by budget restrictions. You can refer to the numbers and set an appropriate daily budget.
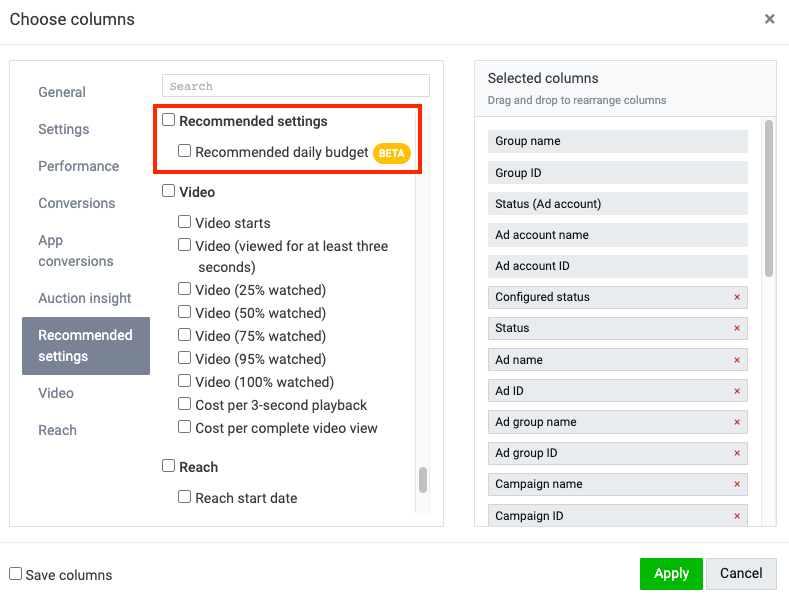
The recommended daily budget cannot be displayed under the following conditions:
1. Reach objective is used
2. Ad delivery has not been performed for the past 7 days from the previous day, or the performance data is insufficient
3. When campaign setting information (campaign budget optimization on/off, campaign daily budget, bid strategy, etc.) is changed within 7 days, or when ad group setting information is changed.
4. The current daily budget is higher than the recommended budget.
Note:
- Data will be shown only on the ad manager dashboard and will note be reflected in the download report.
(Last updated: October 26, 2022)
You can refer to "CTR Level" for your ads performance evaluation. CTR Level is an index to evaluate the level of predicted CTR compared to other ads competing for the same audience.
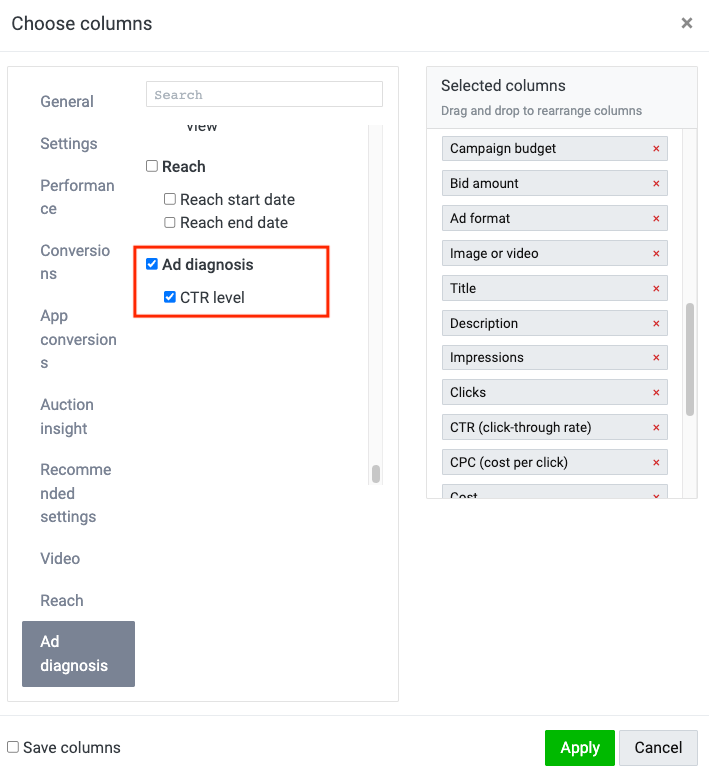

Display result:

Remarks:
- “Predicted CTR” means the platform’s predicted CTR based on past delivery performance.
- The CTR level is not a rating for all users, it is a metric compared to advertising that competes with a target audience.
- Displays evaluations for the period selected on the dashboard.
- CTR level is displayed in ad level only.
- It will not be displayed if the auction participation rate during the selected period is low.
- It cannot be used for the Video View, Reach, Smart Channel Custom.
- It cannot be used in campaigns with CPM manual bidding.
- You can check the data after March 1st.
(Last updated: April 1, 2023)
Payment methods
You can make payments through credit card or coupon only.
Available credit cards must be issued by either of the following companies:
- VISA
- Mastercard
- JCB
- TPN
* Payment through a prepaid card is not accepted.
Please see below for the credit card registration method and timing for payments:
(Last updated: March 31, 2021)
You can check your payer info by following the steps below:
1. Click on the “Ad account” tab on the homepage. > Select the ad account name linked to the payer info you want to check.
2. Click on the “≡” icon in the upper left of the Ad Manager screen. > Go to “Settings.” > Select “Billing and payments.”

3. Click the payer name that you want to check

4. Click “Settings” on the upper right side of the screen.
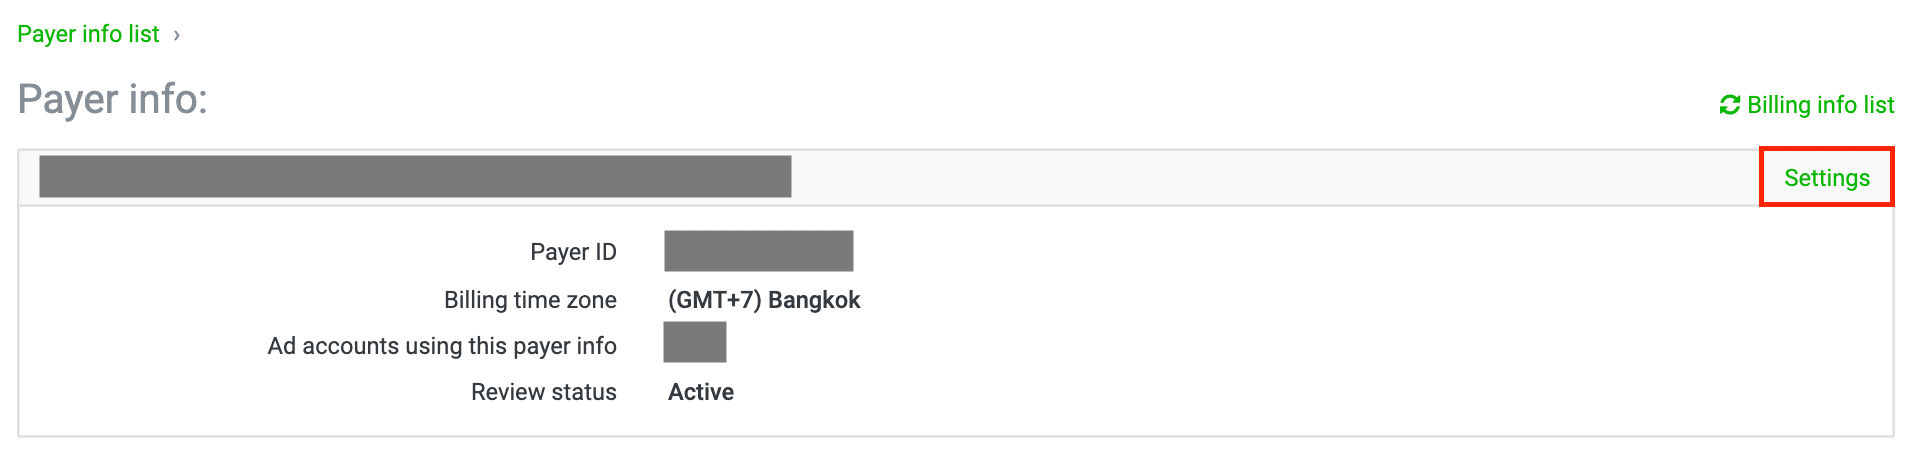
5. The payer info that you have registered will then appear on the screen.
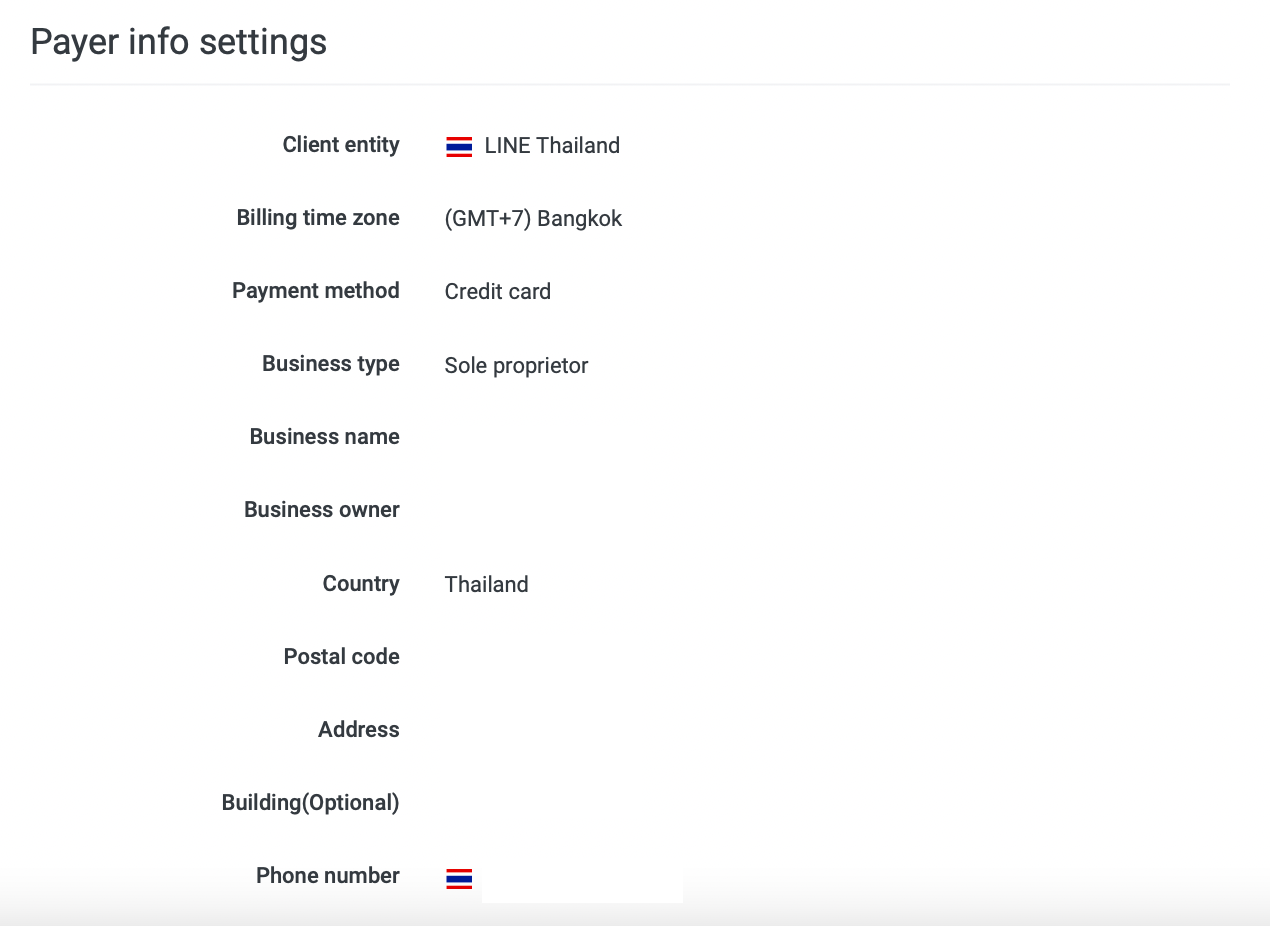
(Last updated: October 19, 2020)
You can edit your payer info by following steps:
1. Click on the “Ad account” tab on the homepage. > Select the ad account name
linked to the payer info you want to check.
2. Click on the “≡” icon in the upper left of the Ad Manager screen. > Go to “Settings.” > Select “Billing and payments.”

3. Click the payer name that you want to check

4. Click “Settings” on the upper right side of the screen.

5. Click “Edit”
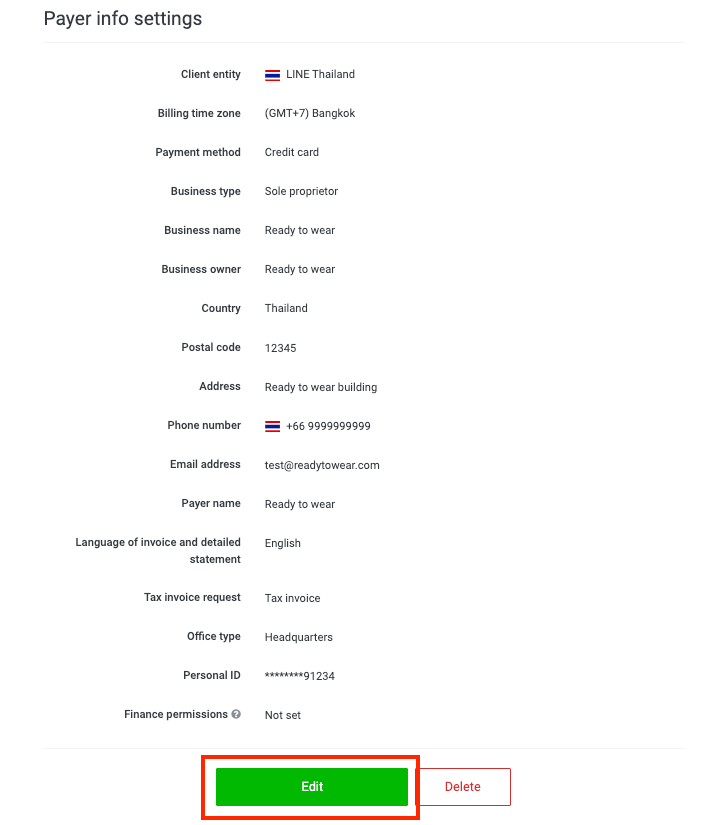
6. When you are done with updating information, click “Update”
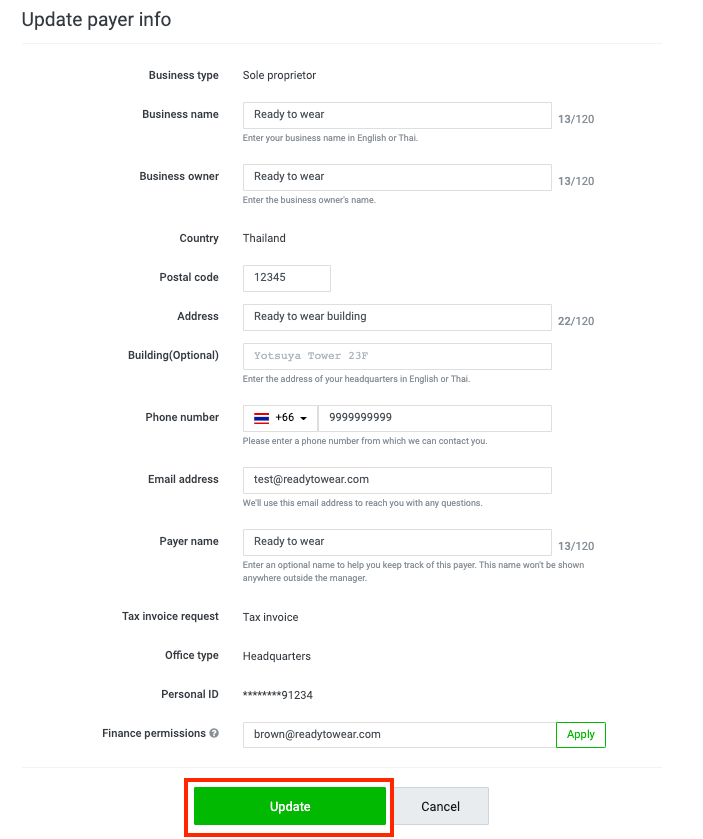
Following detail can be edited.
· Change from “Abbreviated tax invoice” to “Tax invoice” (You won’t be able to change it back later)
· Other information such as Payer name, Address, Email address
· Finance permission. Click here for more information.
Following detail cannot be edited.
· Business Type
· Country
· Corporate Number/ Personal ID
· Office Type
Changing your ad account type
· If you wish to change from a Self-Serve account to an Agency account, please contact a representative from the LINE Ads or LINE Agency Partner.
(Last updated: March 14, 2022)
The payment amount can be automatically charged from your “primary card” and “secondary card” only. The system cannot process automatic payments using other, non-priority registered credit cards.
* If an automatic payment cannot be complete successfully, you can manually make payment by clicking the “Pay now” button on the right side of the outstanding balance.
You can set priority for your registered credit cards by following the steps below:
1. Click on the “Ad account” tab on the homepage. > Select the ad account name linked to the credit card for which you want to set card priority.
2. Click on the “≡” icon in the upper left of the Ad Manager screen. > Go to “Settings.” > Select “Billing and payments.”

3. Click the payer name for which you want to set card priority.

4. Set a primary card by clicking on the “Set as primary card” button on the right side of the credit card that you want to set as a primary card.
* You will be unable to make any changes once the primary card has been set.
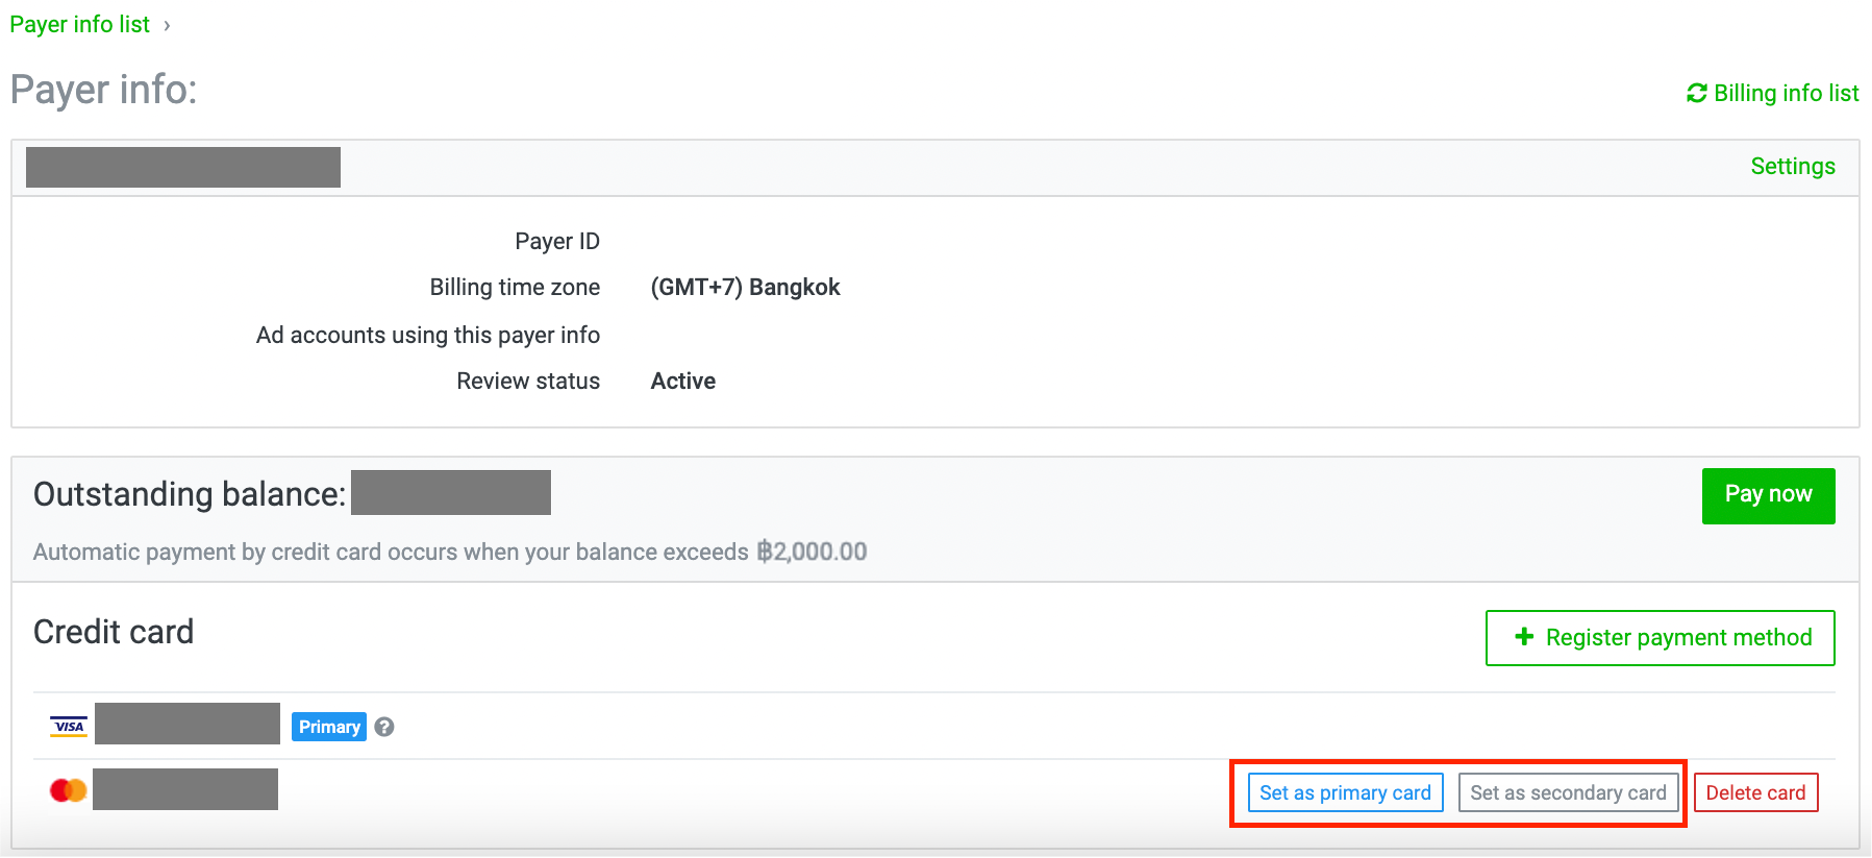
5. Set a secondary card by clicking on the “Set as secondary card” button on the right side of the credit card that you want to set as a secondary card.
(Last updated: October 19, 2020)
You can check your registered credit cards by following the steps below:
1. Click on the “Ad account” tab on the homepage. > Select the ad account linked to your registered credit cards for the information you would like to check.
2. Click on the “≡” icon in the upper left of the Ad Manager screen. > Go to “Settings.” > Select “Billing and payments.”

3. Click on the payer name for the information you want to check.

4. Check the credit card information that appears in the center of the screen.
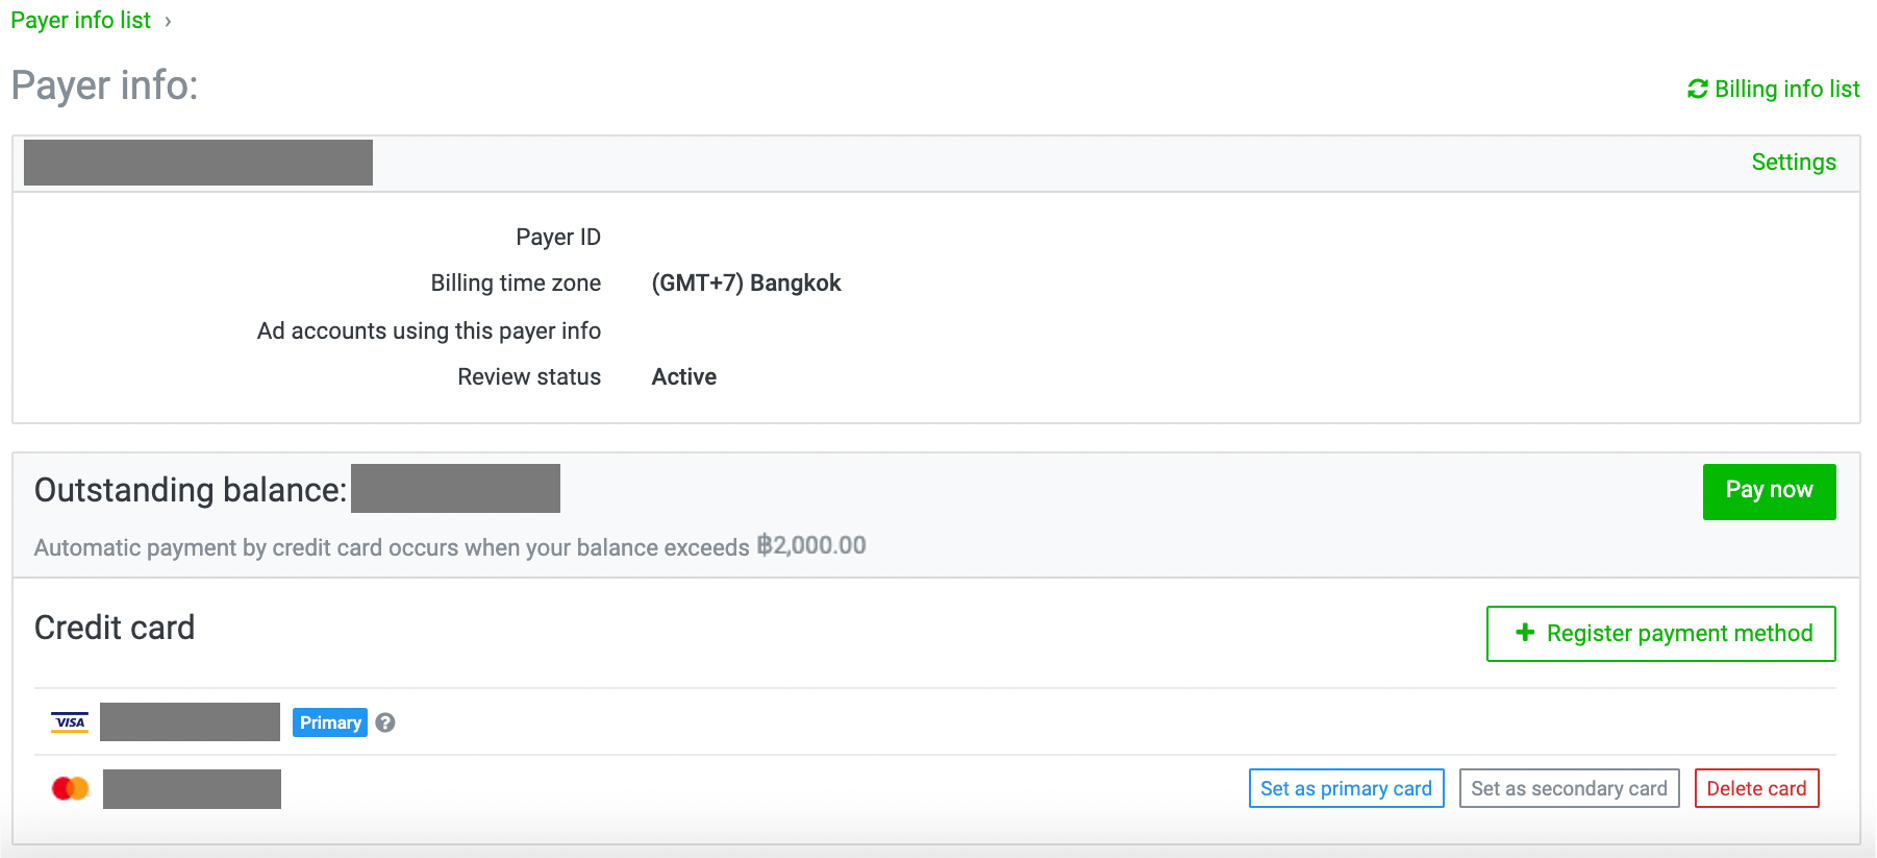
(Last updated: October 19, 2020)
You can change the credit card settings by referring to the information below:
* If you wish to register a new credit card, please see more information here.
To change your credit card priority:
Please see more information on changing credit card priority here.
To delete a credit card:
1. Click on the “Ad account” tab on the homepage. > Select the ad account linked to the credit card you would like to delete.
2. Click on the “≡” icon on the upper left of the Ad Manager screen. > Go to “Settings.” > Select “Billing and payments.”

3. Click on the payer name under which the credit card you want to delete is registered.

4. Delete that credit card by clicking on the “Delete card” button on the right side of the credit card.

* You cannot delete a credit card that has been set as the primary card.
(Last updated: October 19, 2020)
LINE Ads self-serve has 2 main payment methods available.
1. Automatic payment
2. Manual payment
Payment method 1: automatic payment
After your ads run, LINE Ads automatically charges you based on 2 criteria of ad usage: whenever your account reaches a certain amount or a fixed period, whichever reaches first.
1.1 Threshold amount. LINE Ads automatically charges you whenever your account reaches a certain threshold amount, starting from 1,000, 5,000, 10,000 to 15,000 THB. Threshold amount will be updated to another level when successful automatic payment by threshold amount is achieved. With the fourth successful payment, you will continue to be charged at the fourth threshold level or 15,000 THB.
1.2 Fixed period. LINE Ads automatically charges you 20 days after your first ad launch or after your last payment.
*You can check your ending balance at "Billing and Payment"
*If the discount coupon is active, payment will be proceeded with coupon first, before your credit card.
* Your account may be charged several times a day, depending on ad usage.
* If more than 1 credit card is registered, payment will be proceeded with your selected primary card first.
Payment method 2: manual payment
You can make a manual payment anytime by following the steps below.
1. Click on the “Ad account” tab on the homepage. > Select the ad account linked to the payer info that you want to use for making a manual payment.
2. Click on the “≡” icon on the upper left of the Ad Manager screen. > Go to “Settings.” > Select “Billing and payments.”

3. Click on the payer name for which you want to make a manual payment.

4. Click on the “Pay now” button in the center of the screen.

5. Select the credit card for your payment and then click “Pay.” Your credit card will then be charged in full according to the outstanding balance
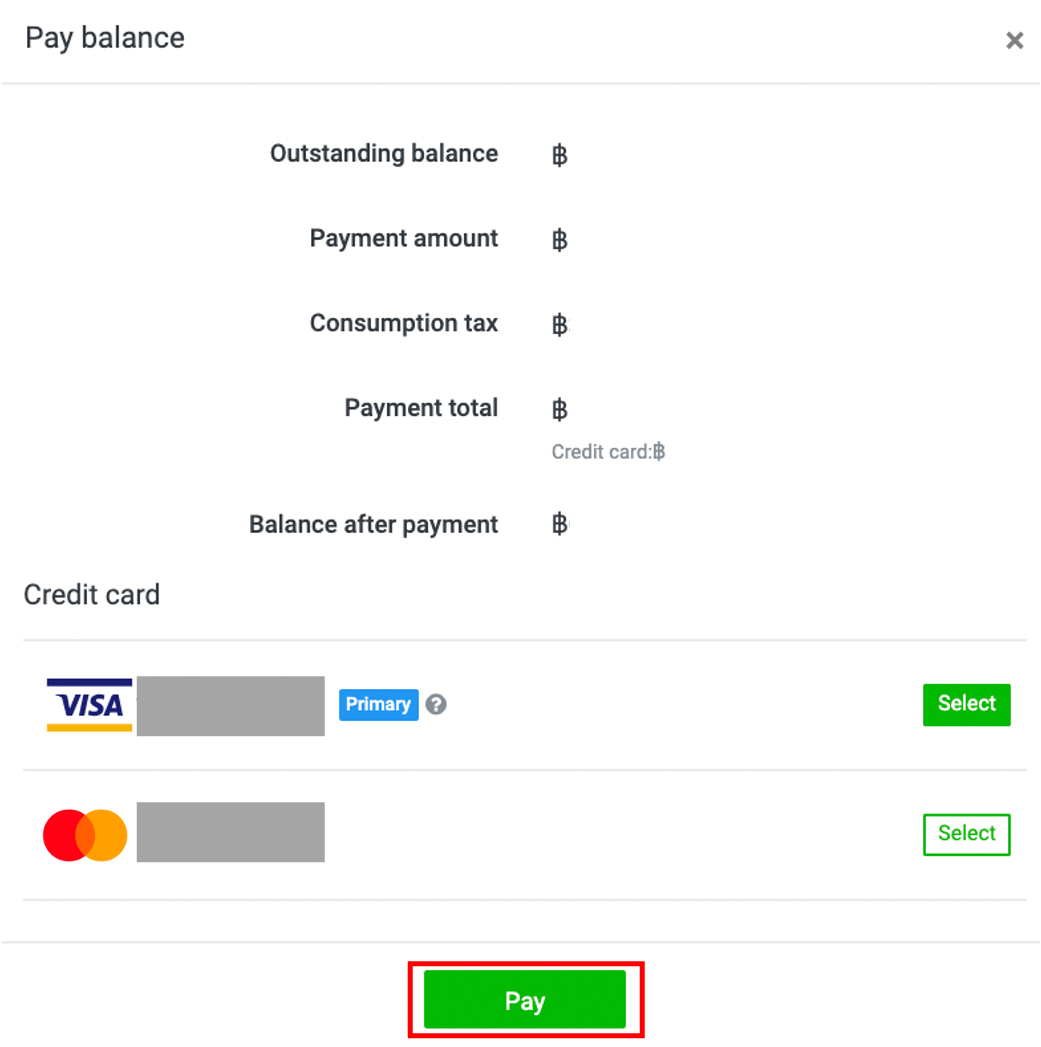
(Last updated: August 25, 2021)
The merchant name “LINE Ads Platform” will appear on your credit card statement.
(Last updated: October 19, 2020)
To use the LINE Ads, you first have to register a credit card.
* You can see the names of the companies issuing credit cards that you can register here.
To register a credit card:
1. Go to the homepage and select the ad account or group for which you want to register a credit card. > Click on an ad account name under the “Ad accounts” tab or a group name under the “Groups” tab.
2. Click the “≡” icon on the upper left of the Ad Manager screen. > Go to “Settings.” > Select “Billing and payments.”

3. On the payer list page, click on the payer name for which you want to register a credit card.
* If you have not added the “Payer info,” please do so before registering a credit card.
* You can see more information on adding payer info here.

4. Click “Register payment method” in the middle of the screen.
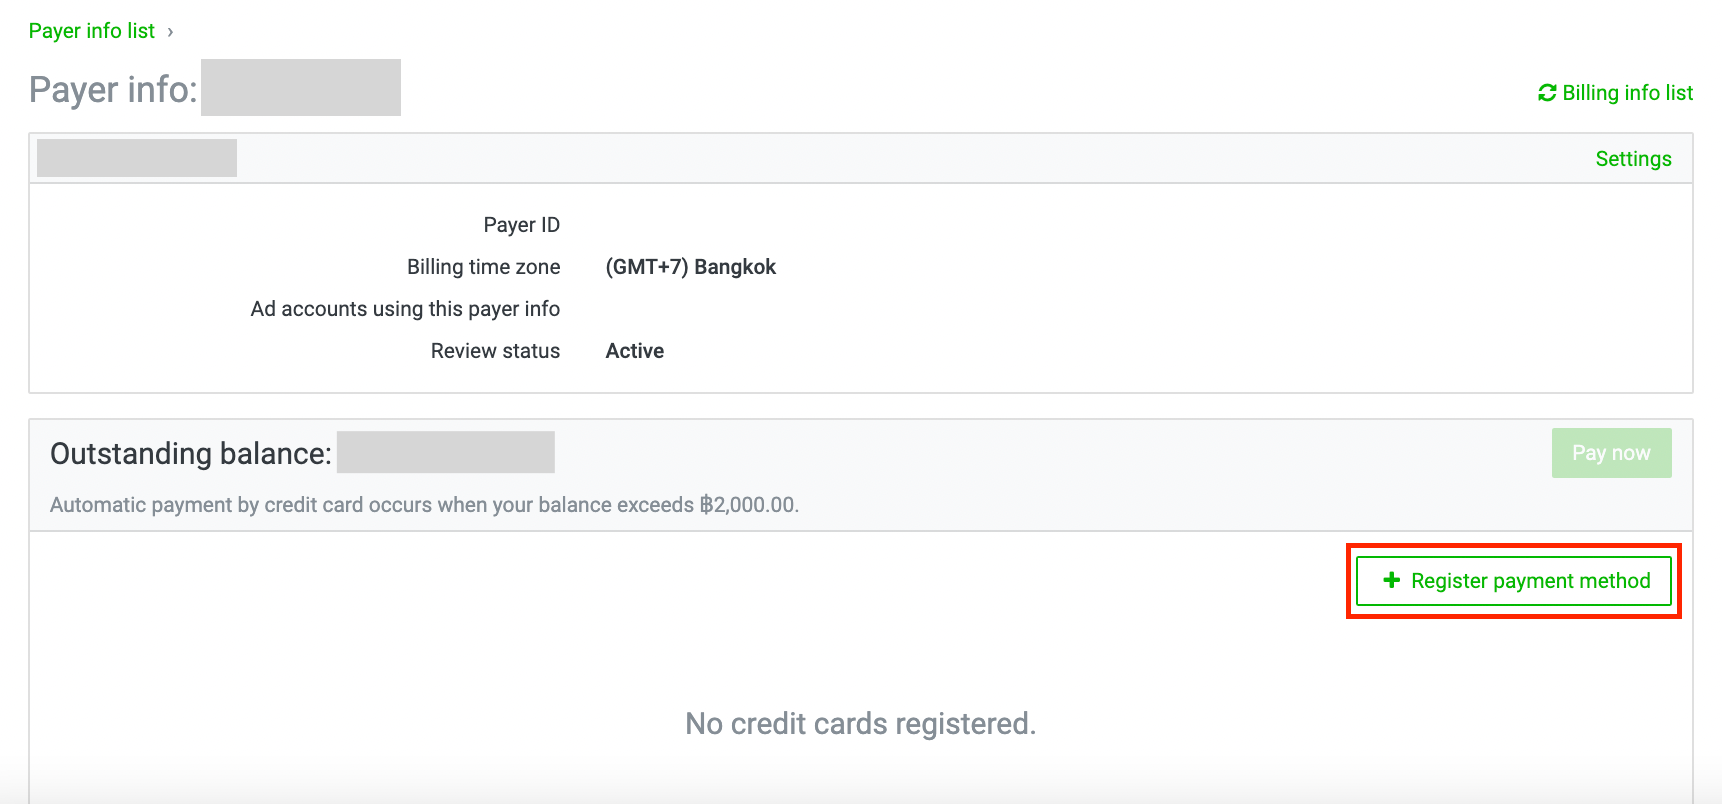
5. If you have not linked your LINE ID to your business account, please follow the steps below:
5.1 Click “Link LINE ID.”

5.2 Click the “Link” icon on the right side of the “LINE” field.
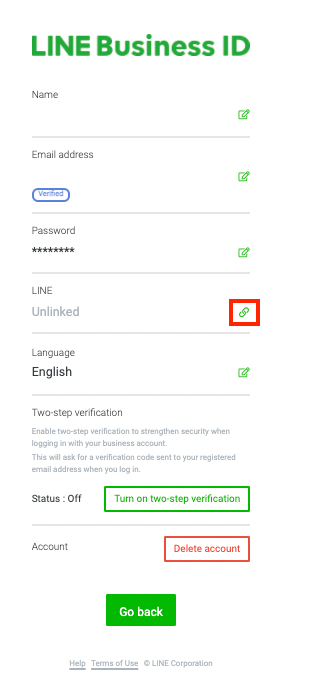
5.3 Enter the email address and password of your LINE Account. > Click “Log in.”
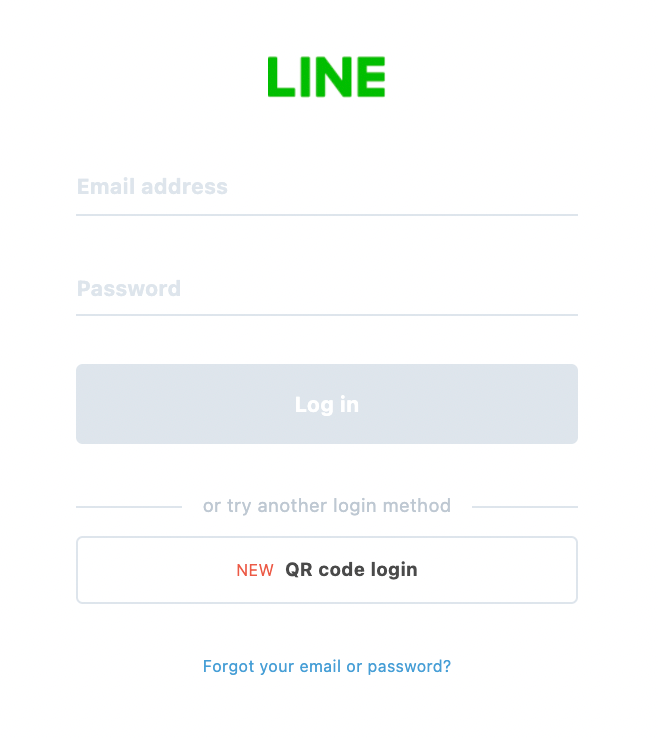
5.4 Click on the “Go back” button if the system does not automatically bring you to the ad groups screen.
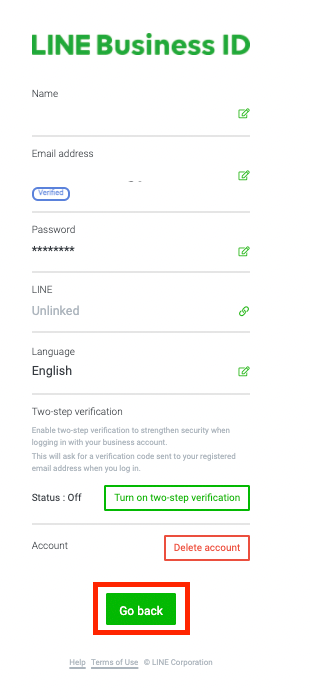
6. Select the “Rabbit LINE Pay (credit card)” or “Credit card” option.
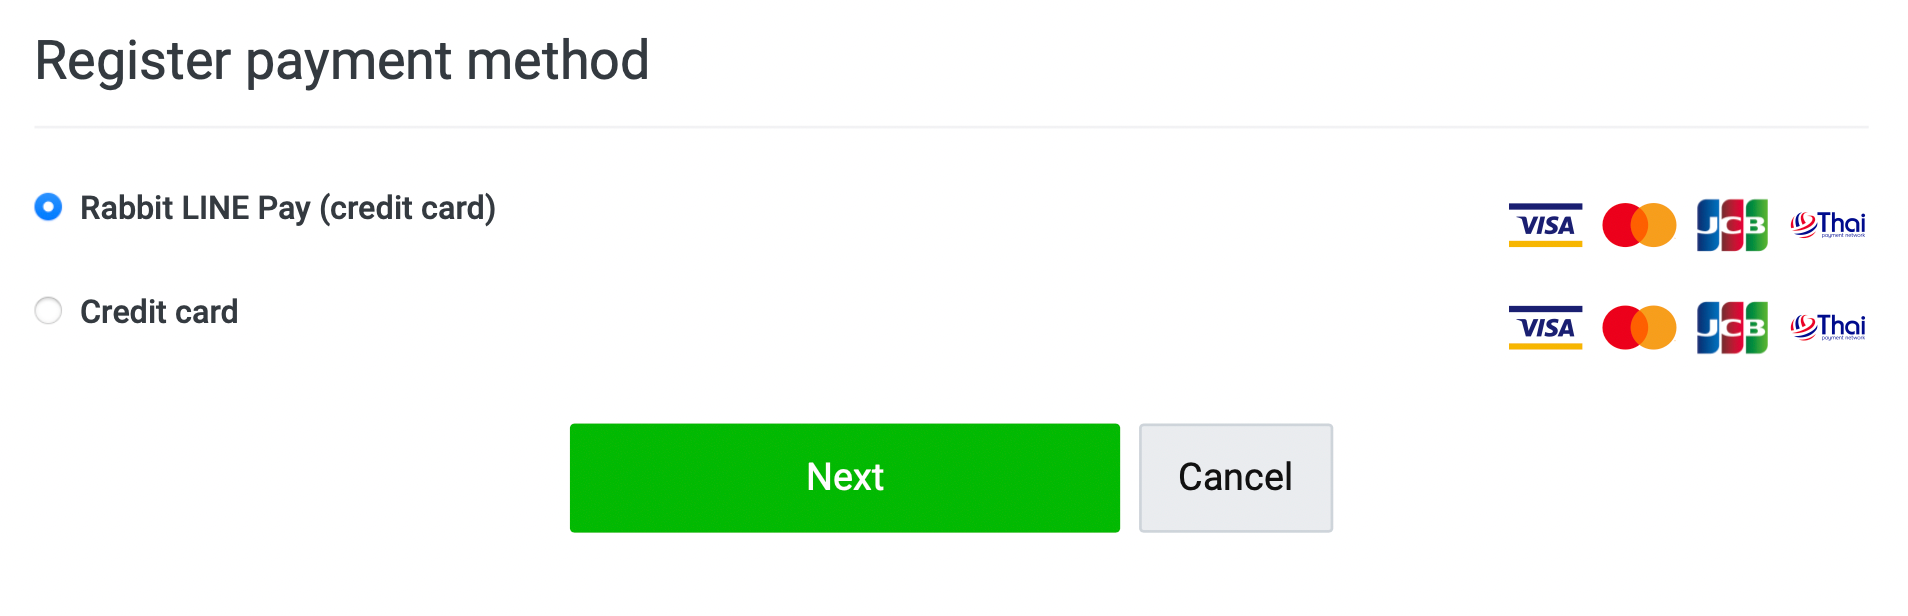
Please check the smartphone that you use for logging in to your LINE Account.
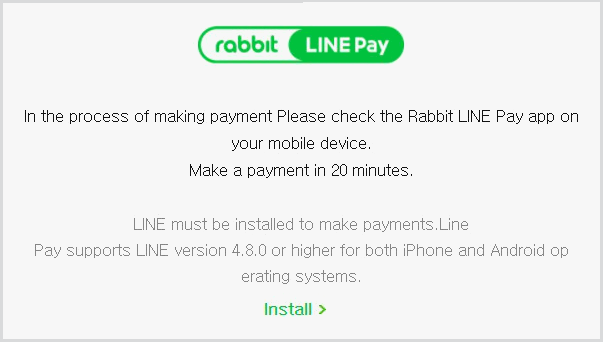
6.1.2 If you have not registered a credit card for your LINE Account, please register a new card first. If your LINE Account already has a credit card registered, please select the existing credit card and then click “Register.”
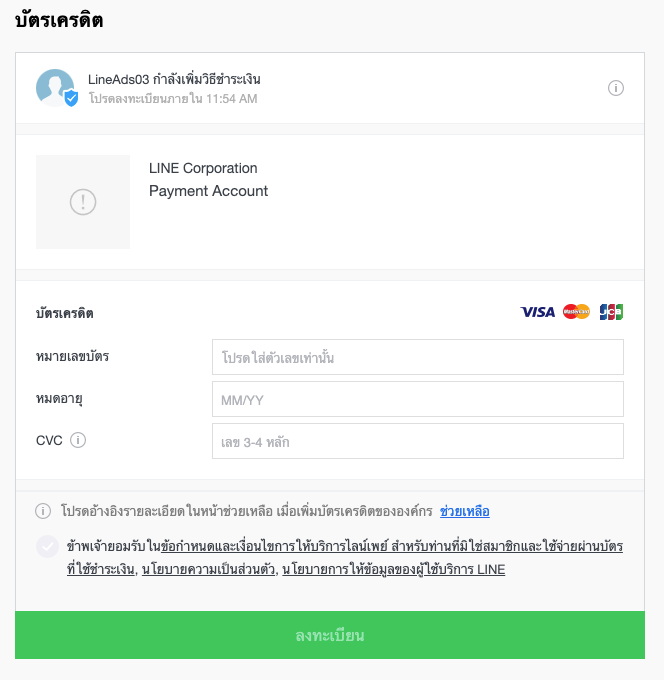
6.2 If you select the credit card option:
6.2.1 Please enter the card number, expiration date and security code (CVV/CVC) of the credit card you would like to register.

You can register multiple credit cards and set credit card priority for payment as well.
* You can see more information on setting credit card priority for payment here.
(Last updated: October 19, 2020)
It is not allowed to transfer advertisement coupon and discount coupon to a third person.
(Last updated: March 31, 2021)
System does not accept re-registration of the same coupon, even though the coupon still has remaining balance or does not yet expire.
(Last updated: March 31, 2021)
Users who receive advertisement coupon within a valid campaign period by LINE Company Thailand can check coupon usage method here. Please note that this function is only available to LINE Ads Self-Serve accounts.
Methods to register coupon
1. Select ad account or group name for which you want to register a coupon. Go to homepage > Click on the “Ad account” or “Group” tab.
2. Click on the “≡” icon in the upper left of the Ad Manager screen. > Go to “Settings.” > Select “Billing and payments.”
3. Click on the payer name for which you want to register a coupon in Payer info list.
4. Click “Register payment method” in the middle of the screen.
5. Select the “Coupon” option > click “Next”
6. Add coupon code you have > click “Add”
7. Once the coupon registration is done, coupon will de displayed below credit card information you registered earlier.
* Only 1 coupon can be registered at a time. Please remove previously registered coupon before adding new coupon code.
Methods to remove coupon
1. Select ad account or group name for which you want to remove a coupon. Go to homepage > Click on the “Ad account” or “Group” tab.
2. Click on the “≡” icon in the upper left of the Ad Manager screen. > Go to “Settings.” > Select “Billing and payments.”
3. Click on the payer name for which you want to remove a coupon in Payer info list.
4. Click “Remove” on the right side of the registered coupon displaying in the middle of the screen.
5. Click “Ok” in the confirmation window
*You can delete coupon of any status, regardless of the remaining balance. But you cannot re-register and use the removed coupon.
(Last updated: March 31, 2021)
You can check your payment information by following the steps below:
1. Click on the “Ad account” tab on the homepage. > Select the ad account linked to the payer for the payment information you want to check.
2. Click on the “≡” icon in the upper left of the Ad Manager screen. > Go to “Settings.” > Select “Billing and payments.”

3. Click on the payer name for the payment information you want to check.
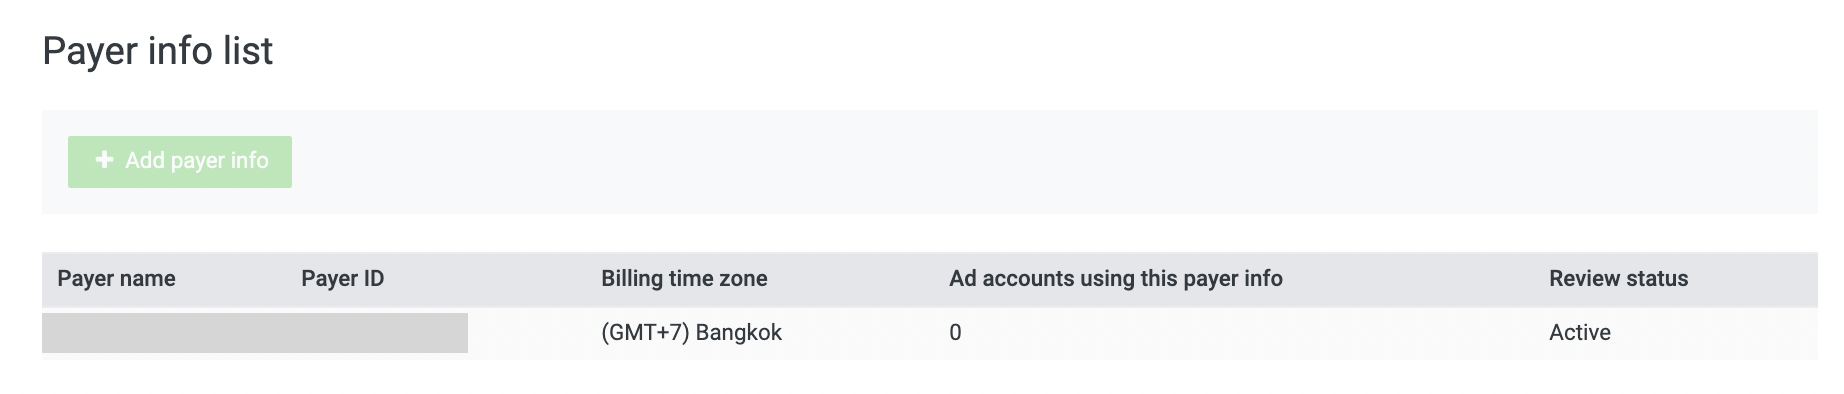
4. You can check the “Summary,” “Costs,” and “Payments” for your ad delivery in “Transactions.”
* When you click “Download detailed invoice,” you can download a PDF file of your detailed payment information.
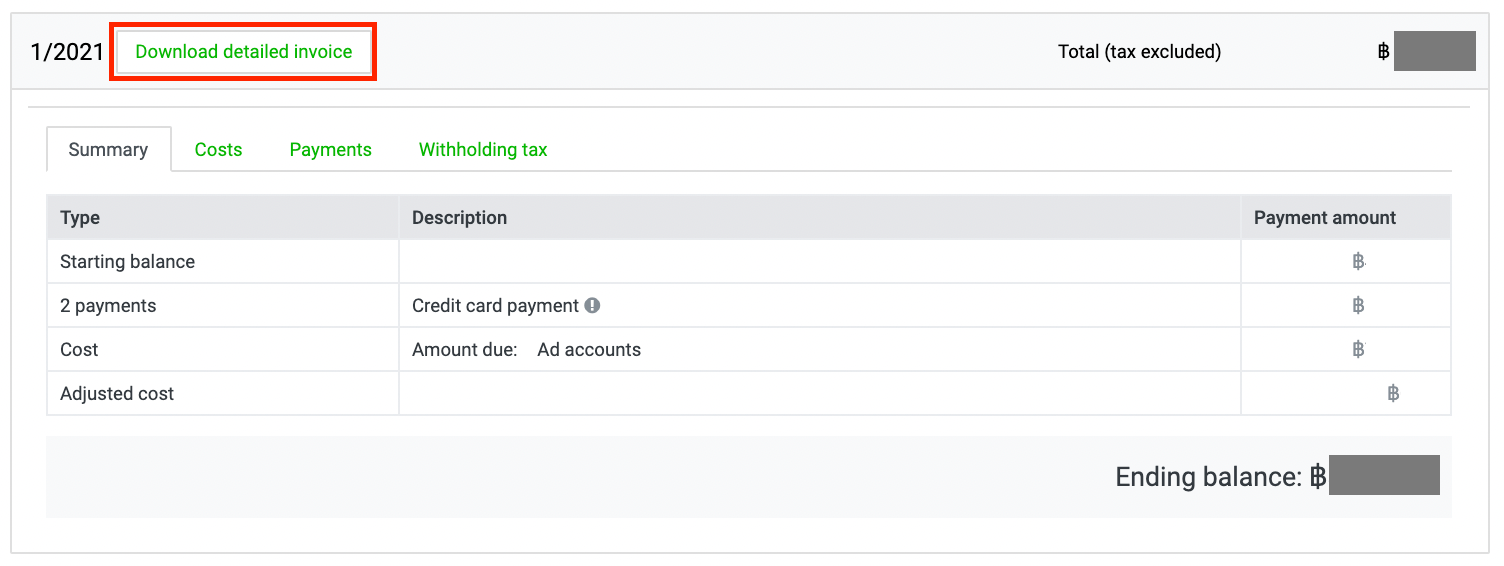
Note:
- The numbers on the admin panel (report, dashboard) are only estimates; they, can therefore be different from the actual finalized numbers.
- If the costs have not been finalized, they can still be adjusted and continue to change. The system will adjust the costs when they exceed the fixed budget or when there are billable events carried over to the next month after the scheduled ad distribution period if the monthly spending limit has already ended. After that, the adjusted costs above will be automatically credited back to you.
- Only the costs in “Payments” are displayed as tax-inclusive costs. Otherwise, they are all tax-exclusive.
- The detailed payment information is available for download in the month after the payment has been made.
- There is no postal document delivery service available; you can directly download and print out the information from the system.
- The detailed invoice will use the payer info that you have registered; you cannot change the payer info on the invoice.
Payment manager screen
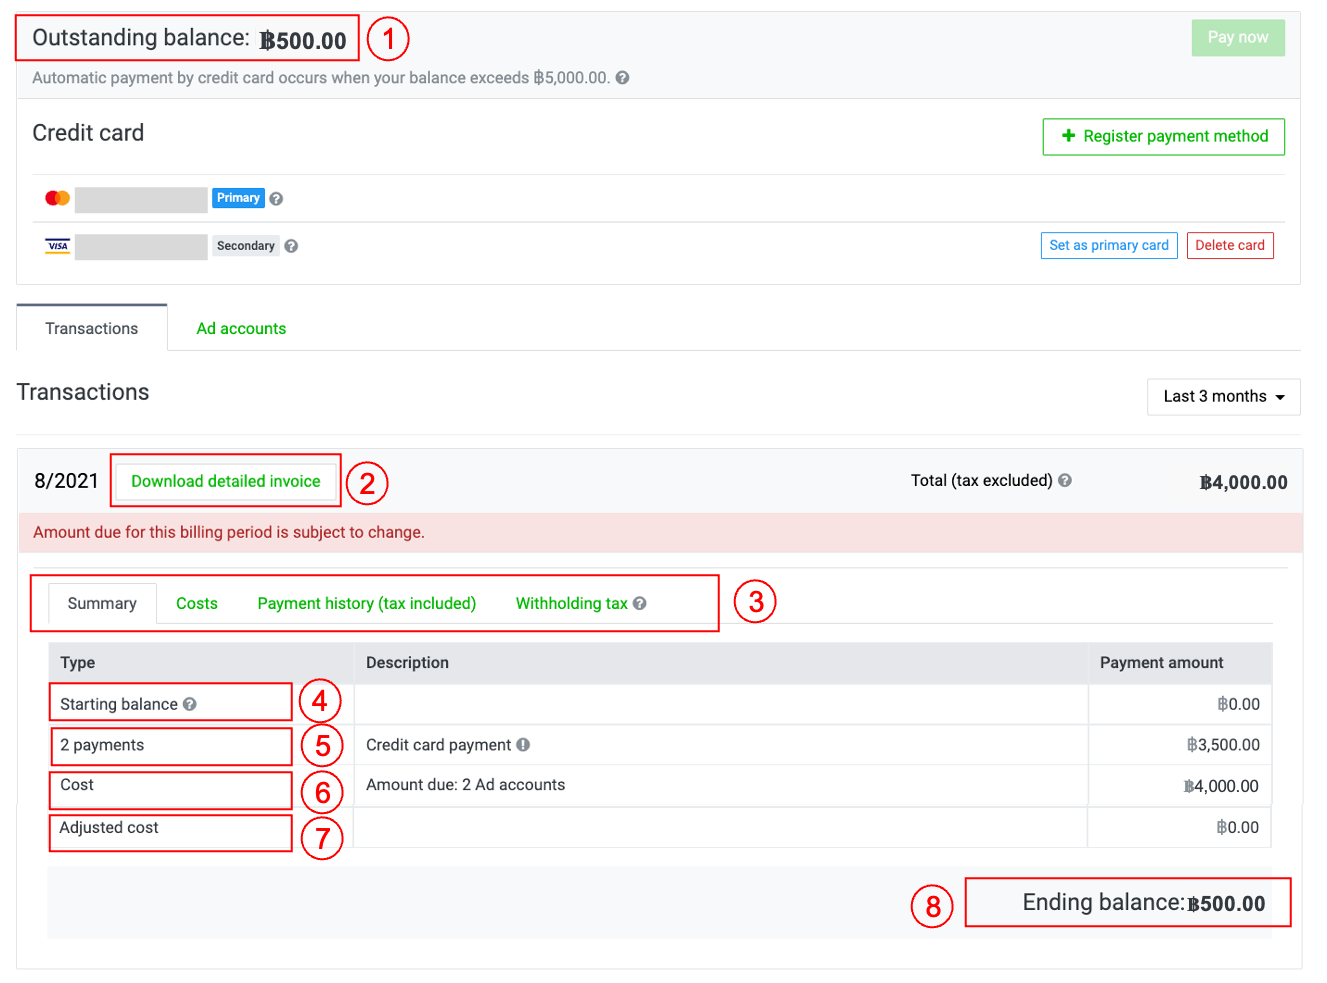
1. Outstanding balance
This is where you can view your remaining unpaid balance.
2. Download detailed invoice
The detailed billing statement is available for download in PDF.
3. Main menu
- Summary: This is where you can see the billing amount summary from all payer IDs.
- Costs: This includes the billing amount for each individual ad account.
- Payments: This shows your credit card payment history. You can download the receipt/ tax invoice here. Please click here for more information.
- Withholding tax: This is where you can view the history and review the status of your withholding tax refund requests. Please click here for more information.
4. Starting balance
This shows the outstanding balance at the beginning of each month. Please click here for more information.
5. Payments
This shows the number of credit card or coupon payments you have made.
6. Costs
This is where you can see the ad cost from all ad accounts connected to the same payer ID.
7. Adjusted cost
This is where you see the adjusted amount. For example, you set campaign budget at 4,000 THB and the system overspends 2 THB. System will automatically deduct 2 THB from the billing.
8. Ending balance
- This shows remaining balance to be paid by month.
- Once the month ends, if the ending balance still occurs, this amount will become the starting balance in new month.
(Last updated: December 8, 2020)
If an automatic payment cannot be processed successfully with your registered “Primary card” or “Secondary card,” all ad accounts linked to that payer info will be suspended.
If this happens, please make the payment by following the steps below:
* Please also refer to further information here.
To make a manual payment:
1. Click on the “Ad account” tab on the homepage. > Select the ad account name linked to the payer info for which you want to make a manual payment.
2. Click on the “≡” icon in the upper left of the Ad Manager screen. > Go to “Settings.” > Select “Billing and payments.”

3. Click on the payer name for which you want to make a payment.

4. Click on the “Pay now” button in the center of the screen.
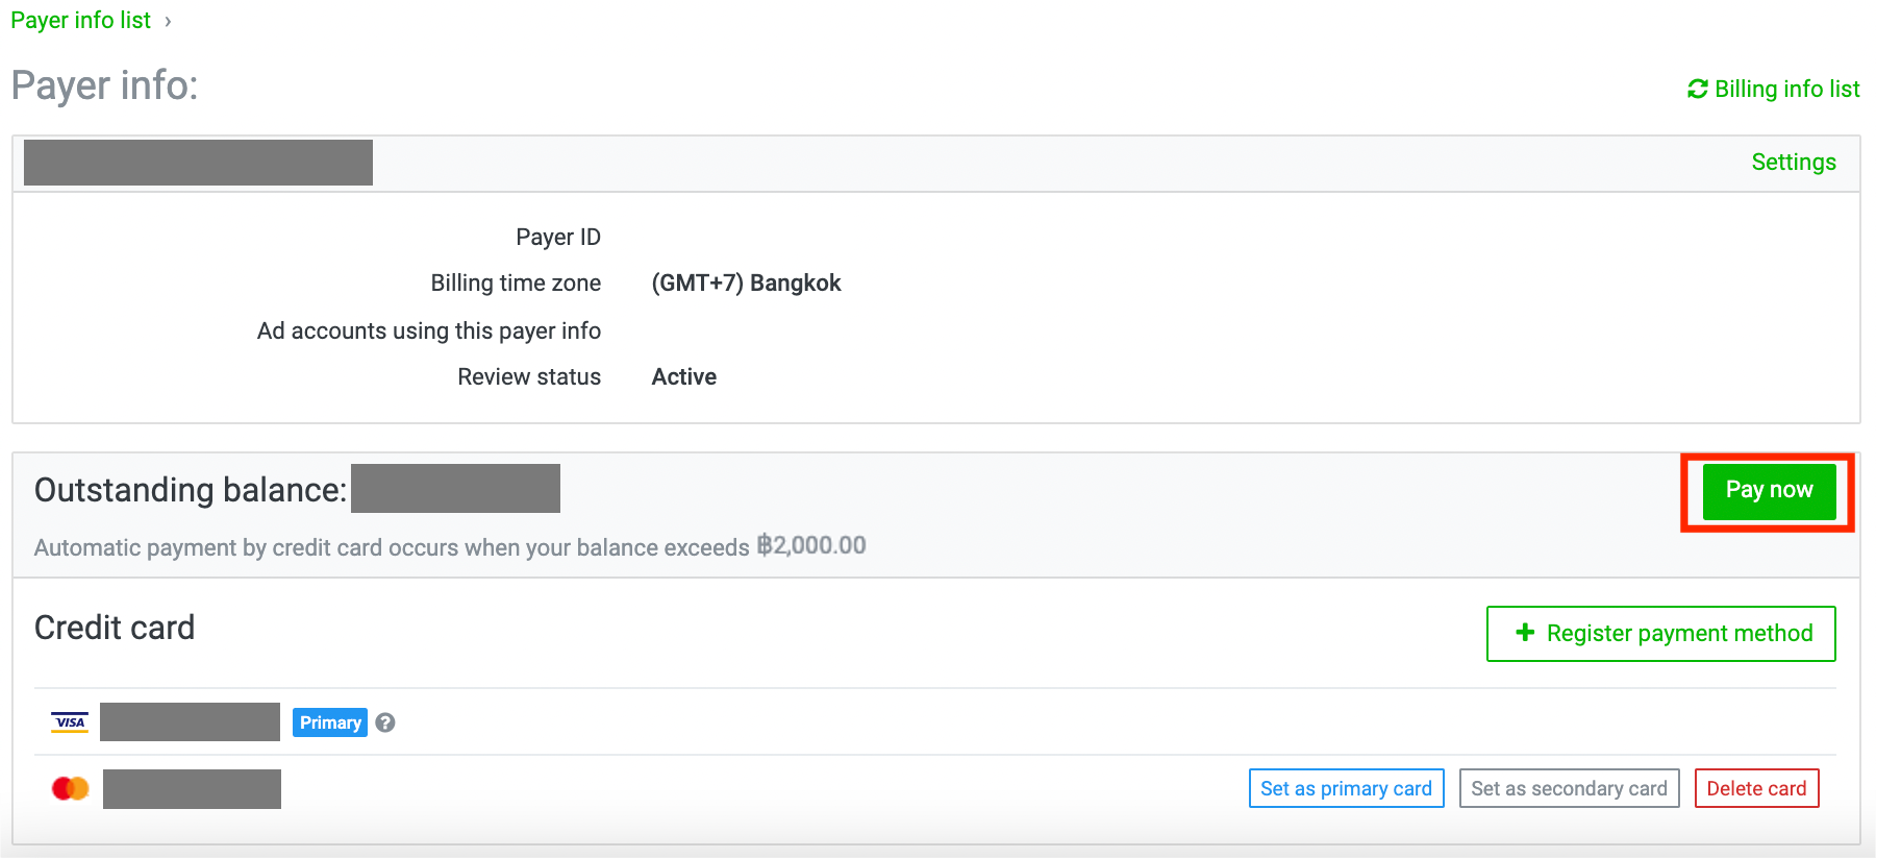
5. Select the credit card for your payment and then click “Pay.” Your credit card will then be charged according to the amount that appears in “Outstanding balance.”
* Please be sure that you select a valid credit card when making a payment.

(Last updated: October 19, 2020)
If it is necessary to make an adjustment to the cost after payment has already been made due to campaign budget overruns or failed activities, the adjusted amount will be shown in your ad credit balance, which can be used for the next ad delivery.
However, if you no longer want to use this service, you can contact us to request a refund through our Inquiry Form.
Before making an inquiry, please be sure to change the “Status” of every campaign that links to the “Payer info” to “Paused” for which you would like to request a refund by following the steps below:
1. Click on the “Ad account” tab on the homepage. > Select the ad account name that links to the “Payer info” for which you would like to request a refund.
2. Click on the “Campaign” tab on the ad Manager screen. > Click the arrow “▼” next to the blue circle. > Change the status to “Paused” and repeat the same for the rest of the campaigns.
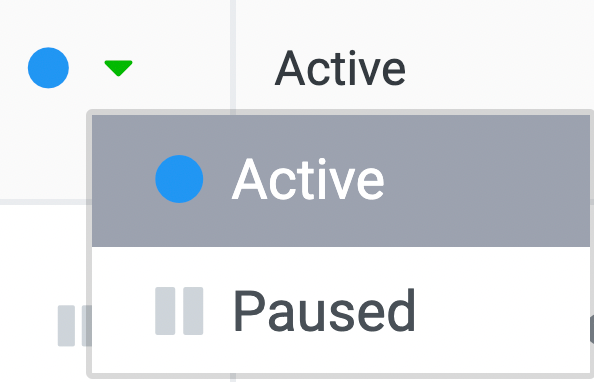
* If the “Payer info” for which you want to request a refund has been linked to multiple ad accounts, please repeat the above steps for every account.
After the refund has been completed, the “Payer info” and any ad account that links to that “Payer info” will be terminated and no longer in use.
Any campaigns, ad groups, and ads created under that ad account will also be terminated.
The payer info and ad account will be terminated after consent from the user has been granted.
Note:
* The refund will be completed through bank transfer to your Thailand bank account only.
* Transfers through a foreign bank account are not available.
* Please be sure to read and understand the information about transfer fees in our LINE Ads Terms and Conditions of Use.
(Last updated: October 19, 2020)
LINE Ads Guidelines provide advertisers with guidance on the types of ad content that are allowed. The advertiser has the responsibility to understand and comply with all relevant laws, regulations, and policies. LINE reserves the right to reject, approve, or remove any ads for whatever reason at LINE’s sole discretion.
The content of these guidelines is not intended for the purpose of offering legal consultation or advice, and there might be other applicable advertising-related laws apart from those stated in this set of guidelines; hence, it is advised that you seek further information by examining all applicable laws.
LINE is not liable for an advertiser’s activities or any other events related to this set of guidelines. You shall agree to not demand compensation from LINE or its affiliates, officers, representatives, and employees, nor to take legal proceedings or pursue any actions against LINE and/or any or all of the above-stated parties for incidents arising from or in connection with your use of or breach of compliance with this set of guidelines, nor shall LINE and/or any or all of the above-stated parties be held responsible for or make any compensation resulting from claims for compensation, losses, damages, lawsuits, judgments, incurred legal costs and expenses, or attorney’s fees.
(Last updated: October 19, 2020)
The LINE Ads is an advertising platform delivering ads to audiences of all ages, from children to adults.
For this reason, LINE Corporation places great importance on the following questions when it comes to ad delivery on the LINE Ads: “How would the audience (users) feel about the information they receive?”; “Is the needed information delivered to users in an appropriate way?”; “Does the delivered content cause negative feelings or discomfort to the users?”; and “Can all users feel safe and secure using the service?”.
(Last updated: October 19, 2020)
As a matter of course, a review of a new ad account is carried out in accordance with criteria solely established by LINE Corporation. If it is deemed that the ad account does not meet the criteria, LINE Corporation reserves the right to reject such account setup.
Please see more information on new ad account reviews here.
(Last updates: January 15, 2021)
1. Ad submission information
Websites
- Image, Video, Carousel, Image (small)
You can choose uploaded assets from “Media”
* “Video” ad format is not available if choosing “Payment: CPC” in the ad group
- Title
Enter text
- Description
Enter text
- Call to action
Choose from management panel.
- Landing page
Enter landing page URL
- Click URL (Optional)
Enter URL with tracking parameter generated by your tracking tool.
*Please enter URL with tracking parameter as click URL.
- Impression tracking URL (Optional)
Enter the URL generated by your third-party tracking service.
The tracking feature supports Nielsen digital ad ratings.
Application
- Image, Video, Carousel, Image (small)
You can choose registered application from “Media”
* “Video” ad format is not available if choosing “Payment: CPC” in the ad group
- Title
Enter text
- Description
Enter text
- Call to action
Choose from management panel.
- App
Choose registered application from “Media”
- Landing page
Enter app store or landing page URL
- Click URL (Optional)
Enter URL with tracking parameter generated from SDK
- Impression tracking URL (Optional)
Enter the URL generated by your third-party tracking service.
The tracking feature supports Nielsen digital ad ratings.
2. Media upload information
Image, Carousel
- Image size: 1200×628 pixels, 1080×1080 pixels, 600×400 pixels
* Carousel only support 1080×1080 pixels
- File format: jpg, png
- File size: Max 10 MB
Video
- Video: H.264, Main/High Profile (Recommended), Square pixels, Constant Frame Rate (CFR),
Progressive scan
- Sound: AAC, 128kbps above (Recommended), Monaural or Stereo
- Frame rate: Max 30 fbs
- File format: mp4, mov
- Aspect ratio
16 : 9 (Width: 240 - 1920 pixels, Height: 135 - 1080 pixels)
1 : 1 (Width: 600 - 1280 pixels, Height: 600 - 1280 pixels)
9 : 16 (Width: 135 - 1080 pixels, Height: 240 - 1920 pixels)
- Resolution: Max 1080 p (Max 720 p during ad display)
- Bit rate: Max 8 Mbps
- Length: 5 - 600 seconds
- File size: Max 1 GB
Application
- Platform
Choose iOS or Android
- App name
Enter official name of application
- App store URL
Enter App Store URL for iOS and Google Play URL for Android
(Last updated: June 7, 2021)
Ad design should contain natural flow, clear focal point, as well as attractiveness. Ad should not contain too many texts. Please try to use little or no text in ad image when possible. Excessive text in ad images may result in your ad reaching fewer users.
(Last updated: April 1, 2021)
Manual bidding amount configuration is a feature that enables you to choose whether to bid by CPC or CPM.
If you choose the CPC, ad delivery will take eCPM into account.
If you choose to bid by CPM, ad delivery will run based on the set CPM.
(Last updated: June 14, 2019)
Budget allocation is applied to the daily budget that you have set for an ad group.
Your daily budget is evenly allocated to ensure even ad visibility throughout the day.
* Budget allocation is applied regardless of whether you set the bidding method as automatic or manual.
The evenly allocated budget can be revised multiple times in 1 day, depending on how it has been spent.
Sometimes, the number of ads delivered may exceed the daily budget you have set for the ad group. This depends on how your ad delivery condition is at the time.
However, the budget allocation feature is not applied to the campaign’s maximum spending limit.
(Last updated: June 14, 2019)
If you reset the auto-bidding or make changes to its settings, the system needs to start a new learning process. Then the word “Learning” will be displayed on the right side of the ad delivery status.
Note:
* It may take a while for the Learning status to be visible.
* Learning means the process where the system is learning and calculating the best bidding amount in order to effectively meet the ad objectives through maximizing conversions or app installs.
(Last updated: September 30, 2019)
Unfortunately, the details on the auto-bidding optimization system cannot be disclosed.
(Last updated: October 19, 2020)
You can create up to 100 groups per User ID, with a maximum of 3 group layers.
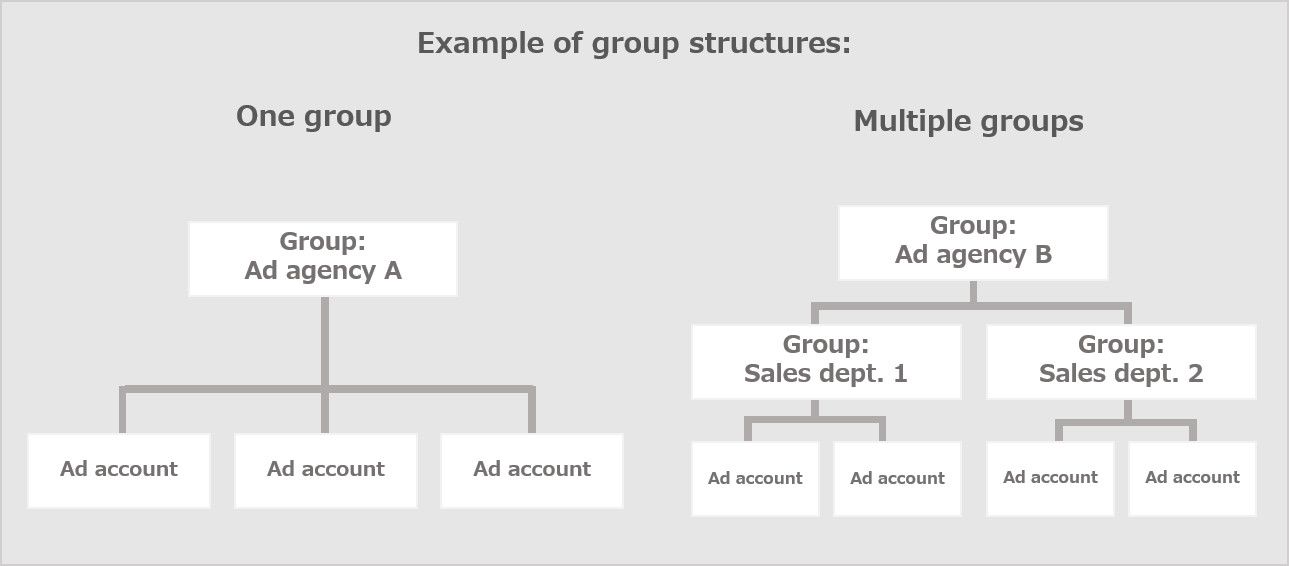
(Last updated: August 1, 2019)
You cannot delete any group that has already been linked to the approved ad account.
(Last updated: August 1, 2019)
You can move an ad account to another group but cannot move an ad account within the same sub-group structure.
(Last updated: August 1, 2019)
Editing an ad account
You cannot edit other information apart from the ad account name and payer info.
Deleting an ad account
You can delete the ad account that has not been approved yet. However, after the account is approved, it can no longer be deleted; please be careful with entering the required information when creating an ad account.
(Last updated: August 1, 2019)
If your account’s LINE ID on LINE Official Account Manager is set to be hidden, that account will not appear on search results.
Please recheck and change the settings of your LINE ID on LINE Official Account Manager.
(Last updated: August 1, 2019)
When you update a profile picture icon on the LINE Official Account Manager, the ad delivery system will change it for you after some time has passed.
* The icon does not change right after the update is completed.
(Last updated: August 1, 2019)
If you use Self-Serve accounts, the bill will be issued in Thai baht only.
(Last updated: October 19, 2020)
The costs exceeding your campaign spending limit will not be included in your billing, but the system will adjust those excess amounts to a negative balance instead.
(Last updated: August 1, 2019)
If you change your campaign spending limit in the middle of the month, the updated spending limit will be applied for the rest of that month.
If you wish to change the spending limit for the next month, please create a new campaign or adjust the spending limit after you have already entered into the new month.
(Last updated: August 1, 2019)
You may be billed after the campaign schedule has already ended. Any amount that exceeds your campaign spending limit will be subtracted from your billing before it is finalized.
However, if you change the end date of your campaign within 25 hours from the time when the ad setting is completed, costs incurred after the campaign has ended may be included in your billing.
(Last updated: October 19, 2020)
You can extend your campaign period after the campaign ends, even though your remaining campaign budget is lower than the minimum spending limit.
(Last updated: August 1, 2019)
You can use common characters and symbols when setting ad names or descriptions, but emojis or characters that only display on specific devices are not allowed.
(Last updated: August 1, 2019)
The actual aspect ratio of your video may differ from how it appears on the screen, depending on the video editing software you are using. Please check and adjust your video aspect ratio before you retry uploading.
(Last updated: August 1, 2019)
It is probably because the file name extension does not match the actual file format. Please recheck the file format and try uploading it again.
(Last updated: August 1, 2019)
If you have problems while uploading images or videos, please see if the file specifications listed below comply with these Guidelines.
- File resolution and size
- Image or video’s file format
For image, you can use feature “Crop” to cut and select the image size that the system supports for file upload.
(Last updated: October 1, 2021)
Same base codes
You can insert only 1 set of base code in 1 URL.
Different base codes
You can insert multiple different base codes in 1 URL.
Also keep in mind that inserting more than 2 sets of the same base code in 1 URL, can affect the performance tracking, please be careful when inserting the base code.
(Last updated: August 1, 2019)
Using Google Tag Manager or Yahoo! Tag Manager does not cause any issues in ad delivery.
For more information on how to use a tag manager to manage tags, such as inserting codes or configuring tag triggers, please directly contact the service provider of the tag manager that you are using.
(Last updated: August 1, 2019)
If you have trouble inserting JavaScript tags, you can track your ad performance by using image tags. Simply add the base code with the <noscript> ... </noscript> part removed and then add the image tag.
Nevertheless, please note that you cannot solely use the image tag to track your ad performance. You need to create a custom conversion specifying the URL of the page that has the image tag inserted before adding it to your service.
(Last updated: August 1, 2019)
If a conversion (CV) has not occurred, the conversion status may appear “Inactive.”
Please wait until a CV occurs.
If the “Inactive” status remains unchanged for a long period of time, it is possible that there are some issues with LINE Tag insertion. Please recheck to confirm that it was inserted properly.
(Last updated: October 19, 2020)
You can check your tag status by following the steps below:
1. Click on the “ad account tab” tab on the homepage. > Select the ad account name that you want to check the tag status.
2. Click on the “≡” icon in the upper left of the Ad Manager screen. > Go to “Shared library.” > Click “Tracking (LINE Tag).”
3. Check the status of each tag under “Status.”
(Last updated: October 19, 2020)
Yes, the audience data is compiled using other data in addition to the data on LINE.
(Last updated: August 1, 2019)
You can set the retention period for your audience to last from 1 to 180 days.
Furthermore, the system will start gathering the audience data as soon as a LINE Tag is inserted in your target page. This enables you to gather the data up to 180 days prior to the time when the audience is created.
(Last updated: August 1, 2019)
The scope of the “Everyone who visited website” option in the Web Traffic Audience includes all pages that have base codes inserted.
(Last updated: August 1, 2019)
You can create up to 500 audiences.
Meanwhile, the maximum limit of lookalike audiences you can create is 10.
(Last updated: August 1, 2019)
You can upload up to 1.5 million IDFA lines at a time.
(Last updated: August 1, 2019)
The users listed below are not included in the “LINE Official Account Audience”:
- Users who blocked and deleted your LINE Official Account from their friends list
- Users who have not logged into LINE for a long period of time
Consequently, the number of users in the “LINE Official Account Audience” does not match your LINE Official Account Manager's total number of followers and blocked users.
(Last updated: August 1, 2019)
The estimated audience size differs, depending on the types of audience.
Web Traffic Audience
The number of website visit users
Mobile App Audience
The number of users with triggered events
IDFA/AAID upload
The number of data uploads
LINE Official Account Audience
The number can change every day depending on the number of LINE Official Account’s followers.
Valid friends: This means the number of friends that do not block your LINE Official Account (except for some users).
Friends blocking the account: This refers to the number of users blocking your LINE Official Account.
(Last updated: August 1, 2019)
If an event has not been triggered, the event name will not appear on the drop-down list. This means there is no event available to choose from.
In the instance when the event does not show on the drop-down list, even though you have already configured the settings of that event on the SDK, the possible causes might be as follows:
- SDK linking fails.
- An error occurs in the event settings on the SDK side.
* Once an event name appears, it stays undeletable for 180 days, so please be careful when proceeding with this process.
(Last updated: August 1, 2019)
Please recheck the following to confirm if they are all correct:
Specifying a URL
- Ensure that the registered URL is correct.
- Ensure that the tag is inserted on the specified page properly.
Setting an event code
- Ensure that the event code is set properly.
If you are using a tag manager, please direct your inquiries to the service provider of that tag manager.
(Last updated: October 19, 2020)
Audience size of 100 or more is required.
For the following custom audiences, you can add more data onto the file before uploading again.
- Upload IDFA/ AAID
- Upload phone numbers
- Upload email addresses
For the following custom audiences, you can wait for the audience size to automatically increase after continuous usage.
- Web Traffic Audience
- Mobile App Audience
- LINE Official Account Audience
- Video view audience
(Last updated: October 1, 2021)
When your uploaded audience file got “contains data in an invalid format” error, you can download the file for validation.
The most commons errors include:
1. If any other details are found in the first row, please remove them and always fill your first row with the raw data you want to upload
2. Enter only one raw data per one row
3. There should be no spaces before the raw data
4. There should not be any irrelevant symbols in the data such as a comma (,), a plus sign (+), or other special characters.
5. All data should be aligned in the same format.
Note:
- Raw data means IDFA/ AAID, phone number, or email address.
- Please check additional detail on creating audience here
(Last updated: October 1, 2021)
The conversion code’s tracking period lasts 30 days.
If you use the custom conversion code, you can set its tracking period to last from 1 to 180 days.
(Last updated: August 1, 2019)
The conversion code’s tracking period lasts 30 days.
If you use the custom conversion code, you can set its tracking period to last from 1 to 180 days.
(Last updated: August 1, 2019)
The conversion code’s tracking period lasts 30 days.
If you use the custom conversion code, you can set its tracking period to last from 1 to 180 days.
(Last updated: August 1, 2019)
You can set a custom conversion by following the steps below:
1. Click on the hamburger menu icon in the upper left of the screen. > Select “Conversions.”
2. Then click “+ New custom conversion.”
3. Enter all general information and set conversion rules. Finally, click “Save.”
If the conversion status reads “Active,” that means the system is currently tracking the custom conversions. If any custom conversion is no longer used, please update its status to “Paused.”
(Last updated: August 1, 2019)
The maximum number of conversions you can create is 100. Please also note that you can edit only the custom conversion’s “Name” and “Description” once it has been created.
(Last updated: August 1, 2019)
The “Last contact” shows the date and time when the custom conversion was last tracked.
(Last updated: August 1, 2019)
The system may sometimes fail to process the data correctly if users perform certain actions on their devices.
Actions that cause errors in tag data processing
- Repeated taps on a button
- Reloading a page
In addition to the above user actions, users’ internet connection environment or data transmission of other tags, can also cause errors in the tag data processing.
(Last updated: October 19, 2020)
Measurement Partners providing the entitled SDKs, you can link to your LINE Ads include the following:
- adjust
- AppsFlyer
- Kochava
You cannot use the SDKs from other service providers that are not listed above because LINE Ads has not partnered with them.
(Last updates: October 19, 2020)
Although you have deleted an event from the SDK, it can still appear on the list of custom conversions for the next 180 days, from when the conversion was last tracked.
(Last updated: August 1, 2019)
You can refer to the following for more information:

(Last updated: October 19, 2020)
If an event has not been triggered, the event name will not appear on the drop-down list. This means there is no event available to choose from.
In the instance when the event does not show on the drop-down list even though you have already configured the settings of that event on the SDK, the possible causes might be the following:
- SDK linking fails.
- An error occurs in the event settings on the SDK side.
* Once an event name appears, it stays undeletable for 180 days, so please be careful when proceeding with this process.
(Last updated: August 1, 2019)
You cannot edit or delete the payer info, for example, the business type, if its review status has already changed to “Active.”
(Last updated: August 1, 2019)
You can register only 1 set of payer information per ad account.
Making any change to the payer information is not allowed.
You, however, can register up to 5 credit cards for your ad account.
(Last updated: August 1, 2019)
If you choose the automatic payment option, the outstanding balance will appear based on your actual usage, and the payment will be processed accordingly.
If you choose to make payment manually, after you click “Pay now,” the system will show you the outstanding balance that has just been updated.
(Last updated: October 19, 2020)
Costs exceeding the campaign spending limit or ad delivery costs that are not subject to the billing process will be adjusted to a negative balance.
(Last updated: August 1, 2019)
You can check your billing amounts by following the steps below:
1. Click on the ad account or ad group that you want to check the billing amounts.
2. Click on the hamburger menu icon in the upper left of the screen. > Select “Billing and payments.”
3. Click the payer name that you want to check.
(Last updated: August 1, 2019)
No, it is impossible to set your ads to be delivered on a particular LINE-related service.
LINE Ads will deliver ads to all LINE-related services.
(Last updated: August 1, 2019)
Impressions or clicks can continue to increase after the campaign period has already ended because cache data still remain in the users’ devices.
Billing based on numbers of impressions and clicks accrued from the next months will be calculated by the following conditions:
In case you set a Monthly budget spending limit
You will not be charged for the increased impressions or clicks, even though they are within the defined spending limit for the month.
* For the Self-Serve accounts, from which you are able to directly make payments through a credit card, the amount of incurred costs will be displayed in the outstanding balance.
In case you set an In total spending limit
You will be charged for the increased impressions or clicks if they are within the defined spending limit.
Please see more information on the campaign budget here.
(Last updated: October 19, 2020)
Ads delivered by an unverified LINE Official Account using the Cost per Friend (CPF) strategy are allowed in Thailand only.
Unverified accounts in Japan in Taiwan are currently unable to deliver ads using the CPF strategy.
(Last updated: October 19, 2020)
Clicking “Like” on an ad is not shared with other users.
(Last updated: October 19, 2020)
The aggregated location data are gathered through users’ LINE applications. If you create a location-based report, the system may also include non-target countries in your report.
Example: The target region of your ad delivery is set as “Thailand,” but the report is updated while the users who use Thailand-registered LINE accounts are in Japan.
In this instance, the system will count the data of these users as those of users in Japan. This is the reason why the country name “Japan” appears on your report, even though you have set the target region for ad delivery as “Thailand.”
(Last updated: October 19, 2020)
There are 2 types of LINE Ads accounts: Self-Serve and LINE Agency Partner.
Self-Serve
Users who use this type of account set up their own LINE Ads account online and make payments using a credit card.
LINE Agency Partner
This type of account is for users who neither set up their own LINE Ads accounts nor process credit card payments through LINE directly. Rather, they choose to contact an agency to set up and run the account for them.
Self-Serve and LINE Agency Partner accounts may have certain functions and operational processes that differ from one another.
(Last updated: October 19, 2020)
Please check the following data when an error of “No install events found. Install the SDK in your app and then trigger the relevant install event you wisht to optimize for” is found in your ad group.
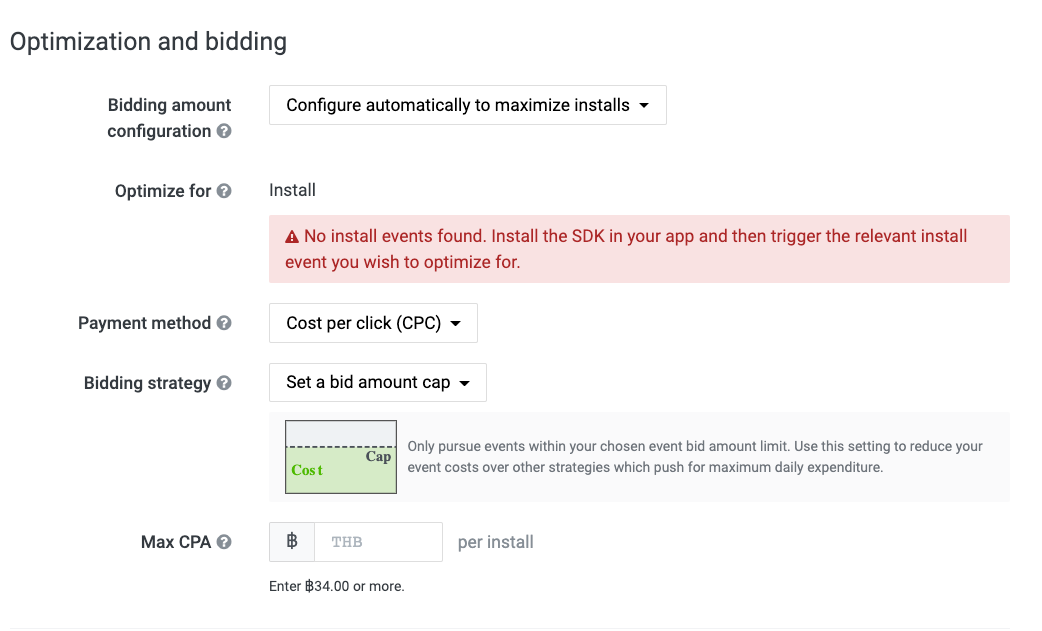
- If the application has not been registered on LINE Ads yet, please check the app conversions set up here.
- If application has already been registered on LINE Ads, please make sure to complete the set up on SDK admin adpel using your ad account ID and app ID.
Ad Account ID:

App ID:

Note:
- Check which part of the SDK manager to enter the ID obtained from the LINE Ads admin panel here
- If the issue is still unresolved, please contact the SDK you are connected for more information.
(Last updated: October 1, 2021)
Due to the Personal Data Protection Act (PDPA) effective on 1 June 2022, targeting on LINE Ads (LINE Ads), including core audience and custom audience will no longer be available to target audience under 20 years old in Thailand, starting from 31 May 2022 onwards.
Existing audience created before 31 May 2022
1. Core audience (age) setting under 20 years old at the ad group level
· In case you target minimum and maximum age range that are not relevant to 20 years old and under, there will be no change.
· In case you target minimum age under 20 years old and maximum age above 20 years old, the ad group will remain active, with the update of minimum age to 20 years old automatically. There is no change to the maximum age. It will be kept in accordance to your setting.
· In case you target the maximum age under 20 years old, the ad group will be automatically paused. Please update the age range before 31 May 2022 to prevent the automatic pause.
2. Custom audience
· In case your data source such as phone number or email does not contain audience under 20 years old, there will be no change.
· In case your database such as phone number or email contains audience under 20 years old, the audience estimated size may be reduced.
New audience created after 31 May 2022
1. Core audience:
· Age: The age range can be set from 20 years and over.
· Others: Include audience above 20 years old.
2. Custom audience:
· Include audience above 20 years old.
Other changes after 31 May 2022
· Bulk Upload or API upload, it is mandatory to set a minimum age on the template before uploading the file.
· Performance report of age unit will show report from age 20 and over.
Remark:
· Core audience refers to Region, Gender, Age, Operating System, Interests.
· Custom audience refers to Web Traffic Audience, Mobile App Audience, Upload IDFA/ AAID, Upload Phone Numbers, Upload Email Addresses, LINE Official Account Audience, Lookalike Audience, Video View audience, Image Click Audience.
(Last updated: May 1, 2022)
LINE Ads Advertising Policy
Understanding LINE Ads Policy
LINE Ads Policy is only preliminary guidelines concerning legal compliance of the advertising content for advertisers on the platforms of LY Corporation and/or any group company designated by LY Corporation (hereinafter collectively referred to as the “Company"). Therefore, it is the advertisers’ legal obligations to understand and adhere to all applicable laws, regulations, and advertising-related policies.
The Company reserves the right to reject, suspend, cancel, block access, or remove any advertisements from
the Company’s platform for any reason in the Company’s sole discretion, including where the Company suspects, discovers, or is notified from time to time that your advertisement does not comply with applicable laws, regulations, or policies.
Content within this document is neither legal opinion nor advice in any respect and advertisements may be subject to applicable laws other than those stipulated herein. In no event shall the Company warrant the validity or legality of your products, content, and advertisements appearing on the Company's platform. You should, therefore, additionally monitor, review, and comply with applicable laws, regulations, and policies, as well as obtain permission or authorization from the relevant regulatory authority (if any) before publishing the advertisement on the Company's platform, including maintaining such licenses and authorization throughout the period of advertising on
the Company's platform for immediate submission upon the government agency or the Company’s request.
As the applicable laws, regulations, and policies concerning the advertisements, products, and content are subject to change, the Company may amend this policy from time to time and you should review the contents of this policy regularly, especially before publishing every advertisement. This policy is intended as a guideline and educational purpose for advertisers only. The Company will not be responsible for the use of this guideline or in any case related hereto. You represent and warrant that you will not demand the Company, its officers, agents, and employees to indemnify your damages and will not file a lawsuit or take any action arising from or regarding the use or breach of this policy, and shall hold such person harmless from any liability or costs arising from claims for compensation, loss, damage, actions, decisions, litigation expenses, and attorney fees.
Prohibited Products and Content
You should be aware that certain products and content cannot be advertised under applicable laws, regulations, and policies, or it may require permission or approval from the relevant regulatory authority before the publication thereof. Please see below for an example list of products and content that may not be advertised:
1. Cigarette products, electric cigarettes, tobacco, or related products, including quit-smoking aid products containing nicotine.
2. Digital currency or any related digital currency business, consumer credit business, or solicitation of futures trading, foreign currency trading, or real estate investment (products provided by financial institutions, banks, securities companies, and digital asset business operators authorized by relevant government agencies)
(as the case may be).
3. Weapons (all types), hazardous materials and substances.
4. Sale of information, whether personal information or not, and disclosure of others’ trade secrets.
5. Pyramid schemes, direct sales in an illegitimate multi-level, or any other businesses of the same nature which are not approved by the relevant regulatory authority such as businesses which push members to buy products
in order to be a part of its business, businesses which do not focus on selling products to users but rather encouraging members to invite others to join a network, where the revenues of businesses are based on additional invited participants joining the network, high price merchandise with non-standard quality, and do not have refund policy because its payment scheme is to pass through money received from new members payable to current members as a pyramid system.
6. Buying and selling services or services for breeding of all kinds of animals and buying and selling services for animal organs, or products derived from animals, such as eggs, fur, fat, blood, or any liquid from animal bodies that are not approved by the relevant regulatory authority, excluding animal products for consumption that are lawful and supported by certification documents, including animal treatment or nourishment products and medical equipment used with animals. Additionally, advertisements related to controlled wood species are prohibited by forestry law, as well as controlled plant seeds, reserved plants, and protected plants as regulated by plant variety laws that are not approved by the relevant regulatory authority.
7. Fraudulent lending and fundraising for unlawful purposes.
8. Products that are deemed infringing third party’s copyright or intellectual property.
9. Websites involved in accumulating points that are considered gambling or websites that are in the nature of prize drawing operated without authorization from the Department of Provincial Administration.
10. Online marketing and public relations conduct with compensation in the form of revenue sharing.
11. Narcotics and psychotropic substances, hazardous drugs, and specially controlled drugs.
• These products are prohibited from being publicly advertised, while direct advertisement to medical personnel must be compliant with applicable laws, regulations, and policies e.g. compliance with the rules and regulations of the Food and Drug Administration, Ministry of Public Health, including but not limited to advertisement permission, as the case may be.
12. Non-profit organizations, public benefit organizations, and non-governmental organizations (NGO) that are not approved by the relevant regulatory authority:
• A registration certificate, establishment permit, or permits to operate in Thailand issued by
the Department of Provincial Administration, Ministry of Interior, the Committee on Consideration of
the Entry of a Foreign Private Organization, or Ministry of Labor are required, as the case may be.
13. Gambling-related products and services such as pachinko, football betting websites, and online games banned under laws.
14. Adult goods and services (including sex shops such as unlawful and immoral massage parlors, adult shops such as adult video shops, other entertainment businesses for adults that must be licensed or registered, and other related businesses or those of the same nature).
15. Infant food (such as stage 1 formula or stage 2 formula milk powder for infants) and infant supplements.
16. Surrogacy, content related to adopted children, accepting or giving non-relative adoption to a third party.
17. Alcoholic beverages, including the sale and purchase of all types of alcoholic beverages (both directly and indirectly).
18. COVID-19 antibody test kits:
• Certain types of products may be classified as medical devices that must be sold only to government hospitals, general hospitals, specialized hospitals, medical clinics, specialized medical clinics, medical technology clinics, or polyclinics that provide medical practice or medical technology according to the law on medical facilities or any other person according to relevant laws. As such, they are not allowed to be advertised to the general public. Those products may, however, be advertised directly to healthcare professionals in accordance with the applicable laws, regulations, and policies e.g. the advertisement must be notified to the Food and Drug Administration, Ministry of Public Health.
Regardless, LINE Ads is intended to be accessed by the general public, without limitation only to healthcare professionals. For this reason, you may not publish an advertisement on COVID-19 Antibody Test Kits on LINE Ads.
• For COVID-19 Antigen Test Kits, please check applicable laws, regulations, and policies of the Regulated Products and Services.
19. Advisement of cryptocurrencies (as the advertisement of cryptocurrencies must be carried out via the digital asset business operator's own official channels).
20. Advertisement of cannabis flowers
Regulated Products and Services
You should be aware that certain products and content can be advertised under the control of applicable laws, regulations, and policies. Please see below for an example list of regulated products and content:
1. Food and Beverages, Dietary Supplement Products, Beverage Products, and Household Medicines
Advertisements on food and beverages, dietary supplement products, beverage products, and household medicines must be compliant with the applicable laws, regulations, and policies e.g. rules and regulations of
the Food and Drug Administration, Ministry of Public Health, including advertisement permission, as the case may be.
Certain common food products may be exempt from applying the product notification and displaying the FDA mark on the label, but the label must contain statements required by law e.g.
· Plant products including brown rice, whole grains, dried beans, sesame seeds, dried chilies, rice crackers (not fried), grains, crushed cereals, crushed pepper
· Animal products including dried fish, dried shrimp, dried bird's nest, raw salted eggs, shrimp paste, raw/powdered pickled fish, pickled fish sauce (Budu sauce), honey (produced from a place of manufacture that is not classified as a factory)
1.1 Cannabis and hemp
Latest update as of June 30, 2025, subject to further changes following the enactment of Cannabis and Hemp Act B.E…..
In summary:
· Advertisers must comply with the rules of applicable laws, regulations, and policies subject to the type and form of the products.
· Advertising of cannabis flowers is prohibited.
1.1.1 Whole plants and unprocessed parts of cannabis and hemp except for cannabis flowers that may be advertised without permission but must be compliant with applicable regulations and conditions
· The unprocessed parts of cannabis and hemp (except for cannabis flowers, which are prohibited from being advertised in any channels for commercial purposes, and cannabis flowers may only be sold under the prescription of the relevant healthcare professionals according to the applicable notifications of the Ministry of Public Health) may be sold and advertised without permission required but in accordance with the following conditions:
(1) The advertisement must not claim recreational effects
(2) The advertising media must not include false or exaggerated statements and shall not cause misunderstandings regarding the essence of that plant part.
1.1.2 Extracts and seed oils of cannabis and hemp, provided that the extracts that are not classified as narcotics may be advertised but must be compliant with applicable regulations and conditions
· Under the applicable notifications of Ministry of Public Health, the following products are not classified
as narcotics and may be sold or advertised:
(1) Extracts having not exceeding 0.2% by weight of Tetrahydrocannabinol (THC), which were produced from domestically grown cannabis and hemp and under an FDA license
(2) Extracts from seeds that were produced from domestically grown cannabis and hemp
· Extracts and seed oils from cannabis and hemp used as raw material in the production of certain health products may require advertising license from the FDA.
1.1.3 Ready-to-eat food and drink (cooked in a restaurant) having cannabis or hemp as an ingredient without
the part of flowers attached may be advertised without permission but must be compliant with applicable regulations and conditions
· Operators who sell ready-to-eat food or beverages having cannabis or hemp as an ingredient (such as leaves) without the part of flowers attached may publish advertisement but must be comply with applicable regulations and conditions, including listing all food items that use cannabis or hemp as
an ingredient and must display safety endorsements for consuming food that contains cannabis or hemp as an ingredient in the advertising materials of the ready-to-eat food or beverages that contain cannabis or hemp, such as:
(1) “People younger than 20 years, pregnant and breastfeeding women should not consume.”
(2) “If abnormal symptoms occur, stop consuming immediately. If the symptoms become severe, immediately visit or consult a physician.”
(3) “People allergic to cannabis or hemp should not consume.”
(4) “May induce drowsiness. Avoid driving vehicles or operating machines.”
1.1.4 Finished health products having cannabis or hemp as an ingredient (e.g. certain food products, certain beverage products, and herbal products) containing those in 1.1.1. or 1.1.2. above as ingredients: food products and herbal products may be advertised with permission from the FDA, while cosmetics may be advertised without permission required but must be compliant with applicable regulations and conditions
· Certain food products and certain beverage products: applicable notifications of Ministry of Public Health prohibit cannabis and hemp flowers from being used as an ingredient in food products. However, certain food products or certain beverage products containing other parts of cannabis and hemp as ingredients (such as roots or leaves) without the part of flowers or young shoots attached may be registered or notified to obtain the food product serial number from the FDA if their quality and standards meet the relevant requirements. They may thereafter be advertised, provided that an advertisement claiming properties and benefits requires a food product advertisement license from the FDA first.
· Herbal products: herbal products may require an herbal product registration certificate and
an advertisement of herbal products may require an herbal product advertisement license from the FDA.
(1) Herbal products, i.e., herbal drugs (such as traditional drugs and developed herbal drugs) and herbal health supplements (such as herbal cosmeceuticals and nutraceuticals formulated based on herbs)
(2) Herbal products may contain any part of cannabis or hemp, including extracts. If the flower is included in the ingredients, the product may be classified as a developed herbal drug, which requires documentation of scientific evidence (such as human trials) to support its quality, safety, and efficacy for registration for FDA approval.
· Certain cosmetics: certain cosmetics containing parts of cannabis or hemp (without the part of flowers) or kratom as ingredients may be advertised without permission required if their notification has been registered, provided that the advertisement must be compliant with the rules and regulations of the FDA concerning the advertisement of cosmetics (including prohibition on the claim of benefit that exceeds the scope of cosmetic (e.g. preventing, curing, or relieving a disease)).
1.2 Kratom
Latest update as of June 30, 2025
In summary:
· Advertisers must comply with the rules of applicable laws, regulations, and policies subject to the type and form of the products.
1.2.1 Whole kratom plant, leaves, or any of its parts: may be sold or advertised without permission under the Kratom Plant Act B.E. 2565 (2022) as follows:
· An advertisement on kratom leaves or food containing kratom for sale must state the sale restriction that “Sale of kratom leaves or food containing kratom as ingredient or components to the following persons is prohibited:
1. Person under 18 of age
2. Pregnant woman
3. Breastfeeding woman
In addition, other prohibited target groups and/or advertising criteria and methods may be further announced.
· An advertisement on kratom leaves must not be associated with the following places or manners of sales: (1) educational institution (2) dormitory (3) parks, zoo, and amusement park (4) sales by a vending machine, and other prohibited places or manners of sales may be further announced.
· An advertisement on kratom leaves must not be associated with the consumption of kratom leaves cooked or mixed with narcotics or psychotropic substances under the Narcotics Code, drug under the drug law, or hazardous substances under the hazardous substances law, and other substances that are prohibited from consuming with kratom leaves may be further announced.
1.2.2 Food products: applicable notifications of the Ministry of Public Health prescribe that the whole kratom plant and its extracts may be used as ingredients in the production of certain food products, provided that
the manufacturer or importer must comply with the regulations and conditions prescribed by the FDA regarding new substances/new foods. In addition, if an advertisement is intended to be made on the properties and benefits of the registered food products after the registration is made, advertisers must obtain a food advertisement license from the FDA accordingly.
1.2.3 Products such as kratom decoction, kratom tea, crushed dried kratom leaves powder packed in capsules or tablets: may be classified as herbal products and may be sold or advertised, but may be subject to a product registration requirement to obtain a herbal product registration certificate and request an advertisement license from the FDA in accordance with the Herbal Products Act B.E. 2562 (2019).
1.3 Food supplementary products may not make any claim related to sexual performance and advertisers must comply with the rules of applicable laws, regulations, and policies as follows:
1.3.1 If advertisers intend to promote the benefits, quality, or properties of food supplementary products,
the advertisers must obtain a food advertisement license from the Food and Drug Administration and are obliged to consider the legality and content of the said license before publishing the advertisement.
1.3.2 Advertisers must publish the advertisement with the complete statement and the exact format as permitted, and information must be displayed in advertising media only as stipulated in the advertisement license.
1.3.3 Advertisers must not advertise the benefits, quality, or properties of foods that are false or exaggerated or beyond the scope of food. For example, no claims can be made that food products can prevent, treat, alleviate, or cure disease. In case a claim is intended to be made that consuming the food products can help prevent the risk of disease, the products must first be evaluated based on their health claims to obtain permission from the FDA.
1.3.4 Advertisers must not advertise the benefits, quality, or properties of food supplementary products using statement, images, or audio that convey or show the understanding that the food supplementary products help nourish libido, enhance sex, or are related to sexual intercourse.
2. Hospital and Clinic
· Must comply with applicable laws, regulations, and policies e.g. possessing a license to operate
a medical facility and comply with the regulations and criteria of the Ministry of Public Health. Advertisement of certain types of medical facilities requires approval from the Department of Health Service Support, Ministry of Public Health, or the Provincial Health Service Authority.
3. Dating Service Website or Application
· Must comply with applicable laws, regulations, and policies e.g.
o The app must be created and has been in service for at least 1 year
o The app must be reviewed and rated by users with at least 4 stars
o Target audience must be over 20 years old
o A warning message on the banner/video that “This service is only for people ages 20 years and above” is required.
4. Cosmetics
· Certain types of cosmetic products (including cosmetics containing cannabis and hemp without the part of flowers or kratom) can be advertised without advertisement permission, provided that
the advertisement must not claim a benefit that exceeds the scope of cosmetic (e.g. preventing, curing, or relieving a disease), and must be compliant with applicable laws, regulations, and policies e.g. compliance with the rules and regulations of the Food and Drug Administration, Ministry of Public Health.
5. Politics and Election
· Must comply with applicable laws, regulations, and policies e.g. political parties, its members, candidates for election campaign, voting or survey polls, or contents relating to election can be advertised during
a specific period as determined by the Company and by purchasing via agency only. The Company may require additional documents (such as registration documents of political parties, political parties’ members, certificates of candidates for election campaigns, and other documents as required), subject to consideration on a case by case basis.
6. Lotteries Issued by the Government
· Must comply with applicable laws, regulations, and policies e.g.
o Lottery advertisements must not contain language that creates excessive expectations of winning and must also consider its effects on underage consumers.
o Lotteries issued by the government may be advertised with a license or proof of being a government lottery distributor from the Government Lottery Office (GLO).
o The lottery selling price must not exceed THB 80. Wholesale of lottery or advertisement thereof are prohibited. The advertisement must stipulate that the lottery will not be sold to persons under 20 years of age.
o Any other lottery or raffle (other than a government lottery issued by GLO) may be advertised with
a gambling license from the Department of Provincial Administration.
o Award purchase advertisements may be advertised with an award purchaser's number from
the Government Lottery Office (GLO).
7. Product and Service with Premium Gifts or Prizes by Means of Random Selection or Drawing
· Must comply with applicable laws, regulations, and policies e.g.
o Permission from the Department of Provincial Administration, e.g. random box, is required.
o Advertisements must be compliant and contain information in accordance with the rules and regulations of the Office of Consumer Protection Board.
8. Financial, Securities, Payment, and Digital Assets Businesses
The following businesses, services, and/or products are regulated by the Bank of Thailand (BOT), the Securities and Exchange Commission of Thailand (SEC) or any relevant authority (as the case may be), and the products or services must be offered, dealt, underwritten, provided, or handled in any manner by person, financial institutions, or business operators of financial business, securities business, derivatives business, foreign exchange business, digital asset business, and/or payment business, according to their respective laws, who are authorized to operate such businesses under the supervision of the BOT, the SEC, and any relevant authority; except for non-regulated businesses, products, and/or services which are exempted from regulations by virtue of laws, notifications, circulars, rulings or any media officially issued by the said regulators.
· Financial businesses (e.g. commercial banking business, specialized financial institutions, finance business, credit foncier business, credit card business, personal loan business, nano finance business, pico finance business, peer-to-peer lending business, and asset management business)
· Securities businesses (e.g. securities brokerage business, securities dealing business, investment advisory business, securities underwriting business, mutual fund management business, private fund management business, and other securities businesses as prescribed by the SEC)
· Derivatives businesses (e.g. derivatives brokerage business, derivatives dealing business, derivatives advisory business, derivatives fund management business, and other derivatives businesses
as prescribed by the SEC)
· Foreign exchange businesses (e.g. foreign exchange business of authorized juristic person, foreign exchange business of authorized company, foreign exchange brokerage business, money changer business, treasury center business, money transfer agent business, foreign exchange e-money business, business of authorized securities company, and other foreign exchange businesses as prescribed by
the Ministry of Finance)
· Digital asset businesses (e.g. digital asset exchange, digital asset broker, digital asset dealer, digital asset investment advisor, digital asset funds manager, or digital asset custodial wallet provider)
· Payment businesses (e.g. credit card, debit card, or ATM card business, e-money business, business of receiving electronic payment services to the merchants of goods or services or the creditors, or e-fund transfer business)
· Financial products and services, securities, derivatives, FX contracts, digital assets, which include digital tokens and Non-Fungible Token (NFT), provided that such NFT’s characteristics are considered digital assets under laws
Remark:
Products or services must be within the scope of the license, registration, or authorization granted by the BOT,
the SEC, the Ministry of Finance, and/or other relevant authorities and must be compliant with the regulations concerning advertisement (see more, for your preliminary information here.)
Additional Conditions for Loans
· It must be compliant with the law and regulations of relevant authorities (in case there is a specific law such as Supervised Personal Loans and Peer-to-Peer Lending, etc.)
· It must clearly disclose information on service price, fees, other expenses, and conditions using easily comprehensible languages
· Contract terms and interest rates must not exceed the legal rates
· The client’s potential and ability to repay loans must strictly be assessed as prescribed by the law and shall not designate the target group of people who do not have the potential and ability to repay loans
· It must be compliant with rules and regulations on the advertisement and/or business operation under relevant laws and regulations (see more, for your preliminary information here.)
Additional Conditions for Insurance Products
· Insurance products must be in the form and contain wordings approved by the Registrar, and the rate of insurance premiums are in accordance with approval of the Thai competent authority (currently, the Office of Insurance Commission).
· The insurance product sellers must be an insurance company that is licensed to conduct insurance business, or an insurance agent or broker that obtained a license under Thai laws.
· It must fully comply with all the relevant criteria and conditions pursuant to the Thai insurance laws, including but not limited to:
o the advertising statement must not be false or exaggerated characteristics;
o the advertising statement must be clear, easy to understand, and unambiguous;
o the advertising statement must not cause misunderstanding of the essence of the insurance policy or of
the payment under the insurance contract;
o a warning must be included that the customer must understand the details of the insurance policy before making a decision to obtain insurance;
o the insurance agent or broker must obtain approval from the insurance company prior to using the advertisement wordings or images, or offer letter in order to invite, indicate an opportunity, or arrange for persons to enter into insurance contracts.
9. Contact Lens
· Must comply with applicable laws, regulations, and policies e.g. must be approved by the Food and Drug Administration and must have a medical device advertisement license
10. Hazardous Substances
· Must comply with the applicable regulations under the hazardous substances law
· Must not be harmful to physical or mental health or contrary to good morals of the public or may cause distress or danger to others.
11. Personal Information and Health Information
· Must comply with the laws on personal data protection, national health, and the regulations, guidelines, and ethical code of conduct of the relevant regulators and federation of professions
12. Movies and Videos
· Must comply with applicable laws, regulations, and policies e.g. must be compliant with the regulations for screening movies and advertising media in accordance with the laws of movie and video and must obtain advertisement permission from the Film and Video Review Office, Ministry of Culture
13. Medical Devices
· Must comply with applicable laws, regulations, and policies e.g. obtaining a medical device advertisement license and must be compliant with the rules and regulations of the Food and Drug Administration, Ministry of Public Health.
14. Drones
· Must comply with applicable laws, regulations, and policies e.g. must have permission to import, sell, or possess from the Office of the National Broadcasting. and Telecommunications Commission (NBTC).
15. Auction Sales and Antiques Trade
· Must comply with applicable laws, regulations, and policies e.g. must have a license for public auction or antiques license from the Department of Provincial Administration, the Ministry of Interior.
16. COVID-19 Antigen Self-Test Kits (ATK)
· Must comply with applicable laws, regulations, and policies e.g.
o Evidence that the product has been approved by the Food and Drug Administration (FDA) is required.
o Advertisement requires the medical device advertisement license and must follow the rules and conditions prescribed by the Food and Drug Administration, Ministry of Public Health.
17. Amulets, Sacred Objects, Antiques
· Must comply with applicable laws, regulations, and policies e.g.
o Only for stores with well-defined physical business locations or businesses operating as trustworthy juristic persons.
o In case where claims, warranties, certifications from various institutions, or factual confirmations are made, clear details must be specified and provided along with substantiating documentation.
o You must not advertise potentially dangerous or weapon-like products.
o The regulatory authority or the Company may request commercial registration certificates, antique trade licenses, and/or import and trade licenses from the Department of Fine Arts (as the case may be).
o Temples, shrines, or places of religious ceremony may not publish advertisements on LINE Ads.
o You must not publish advertisements with statements about personal beliefs and judgments that cannot be substantiated by a rational or acceptable verification process in order to make claims of supernatural benefits or state results gained from worshiping, possession, or ownership of amulets, sacred objects, or antiques, which are false or exaggerated characteristics or will cause material misunderstandings or boasting the properties related thereto, such as enhancing fortune, popularity, enhancing luck, protection from harm, avoiding poverty, etc. However, this excludes advertisements that involve ritual ceremonies or reveal details of the raw materials used to create amulets or sacred objects that are true, unexaggerated, and do not cause any material misunderstandings regarding
the products or services.
18. Products or Services Related to Personal Beliefs and Judgments such as Talismans, Amulets, Fortune-Telling Services, Astrology, Fortune Prediction, Feng Shui, as well as any Tangible or Intangible Items
· Must comply with applicable laws, regulations, and policies. For example,
o It must clearly explain how to use the service, costs, and personal data handling method.
o You must not use statement that relies on personal beliefs that cannot be substantiated by a rational or acceptable verification process or other statements conveying the same meaning and invite or persuade consumers experiencing distress or emotional vulnerability to purchase products or services, such as "Get rich instantly," "See results within 7 days," "Bring back your loved one," "Remove curses," "Amplify merits," "Enhance luck," “Enhance sales volume,” “Enhance charm,” "Anyone who sees will fall in love," "Meditation to see past lives," "Black magic," "Provides protection from danger," "Ensures good fortune or luck," or any other similar statements.
o You must not conduct solicitation for donations or fundraising for purposes related to personal beliefs and judgments.
o You must not use advertisement statements that pose a risk to social morality and advertisement statements that guarantee accuracy. The advertisement statements must not be exaggerated claims or leading users to believe in things that cannot be scientifically proven or are related to gambling or unlawful purposes, or cause anxiety or fear.
19. Sale of Pet-Related Products or Services, as listed below line, whereby you must comply with the applicable laws, regulations, and policies, and the regulatory authority or the company may request licenses or any other documents related to the specific product or service, as the case may be
· Sale of products for pets, such as clothing, toys, collars, leashes, cages, or pet living spaces, etc.
· Services for pet care and boarding
· Service for grooming and trimming
· Pet-friendly cafes
· Pet training services provided that if any reference to documents or certificates obtained from various pet training institutions is made by the advertisers, the complete details of those documents or certifications must be displayed
· Sales of pet foods (provided that in cases where the claims of benefits, quality, quantity, standards, ingredients, or origin of the pet food are made, a registration certificate for specifically controlled animal feed and a license to sell specifically controlled animal feed are required to be displayed
· Pet sitting or boarding services for non-profit organizations, associations, or organizations with a purpose for public welfare that are not seeking profit (documents, registration certificates, and regulations from
the organization must be shown to prove the objectives of pet sitting or boarding services)
· Animal clinic services
20. Private Investigator Services
Must comply with applicable laws, regulations, and policies e.g. the services must not violate the law or personal rights and the Company reserves the right (but shall not be obliged) to request any relevant licenses or documents, for example, the attorney-at-law license, as the Company deems appropriate.
21. Pawnshops
Must comply with applicable laws, regulations, and policies e.g. possessing a license to establish a pawnshop, and must act in strict compliance with the provisions of the Pawnshop Act B.E. 2505 (1962). The Company reserves
the right (but shall not be obliged) to request any relevant licenses or documents, for example, the license for establishing a pawnshop, as the Company deems appropriate.
22. Industrial Product Goods
Advertisers agree and certify that it has acted in compliance with the Industrial Product Standards Act B.E. 2511 (1968) and the applicable ministerial regulations, notifications of the Thai Industrial Standards Institute (TISI), conditions, and regulations, including but not limited to the duty to display certification marks and information
as designated by TISI as follows:
(1) Voluntary certification mark (as shown in Figure 1), in cases where advertisers display a voluntary certification mark on products, the advertisers certify and warrant that they will display the certification marks in the format, manner, size, or other details correctly as required by law, as well as other product-related information as required by law and a "License to Display Certification Mark on Industrial Products" required for displaying the certification marks on the advertised products.
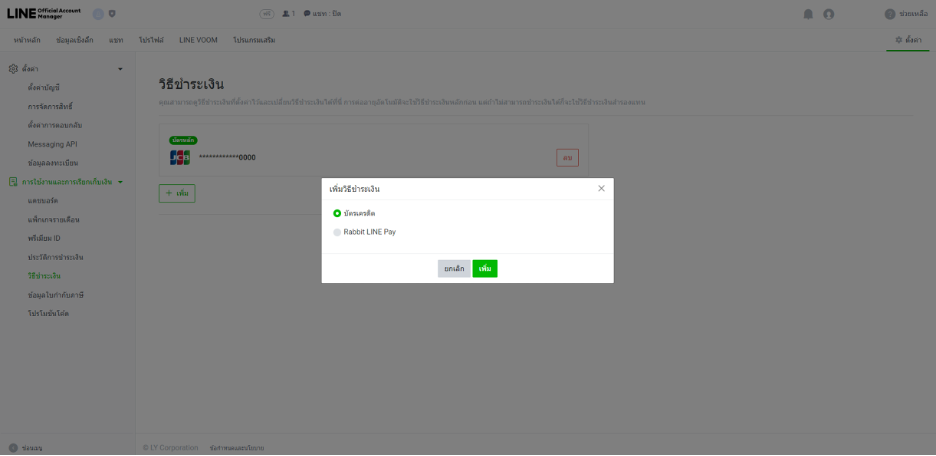
(2) Mandatory certification mark (as shown in Figure 2), in advertisement of regulated industrial product goods, which is required by law to meet certain standards, whether they are manufactured or imported for sale in Thailand, the advertisers certify and warrant that the advertised products have obtained a “License to Manufacture Industrial Products which are Required by the Royal Decree or other Law to Conform with the Standard” or a “License to Import Industrial Products which are Required by the Royal Decree or other Law to Conform with the Standard for Sale in Thailand”, as the case may be, and that they will display the certification marks on the products in the format, manner, size, or other details correctly as required by law, as well as other product-related information as required by law.

Terms and Conditions for Advertising Masks and Hand Sanitizers.
1. For masks, the advertisement must clearly provide the selling price at an appropriate rate, and overpriced selling is prohibited. In addition, the benefits of the products cannot be over-claimed.
2. For surgical masks that are made in Thailand, the selling price per unit cannot exceed 2.5 THB
(VAT included) only, and the advertisement must clearly provide the selling price (if surgical masks or any kind of masks are imported from overseas, the selling price must not exceed the price determined by
the Ministry of Commerce).
3. Filter products or any supporting filter used underneath the masks must be clearly clarified as the “filter” for the avoidance of confusion by buyers to perceive them as surgical masks. In addition, the benefits cannot be over-claimed and overpriced selling is prohibited.
4. Hand sanitizer products are categorized as "cosmetics" and not "medical devices”.
Rules and Conditions for Publishing Advertisements on COVID-19 Antigen Self-Test Kits (ATK)
1. Sales or offer for sales (including the listing of product image, price, and basic description) - sellers must possess evidence that the COVID-19 Antigen Self-Test Kits (ATK) have been approved for registration and approved by the Food and Drug Administration (FDA), provided that the regulatory authority and
the Company may request a Certificate of Technology Assessment (or “Bor. Por. Tor. Form”).
2. Advertisement on COVID-19 Antigen Self-Test Kits (ATK) may be published to the general public, provided, however, that the advertiser must possess evidence of a medical device advertisement license.
3. Exaggerative advertisements or misleading statements is prohibited, for example, claims that the test kit can detect or identify certain variants of COVID-19 (e.g. advertisement with a claim of ability to detect Delta or Omicron variants).
4. Advertisements allowed on LINE Ads must be approved by the FDA to be advertised on “social media platforms”. The allowed type of advertising media may be found on the medical device advertisement license.
5. Dissemination of video clips or user manuals is generally allowed, however, if such media contain contents that laud the benefits of the product, or other contents that attract the product purchase, they shall be considered medical device advertisement, which requires a medical device advertisement license before dissemination.
6. Statements* on the advertisement must match those as permitted by the FDA. You must not change
the approved statement without the FDA’s permission.
7. The number of the medical device advertisement license (“ฆพ XXXX/YYYY”) must be shown among
the Statements* on the advertisement.
Remark*: “Statements” under the Medical Device Act shall include an act of showing or making apparent
a statement, image, symbol, motion picture, light, sound, mark, or any act that enables a layperson to comprehend its meaning

Sample of a Certificate of Technology Assessment
i.e. “Bor. Por. Tor. Form”
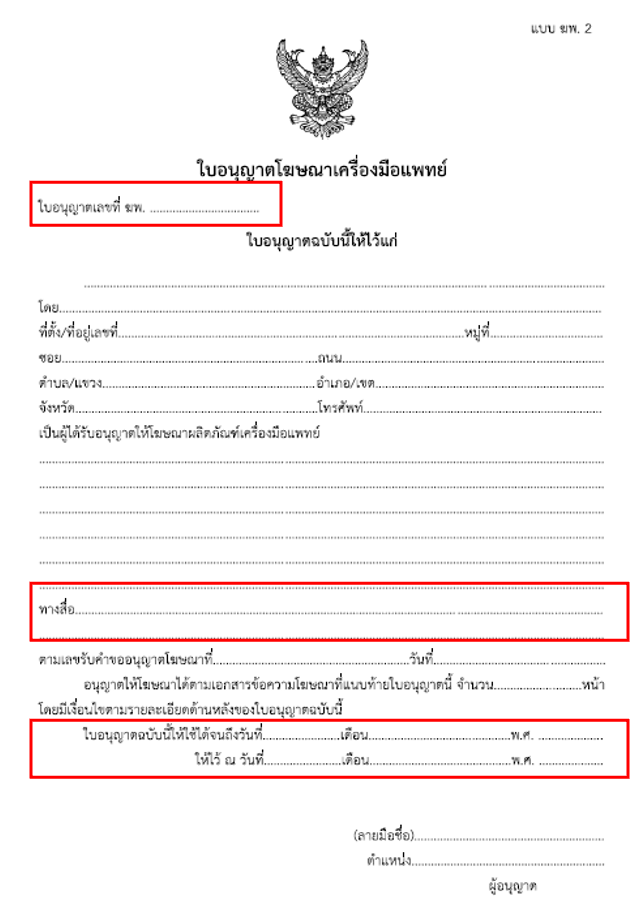
Sample of a Medical Device Advertisement License
i.e. “Kor Por. 2 Form ”
Products and Services that Supporting Documents may be Submitted
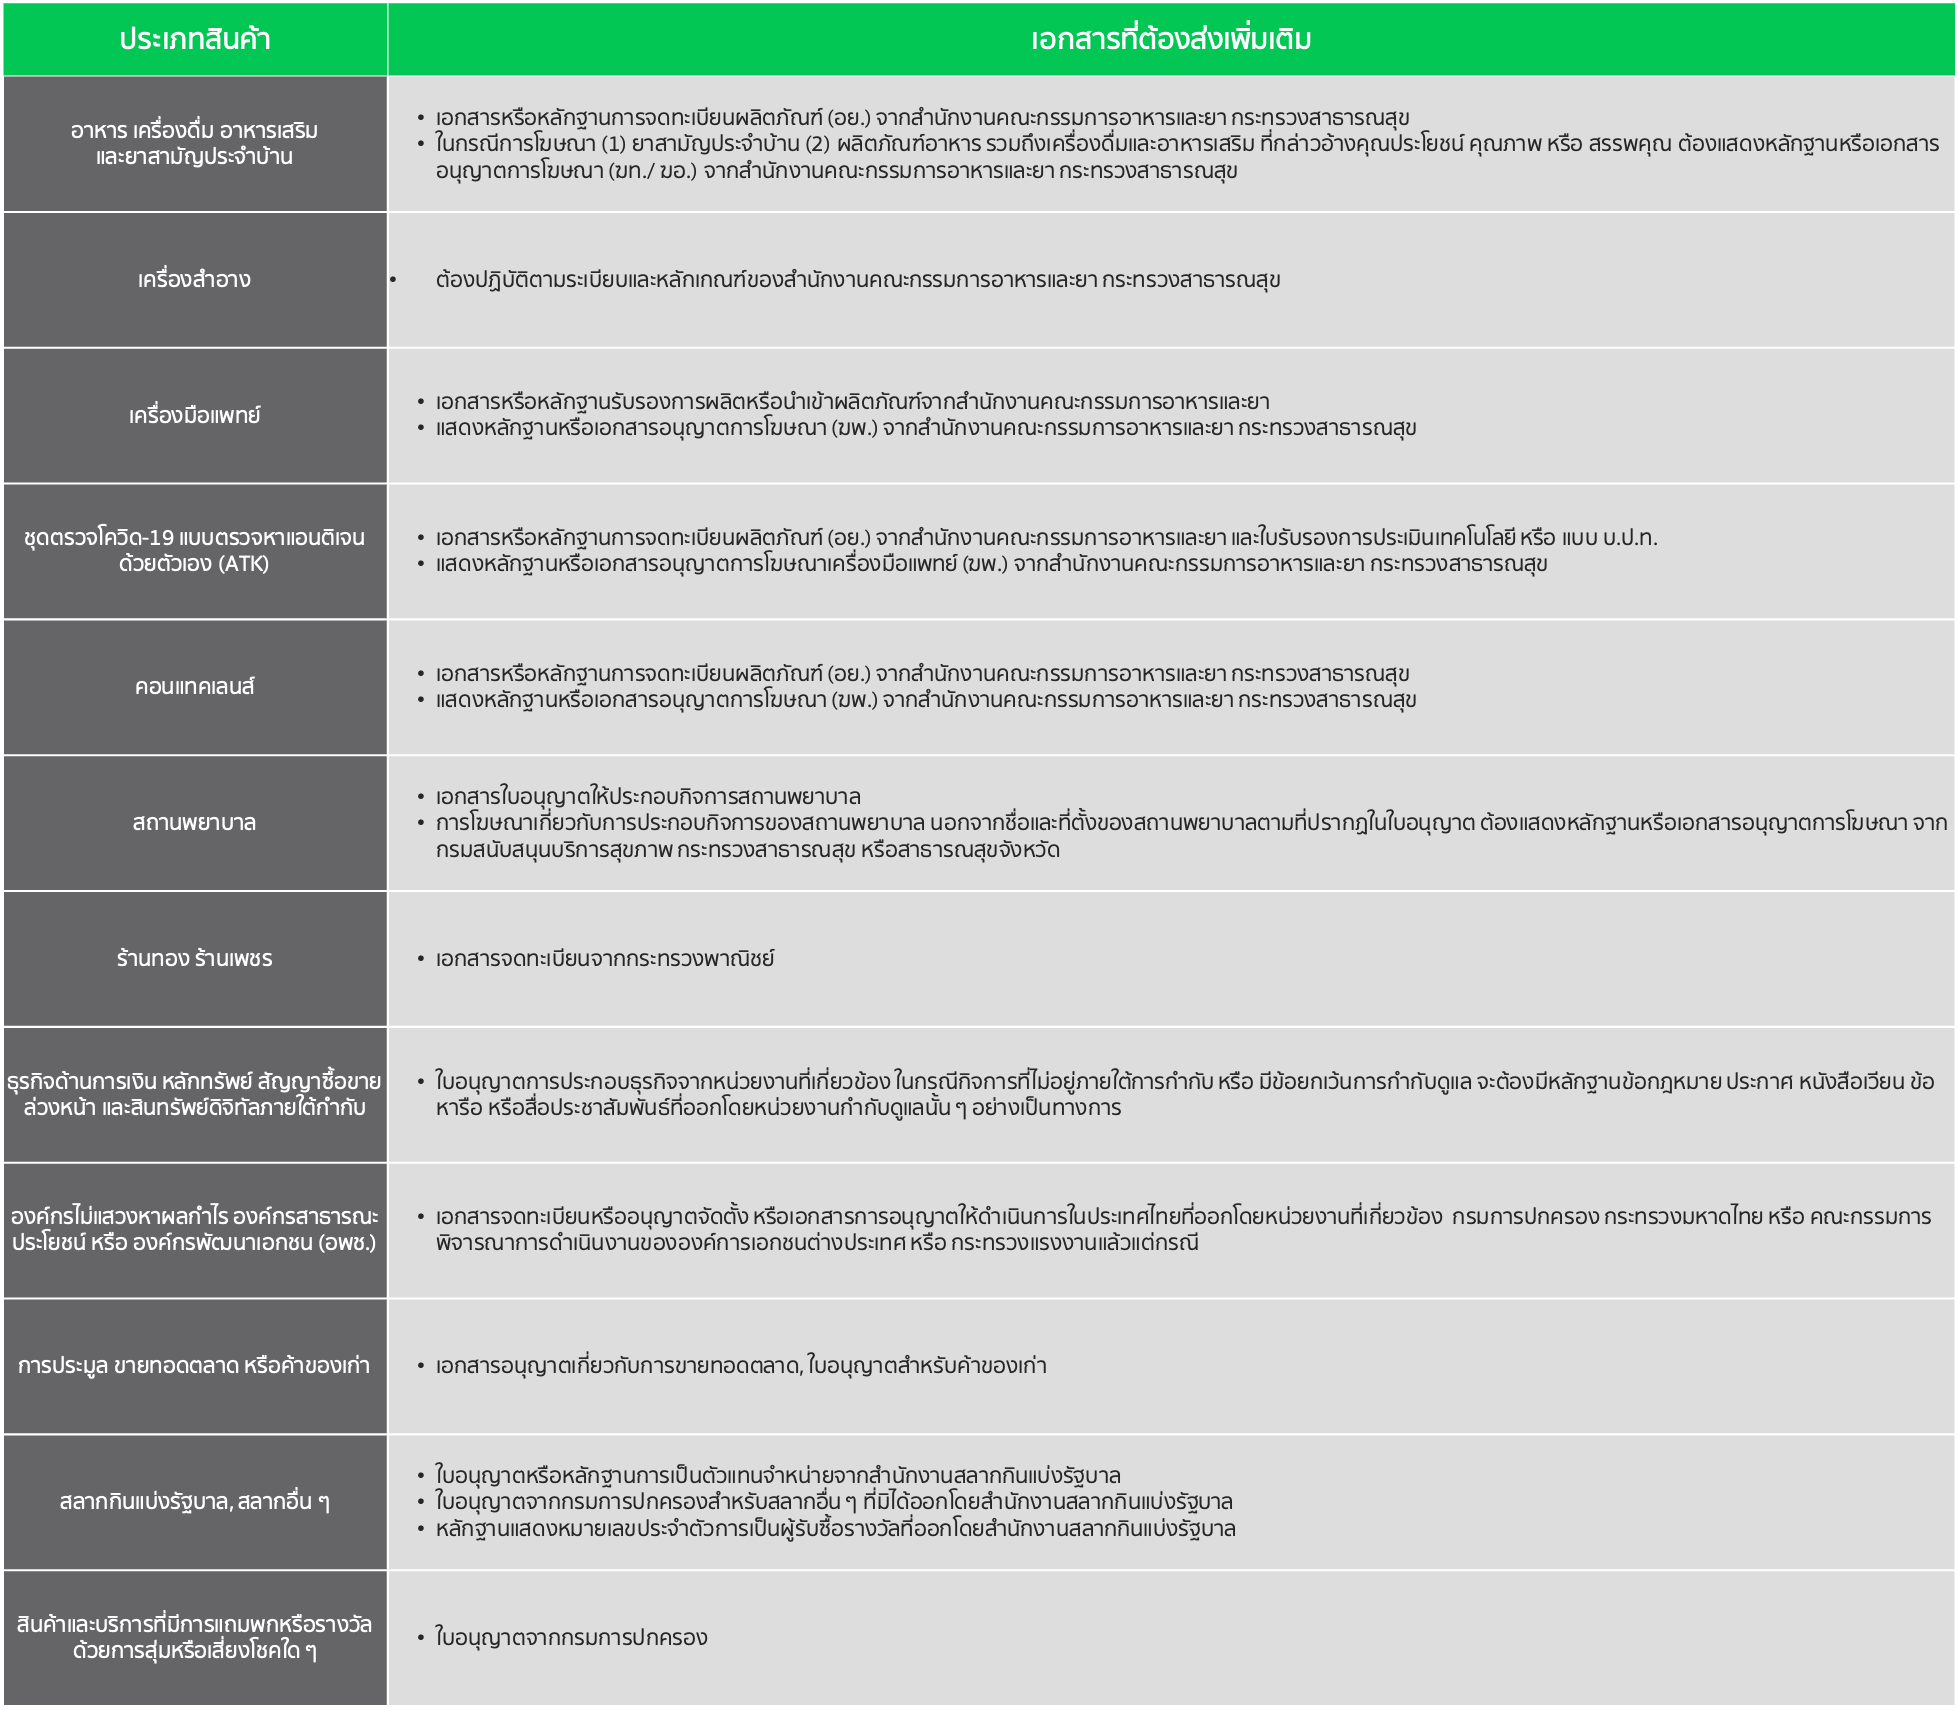
For Regulated Products and Services, Supporting Documents to the Advertisement may be Uploaded
in accordance with the Following Procedure:
1.Create a LINE Ads Ad Account via admanager.line.biz
2.Upload the supporting document files under the ’Product Information’

Sample of FDA Document
Food, Beverages, and Dietary Supplements Must Comply with the Regulations and Criteria of the Food and Drug Administration, Ministry of Public Health
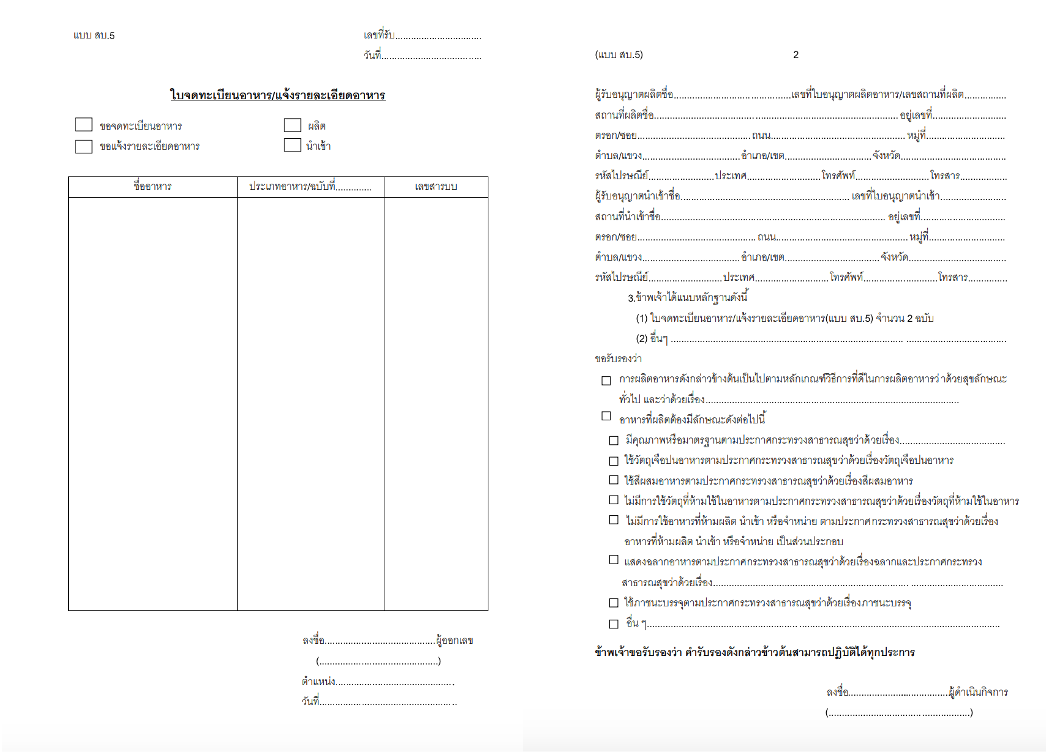
Sample of License to Operate a Medical Facility
A Medical Facility Requires a License to Operate a Medical Facility and comply with the Regulations of
the Ministry of Public Health
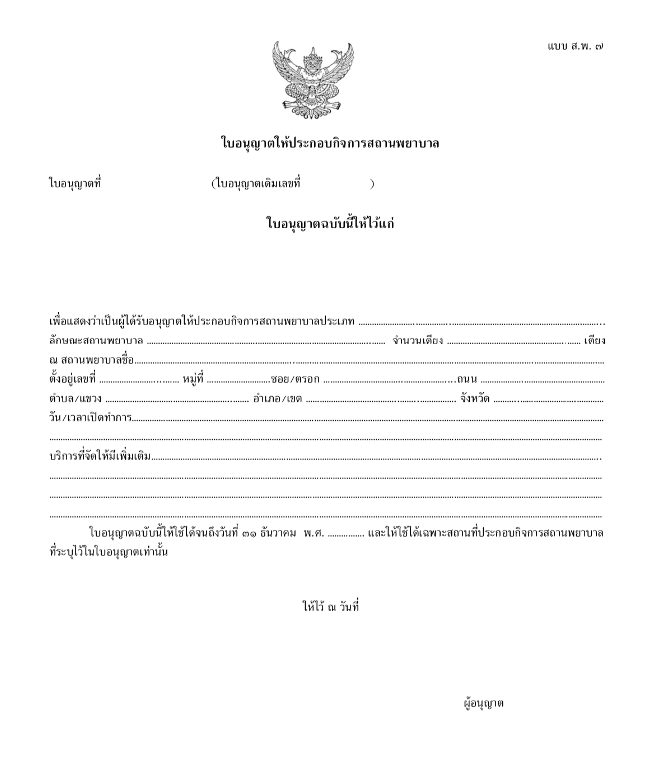
Guidelines on Advertising Copy Language
- Identification of the Product Brand in the Advertisement
The entity name or the product brand must be clearly stated in the advertisement at all times, provided that the name or logo must be large enough to be easily visible to the viewer. Furthermore, the copyright owner of the product must be stated at all times if the advertiser is not the copyright owner
- Prohibition of Statements or Content that Could Cause Confusion or Misrepresent the Company
- as the Provider
You are prohibited from using LINE or LINE Character logos, as well as services or content owned by
the Company in such a manner that could cause confusion or lead users to perceive that the advertisement is made by the Company.
In particular, the copyrights to the LINE Character are the sole property of the Company. The Company does not grant you any license to use in advertisements without permission.
The following terms and conditions of use in URLs below must be adhered to when using the LINE logo,
LINE icon, or LINE Official Account logo:
http://line.me/en/logo/guideline
https://media.line.me/en/how_to_install
- Use of the Term "friend”
A "friend" herein refers to the status of a user who has friended with the official account of LINE such as a LINE Official Account. You are not allowed to use incorrect terms such as "Frenz" and must use the correct term
as “friends” (if written in English).
- Prohibition of Ads with Multiple Sponsors
You may not resell ad spaces without the Company's permission and publish advertisements with content that may be related to other advertisers or cause users to be interested in the products or services of other advertisers.
- URL Link Restrictions
Links unrelated to the advertisements are prohibited.
- URL Prohibitions on using links to direct users to a LINE personal account
You may not use links to destination pages directing users to a LINE personal account for any purposes, such as adding friends. In case you wish the destination page to contain a LINE account, such account must be a LINE Official Account.
- Recommended Ad Formats
The format of the advertisement must be natural, clear, beautiful and attractive to users. Advertisements should not contain too many characters and it is recommended to put as little text as possible on the picture. Placing too many characters may cause your ad to be less visible to users or not at all.
- Ad Relevance
All advertising components, including any text, image, or other media, must be relevant and appropriate to the product or service being offered and the targeted audience viewing the advert. Adverts must clearly represent the company, product, service, or brand that is being advertised. The products and services promoted in an advert's text must match those promoted on the landing page, and the destination site must not offer or link to any unauthorized product or service/
- Prohibition to Use Links to Webpages that cannot be Controlled via a Smartphone
You may not use links to destination pages whose content cannot be accessed via a smartphone (please ensure that your link is compatible with smartphones) and you may not use webpages that contain characters, text, or images unsuitable for the proportions of smartphone's screen.
- Prohibition on the Use of Offensive or Violent Language or Content
You may not publish advertisements containing content with the potential to offend users or statements that may unsettle viewers to feel uncomfortable, images that are overtly revealing skin or sexually suggestive, images of swimsuits or lingerie unrelated to the advertisement, and language and content that promotes violence and discrimination based on race, color, religion, age, gender, or anti-social content.
- Prohibition on the Use of Inappropriate or Misleading Content
You may not publish advertisements that may cause misunderstandings regarding the properties, quality, or properties of products or services that are exaggerated or advertisements containing content that conveys
the understanding that a prize or reward will be received from the use of such products or services,
even though the users have no opportunity to truly receive such prize or reward.
- Advertising Content must be Compliant with and Display Details in accordance with the Laws and Regulations
In the case where any product and service are subject to specific legal requirements that the advertisement must be compliant with or display complete details in accordance with the regulations or criteria under law,
the advertising content of such product or service must be compliant with and display complete details
as prescribed by the respective regulations and criteria as well.
- Prohibition on the Use of Language Containing Absolutes, such as “the Best,” or “No. 1”
You may not use language that conveys superlatives such as “the Best,” “No. 1,” or “World’s First.” In the case that the advertising content contains such words or other words that convey the same meaning, the data source, survey source, and survey year must be clearly identified within linked pages and ad creative.
- Language or Content Designed to Obtain Personal Information Through User Registration or Other Similar Methods
If an advertisement sends users to a separate web page and encourages them to register for your products or services, you must visually state that the link destination is in no way affiliated with the Company. Additionally, strict compliance with the personal data protection laws and other laws related to the collection, use, and gathering of personal data is required, provided that it shall not cause misunderstandings or use any techniques to collect, use, or gather personal data without an opportunity for the user or the data subject to recognize such fact.
- Prohibition on the Claims of Treatment Results or Medical Treatment
You may not exaggerate the properties or use words related to treatment results or medical treatment (except for advertisements that have been approved by the FDA) and you are prohibited from using images and videos that display “before and after” images unless they are in accordance with the criteria prescribed under law.
- Prohibition on the Use of Comparative Language or Content
You may not publish advertisements with comparative content between your products or services with a third party’s products or services or mention the brand names of the third party's products or services therein.
Frequently Incorrect Content
Ads will be banned and removed immediately if they are any of the following “businesses”:
- Cigarette products, electric cigarettes, tobacco, or related products, including quit-smoking aid products containing nicotine
- Gambling-related products and services such as pachinko, football betting, lottery, and games banned under laws
- Pregnancy assistance, surrogacy, content related to adopted children, accepting or giving non-relative adoption to a third party
- Trading service of pets and live animals
- Pawn shops/Pawned diamonds even if they have a certificate or quality guarantee
- Fraudulent lending and fundraising for unlawful purposes
- Pyramid scheme, direct sales in an illegitimate multi-level, or any other businesses of the same nature which are not approved by the Office of Consumer Protection Board (OCPB) such as businesses which push members to buy products in order to be a part of its business, businesses which do not focus on selling products to users but rather encouraging members to invite others to join a network, where revenues of businesses are based on additional invited participants joining the network, high price merchandise with non-standard quality, do not have refund policy due to payment scheme is to pass through money received from new members payable to current members as a pyramid system.
Ads will be banned and removed immediately if they contain the following “content”:
- Images and videos that display “before and after” images for goods or services that are subject to specific laws, regulations, policies, or regulatory bodies, including health-related products, drugs, foods, medical devices, cosmetics, pursuant to the criteria prescribed under law
- Images that contain improper content e.g. zoomed photo of acne, blemishes, freckles, baldness, psoriasis, and a lot of hair loss
- Medical devices or equipment (without the Food and Drug Administration’s evidence or documents certifying the production or import thereof)
- Medicines sold by prescription related to specific diseases e.g. antibiotics, antiseptic, medicines for cataracts, and eye drop
- Low quality images such as disproportionate images, misspellings, and other languages apart from Thai and English
- Images that shows figures and measurement e.g. weight scale, measuring tape, and glucose meters
- Pictures of doctors or specialists without permission from the subject
- Unreliable products and services or those legally banned from selling, possessing, or advertising
Marks or Symbols Recommended on LINE Ads
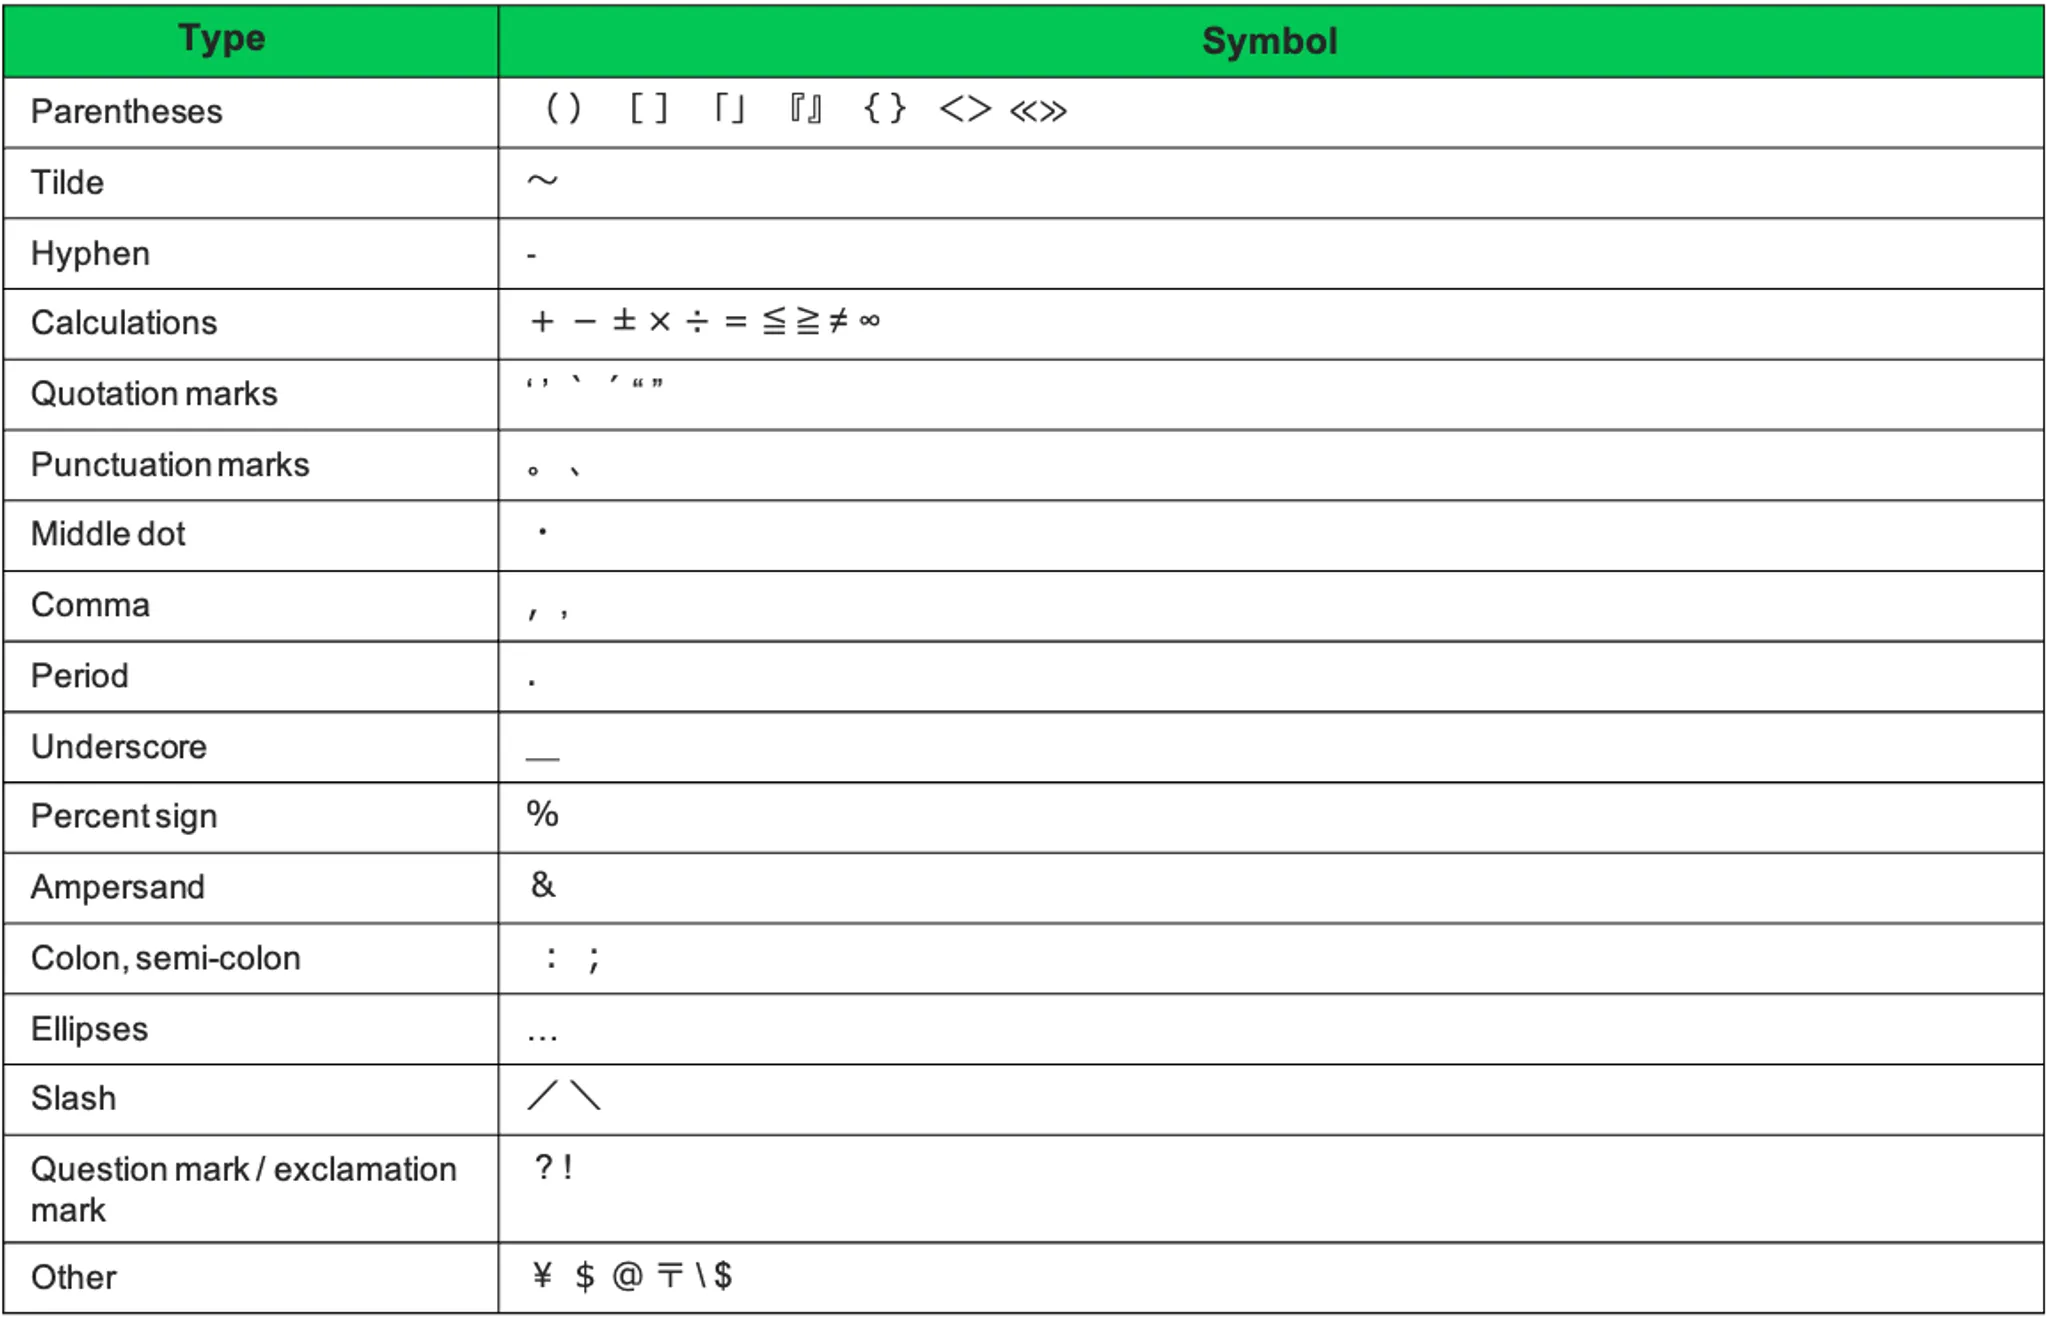
- It is recommended to use the marks or symbols provided above. In case of marks or symbols used other than the above, the Company will not warrant that the statement will appear correctly.
- Use of signs or symbols must be grammatically correct.
- Currency symbols are allowed for the local currency of the country where the ad is displayed.
- Quotations can only be used one at a time, before and after the sentence.
- Do not leave spaces at the beginning and end of sentences.