Frequently Asked Questions
There are 2 types of LINE Ads accounts: Self-Serve and LINE Agency Partner.
Self-Serve
Users who use this type of account set up their own LINE Ads account online and make payments using a credit card.
LINE Agency Partner
This type of account is for users who neither set up their own LINE Ads account nor process credit card payments through LINE directly. Rather, they choose to contact an agency to set up and run the account for them.
Self-Serve and LINE Agency Partner accounts may have certain functions and operational processes that differ from one another.
To use the Help page, please ensure that you select the page associated with your account type.
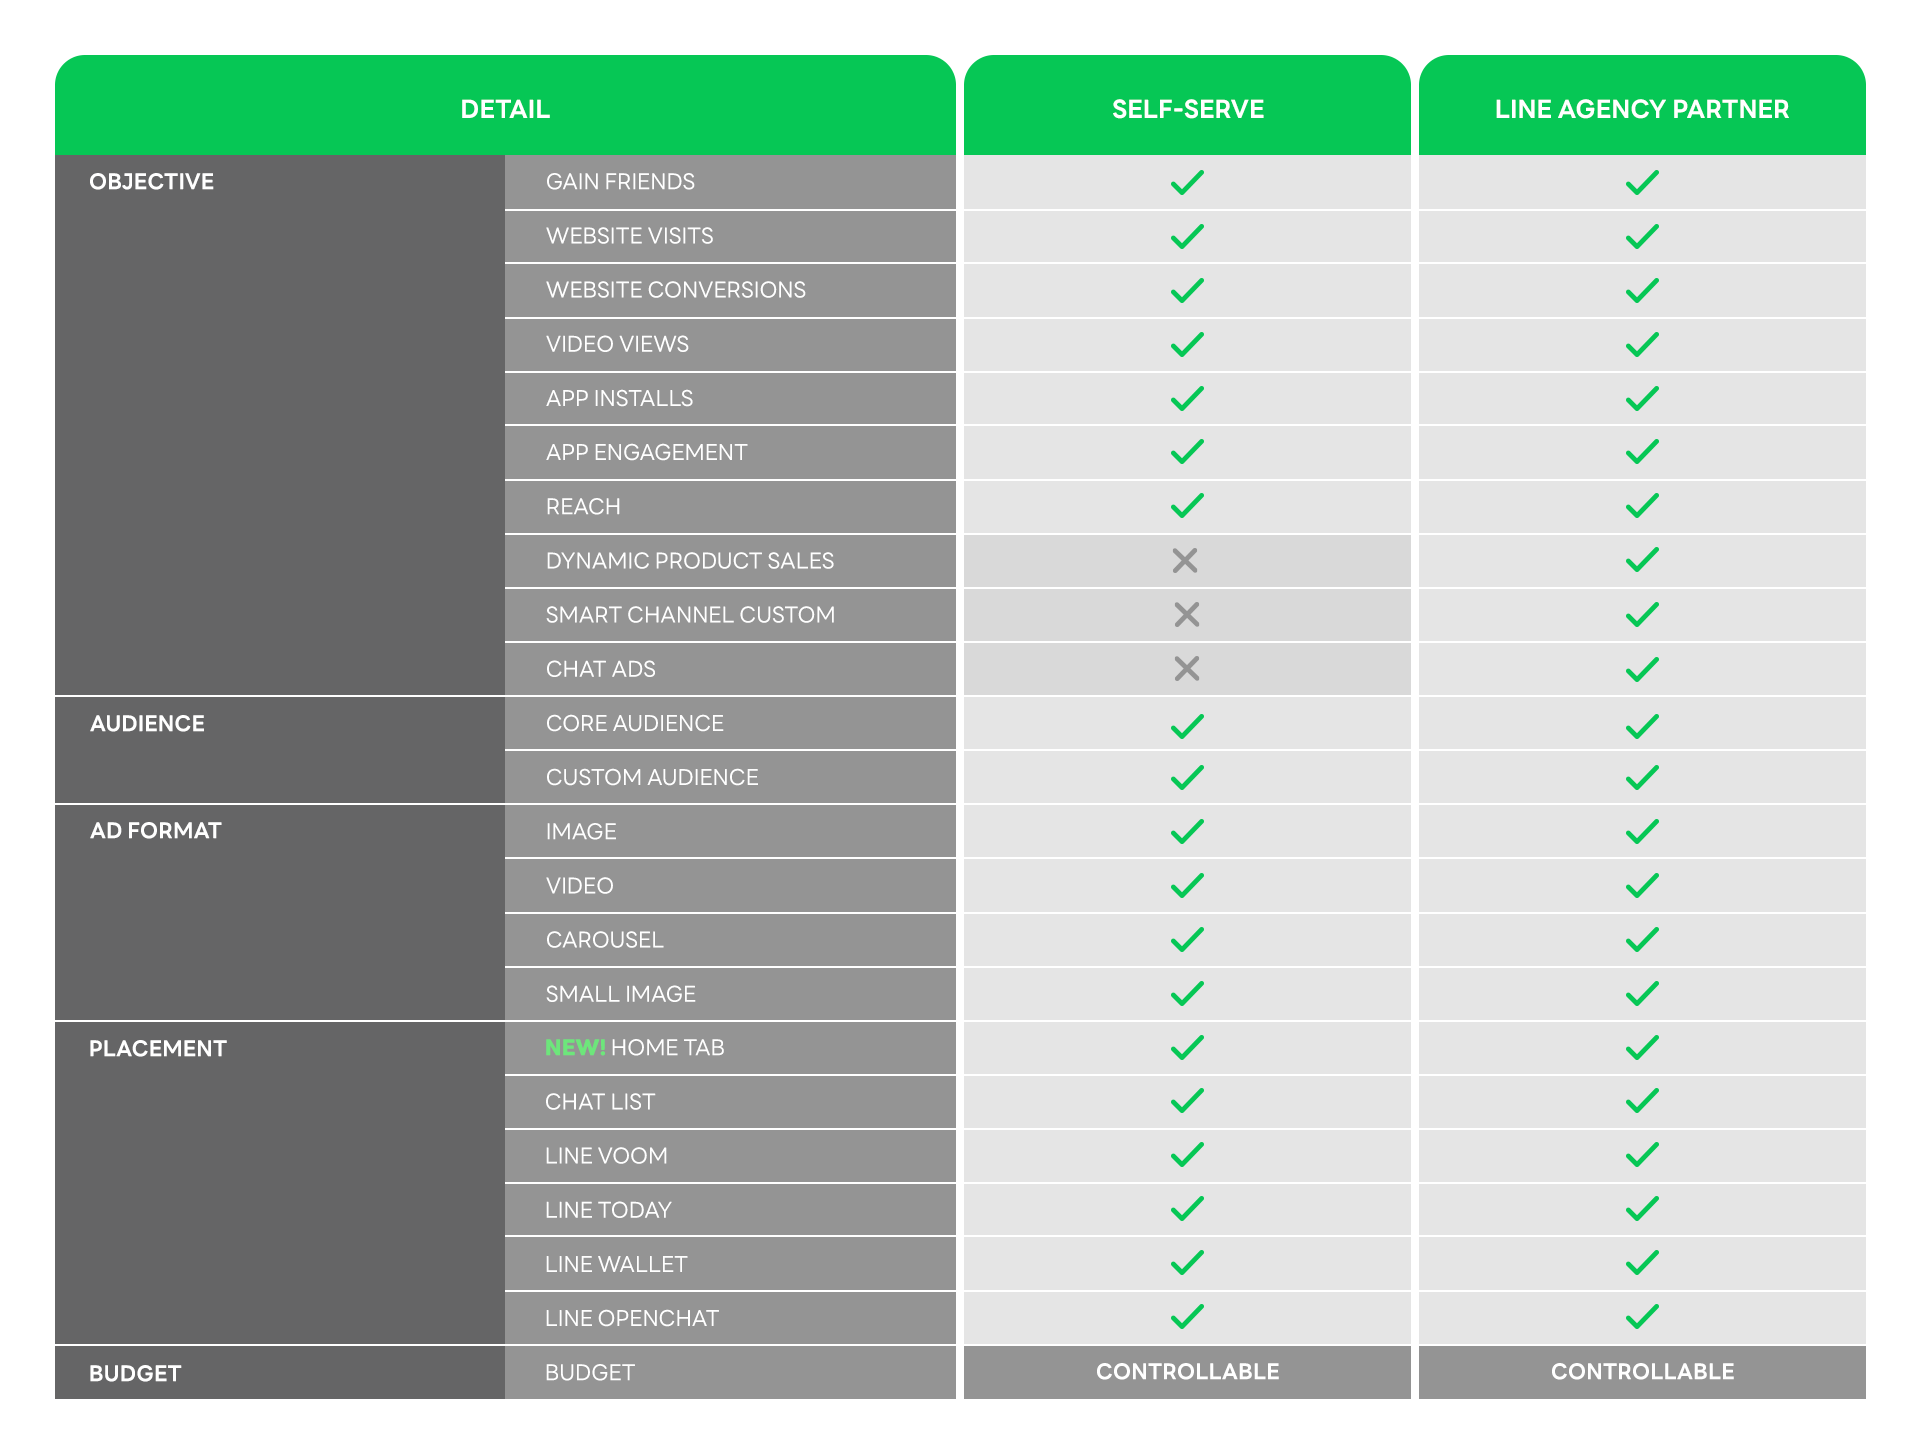
LINE Ads Self-Serve l LINE Agency Partner
(Last updated: June 8, 2022)
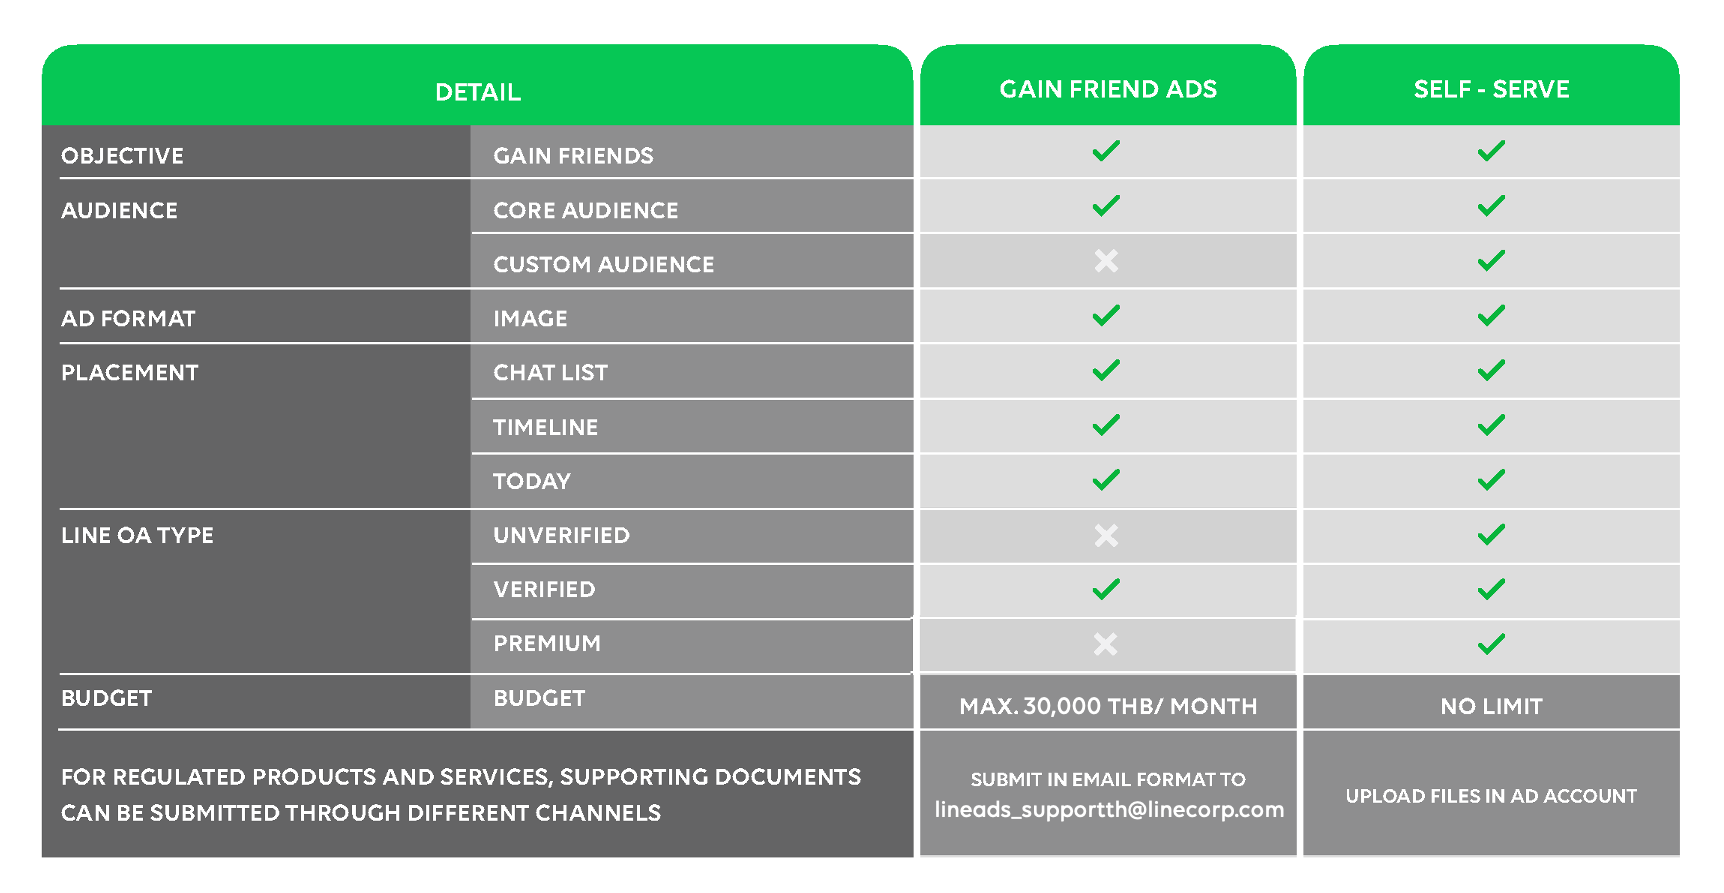
If you use Gain Friend Ads, you can submit supporting documents by following the steps below:
1. Send an email to [email protected]
2. Specify the email subject line as follows: Supporting Documents/Ad Account ID/Product or Service Name
3. Please enter the following details:
- Contact Person:
- Contact Number:
- Ad Account Name:
- Product or Service Name:
*** Please also add supporting documents as attachments.
To purchase a LINE Ads Self-Serve, you can directly upload the documents under your Ad Account by following the steps below:
1. Create your Ad Account via admanager.line.biz.
2. Upload the supporting documents under the ‘Product Information’ menu.
.png)
Gain Friend Ads l Purchase LINE Ads Self-Serve l Controlled Products and Services
(Last updated: June 1, 2022)
You can check the number of successful Gain Friends in the “Clicks” column, and for cost per friend, in the “CPC” column.
.png)
(Last updated: March 1, 2021)
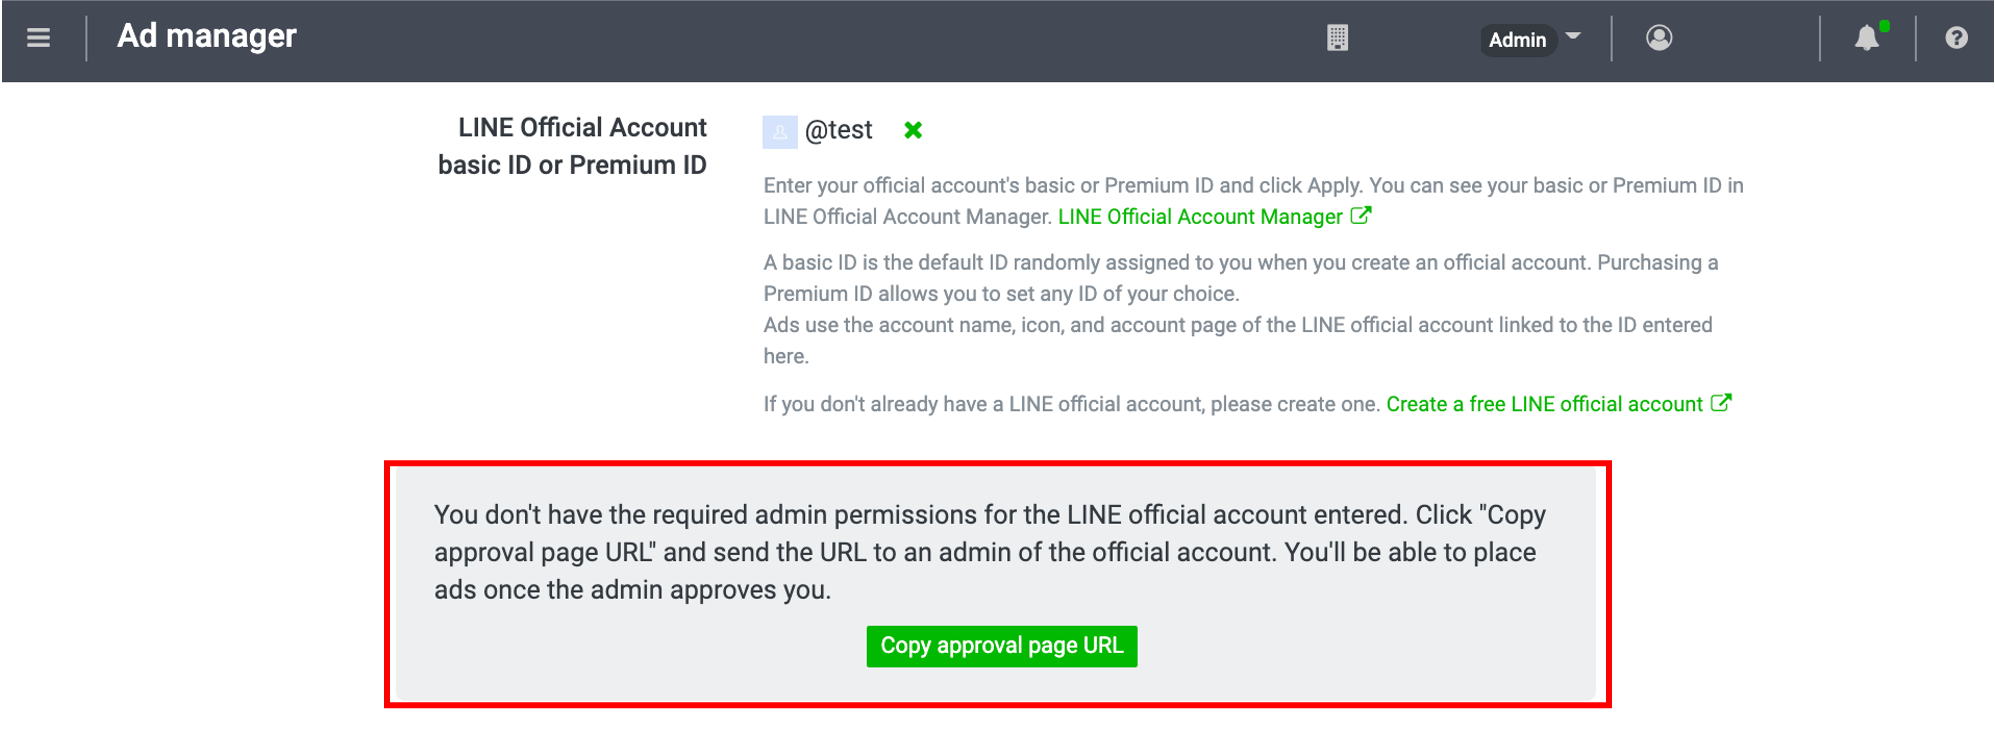
You can connect LINE Official Account to LINE Ads by following the steps below:
Method 1: Copy approval URL when creating ad account
- Open the group in which you want to create an ad account. > Click on the “Ad accounts” tab. > Click “+ New ad account.”
- Under “Product information”, fill out and review your “LINE Official Account basic ID or Premium ID” information
- Click “Copy approval page URL”
- Fill out every required field and then click “Create”
- Send the copied link to an admin of LINE official account you registered
Method 2: Copy approval URL after creating Ad account
- Select the ad account name from which you would like to proceed approval
- Click “Copy link” and send the URL to admin of LINE Official Account that you registered
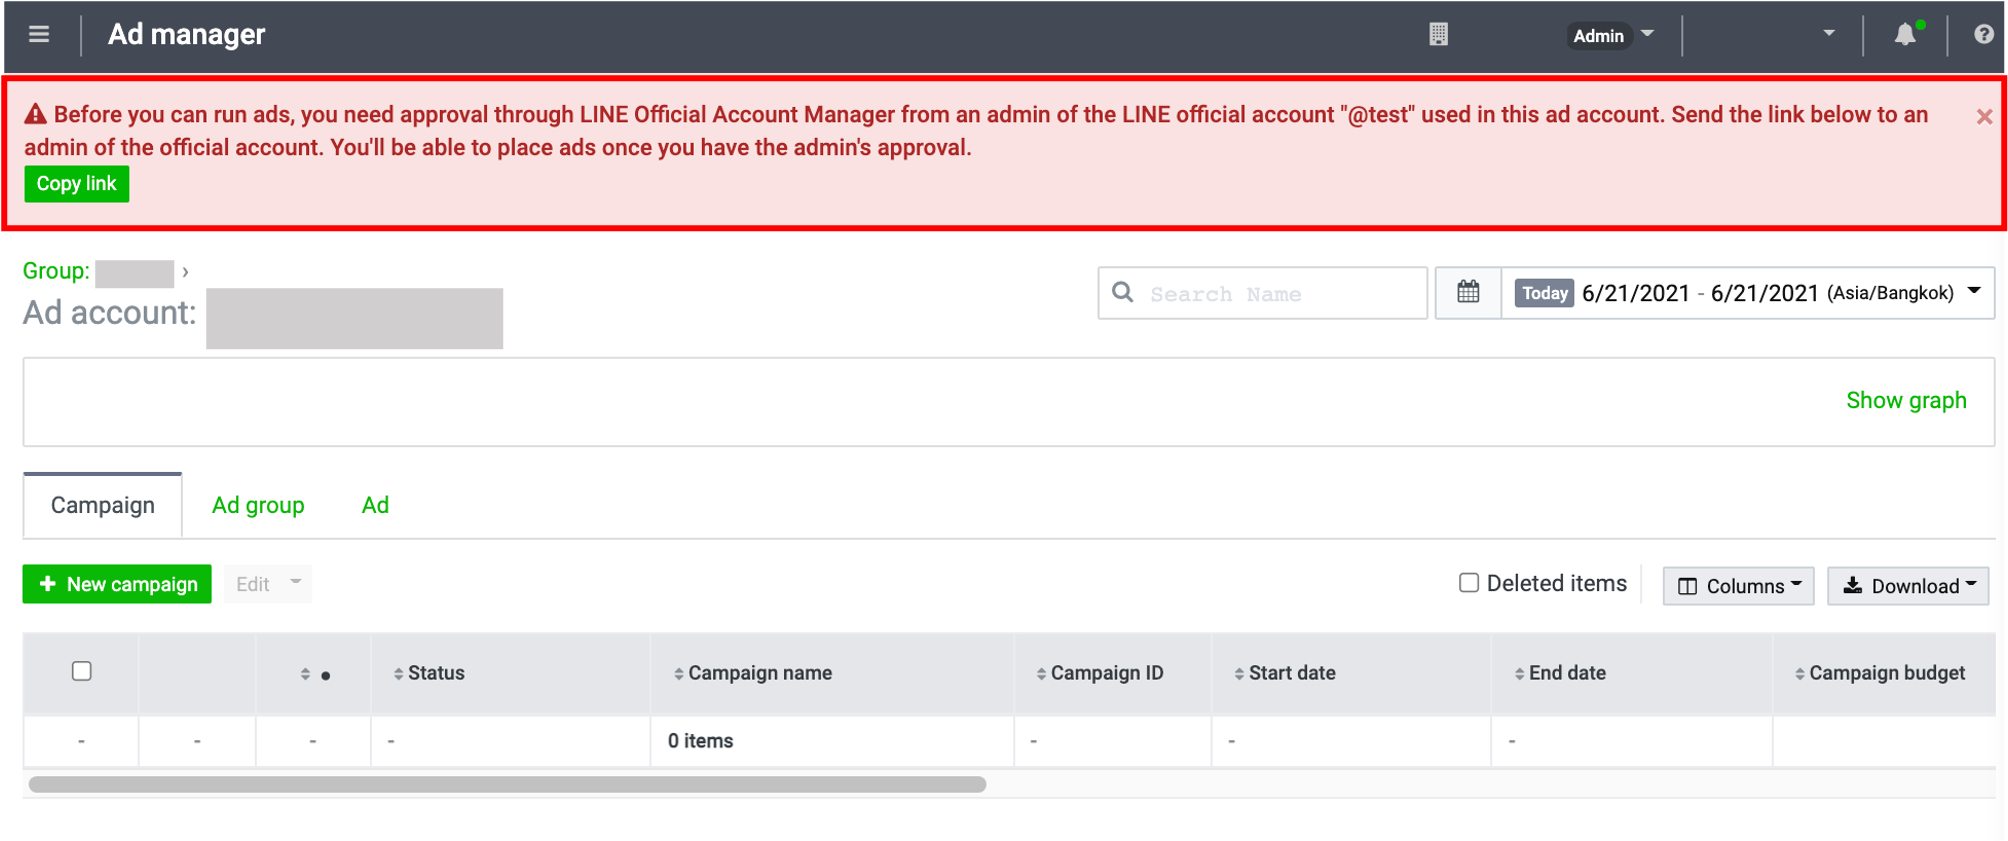
When admin of LINE Official Account receives the approval URL from either method 1 or 2 above
- Open this link and login to LINE Official Account Manager
- Open new tab and paste the approval URL
- Click “Accept” for the ad account you would like to link
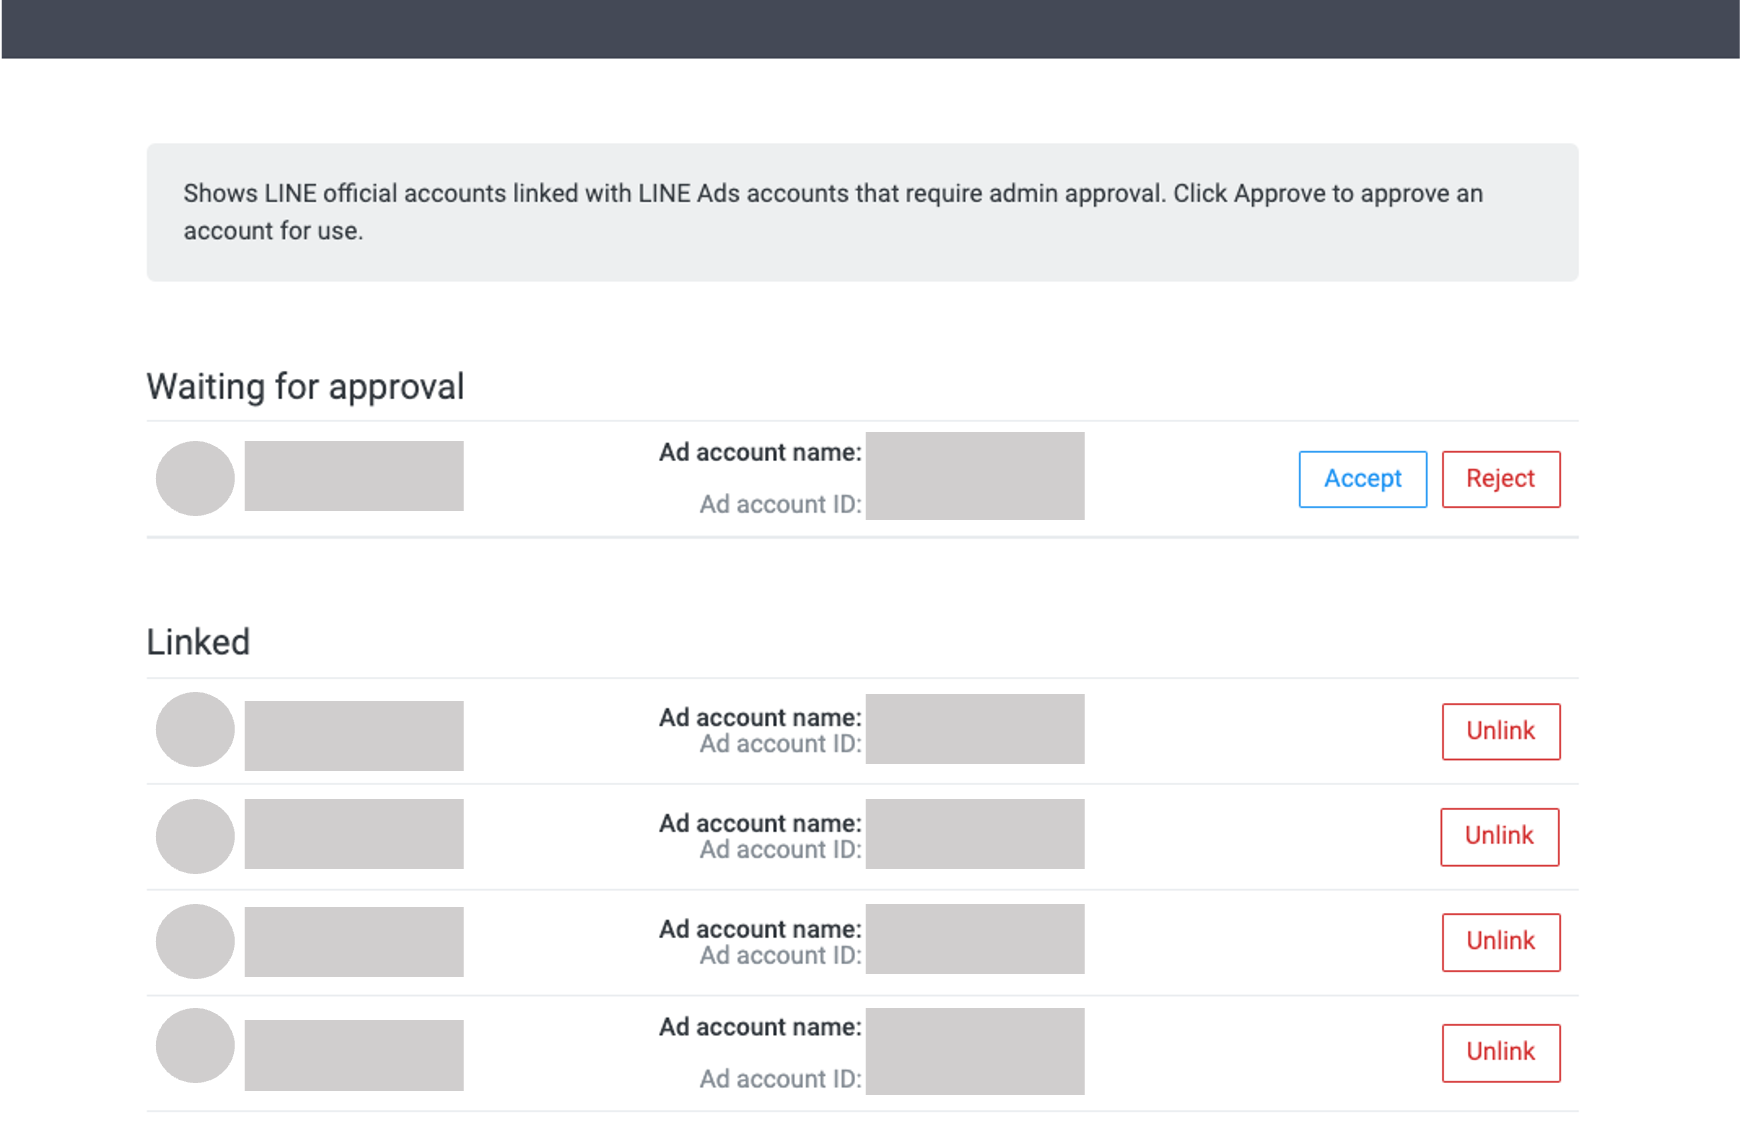
Remark:
- Creation of ad account must be completed before the linkage in approval URL
- Always recheck for the login of LINE official account registered
(Last updated: June 25, 2021)
Before you start delivering ads, please ensure that all the settings below are correct and complete.
Are all campaign settings configured correctly?
See how you can check and edit your settings here.
Are all ad group settings configured correctly?
See how you can check and edit your settings here.
Are all ad settings configured correctly?
See how you can check and edit your settings here.
Has the review process for the ad been completed?
See how you can check the review status for the ad here.
An ad will start to display after you have checked all the settings above and updated the status of the campaign, ad group, and ad to “Active.”
* In cases where you have already set a start date and time in the campaign setting page, and all statuses are set to Active, the ad will automatically display on the previously defined date and time.
.png)
(Last updated: October 19, 2020)
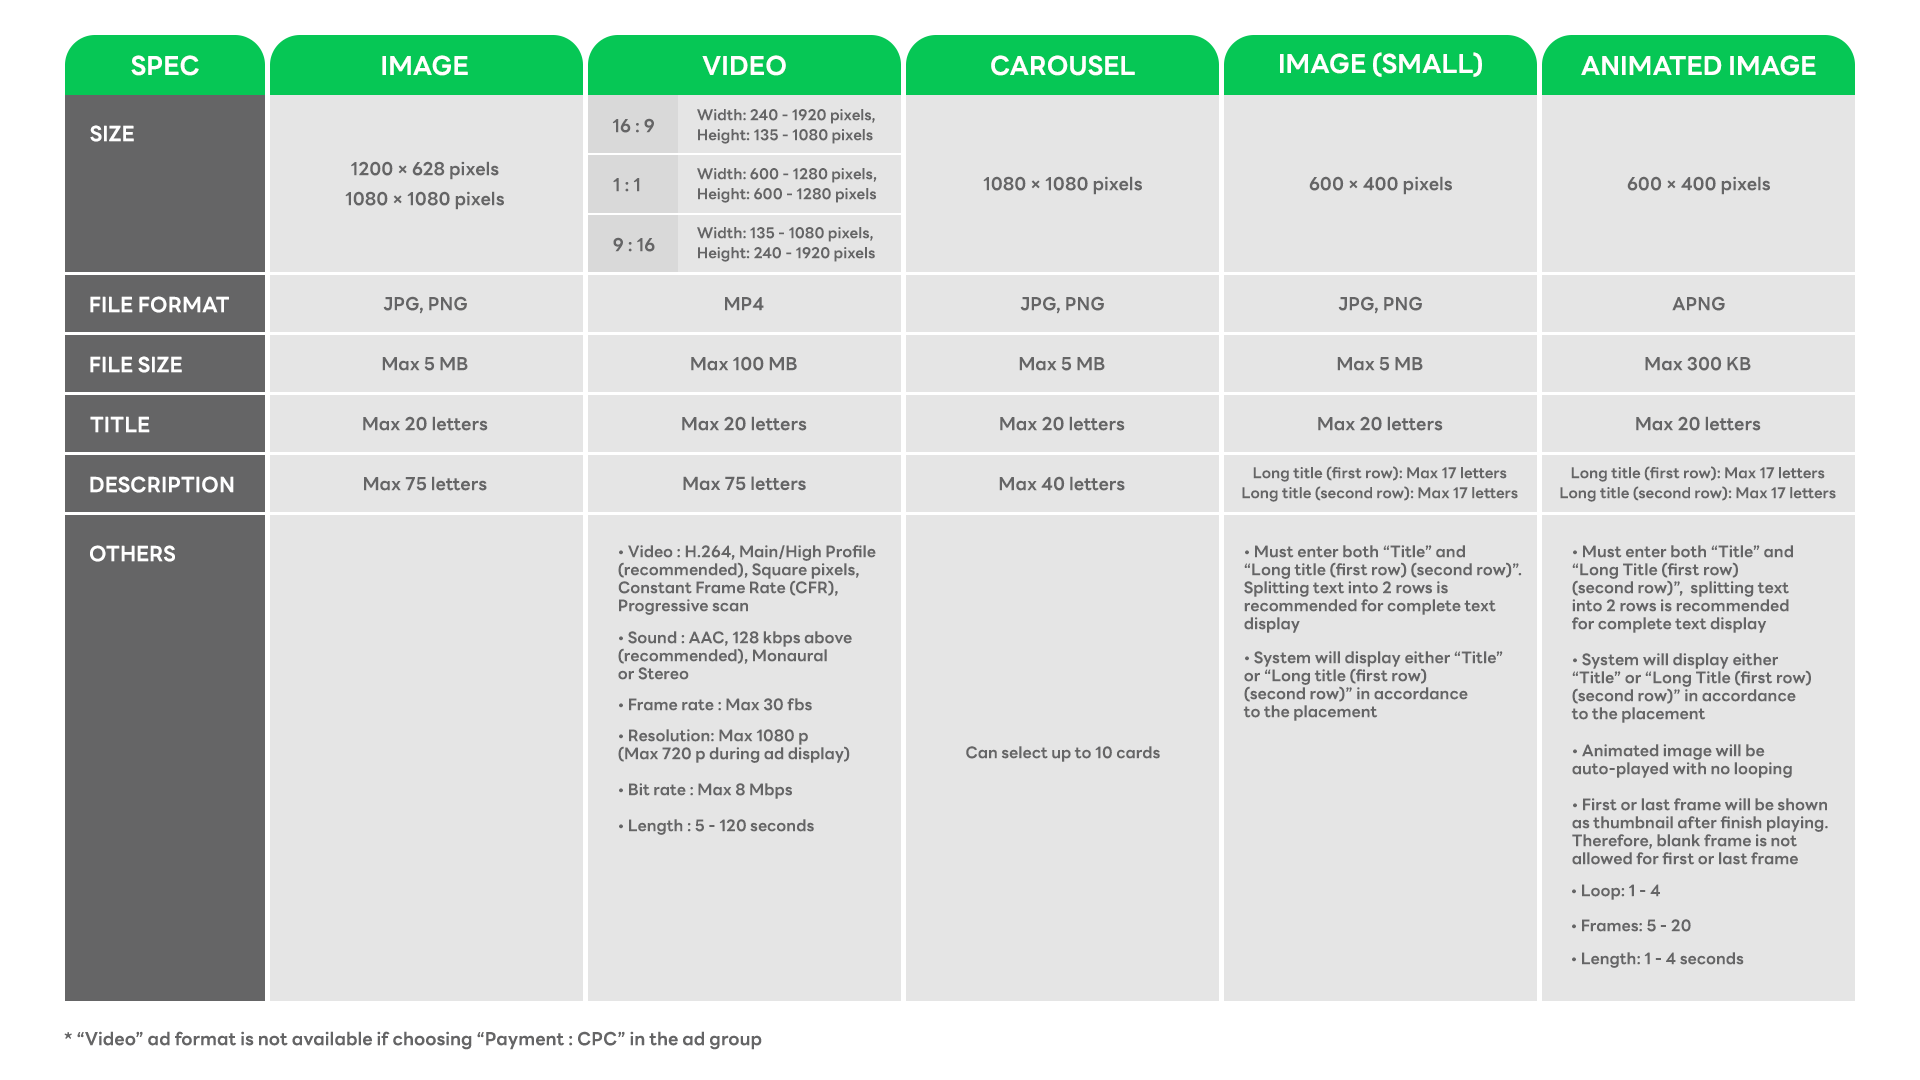
You can recheck specification of each ad format below:
You can recheck LINE placements for each ad format below:
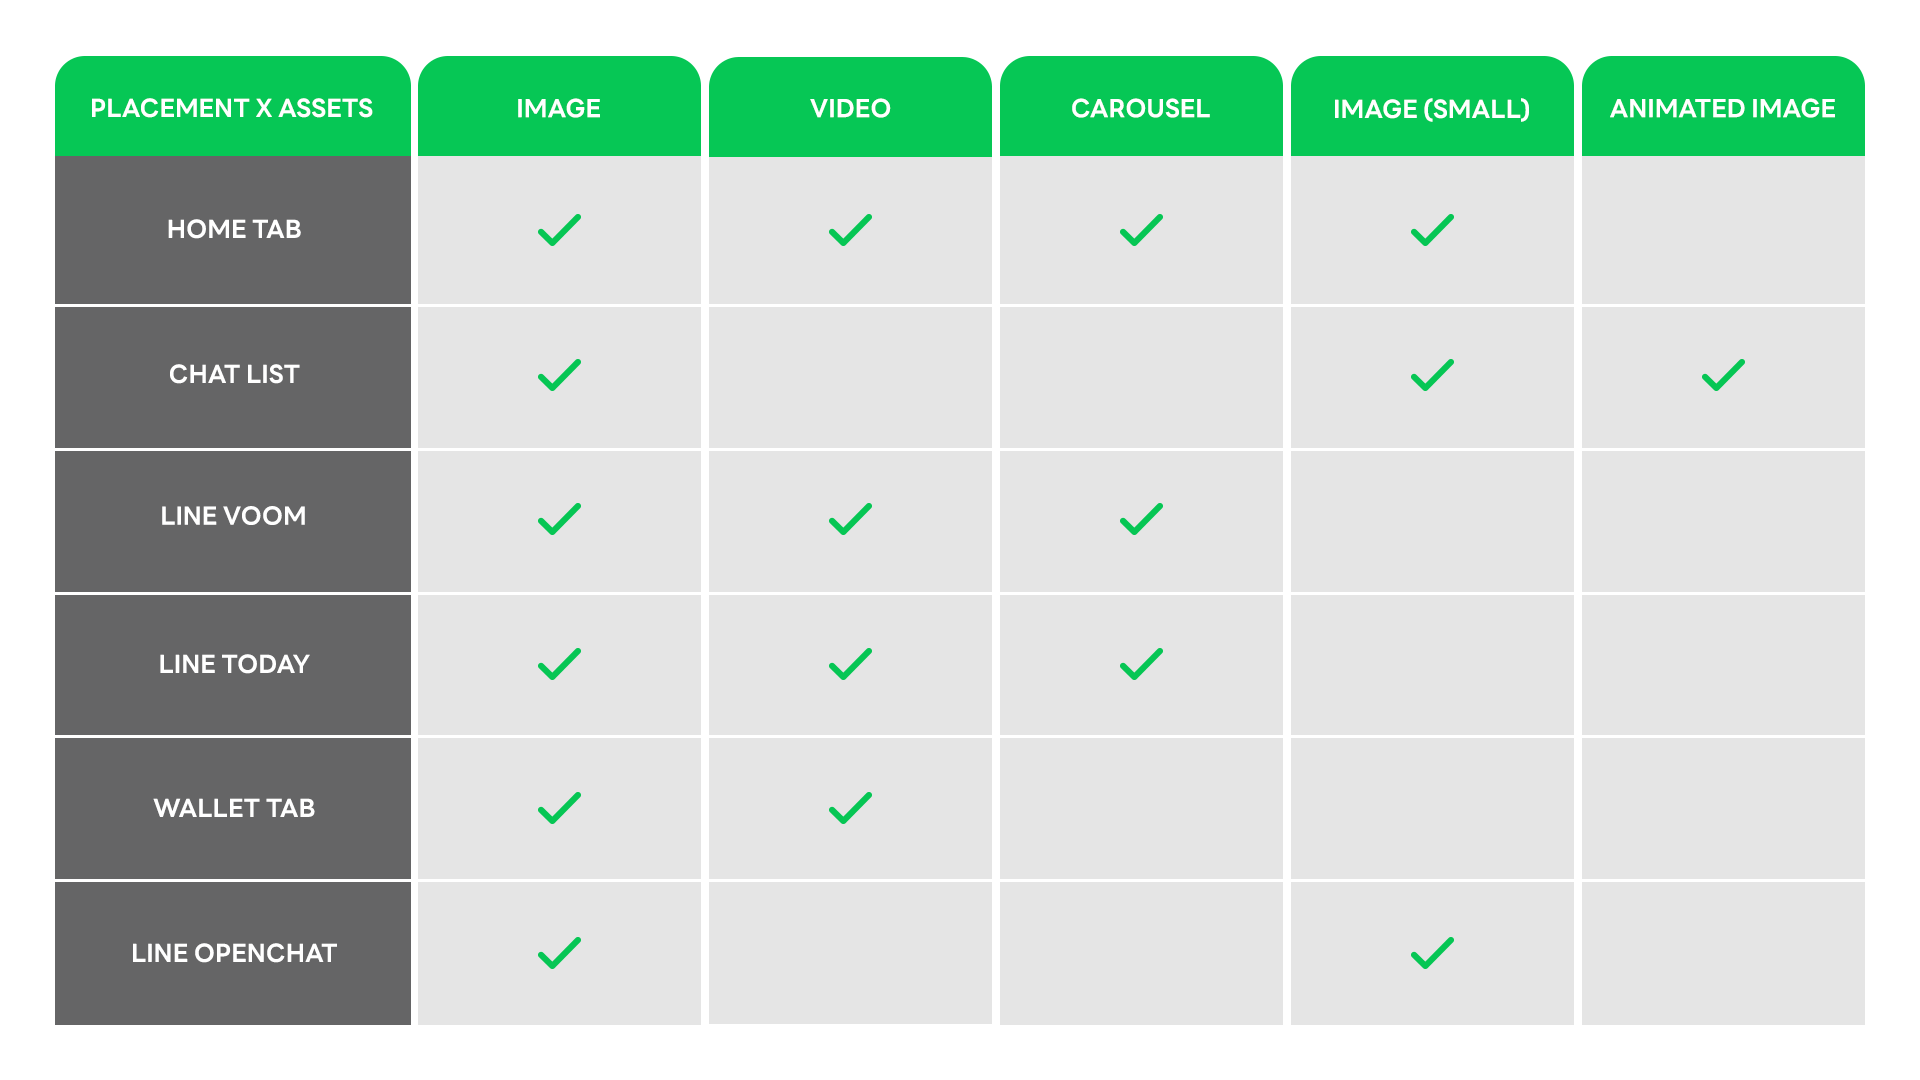
Remark
- LINE Ads will deliver ads to all placements within LINE-related services. You are unable to set ads to be delivered on a particular placement.
- For more information on how to create animated image, please click here.
(Last updated: October 26, 2022)
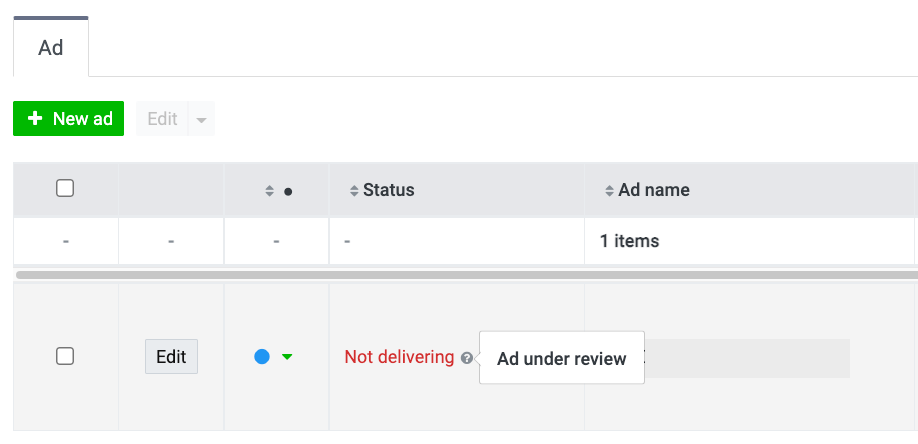
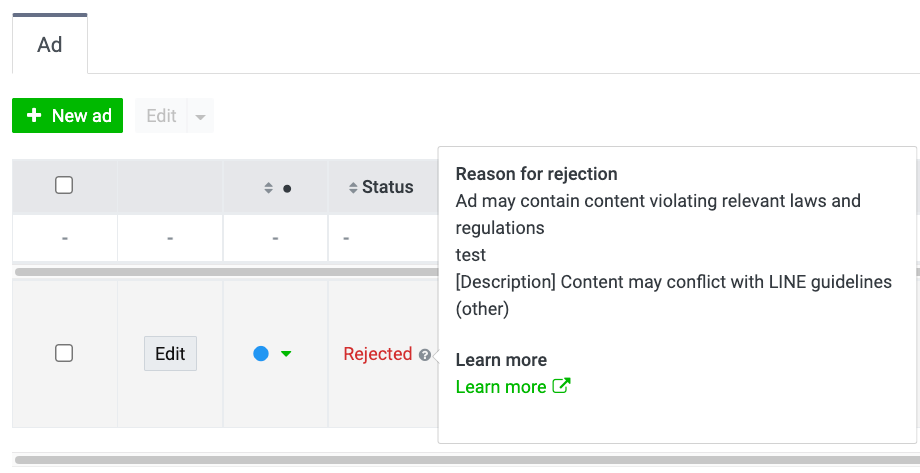
Your “ad” will undergo a review process within 48 hours after submitted.
You can check the review status of your ad by following the steps below:
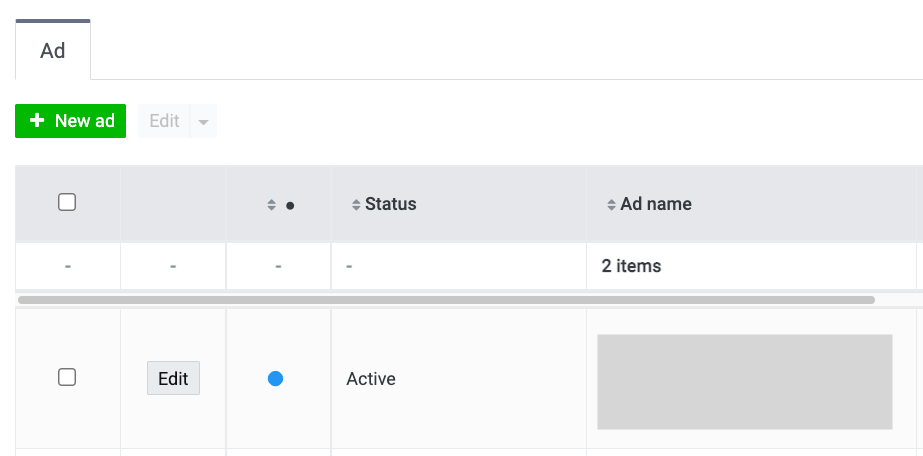
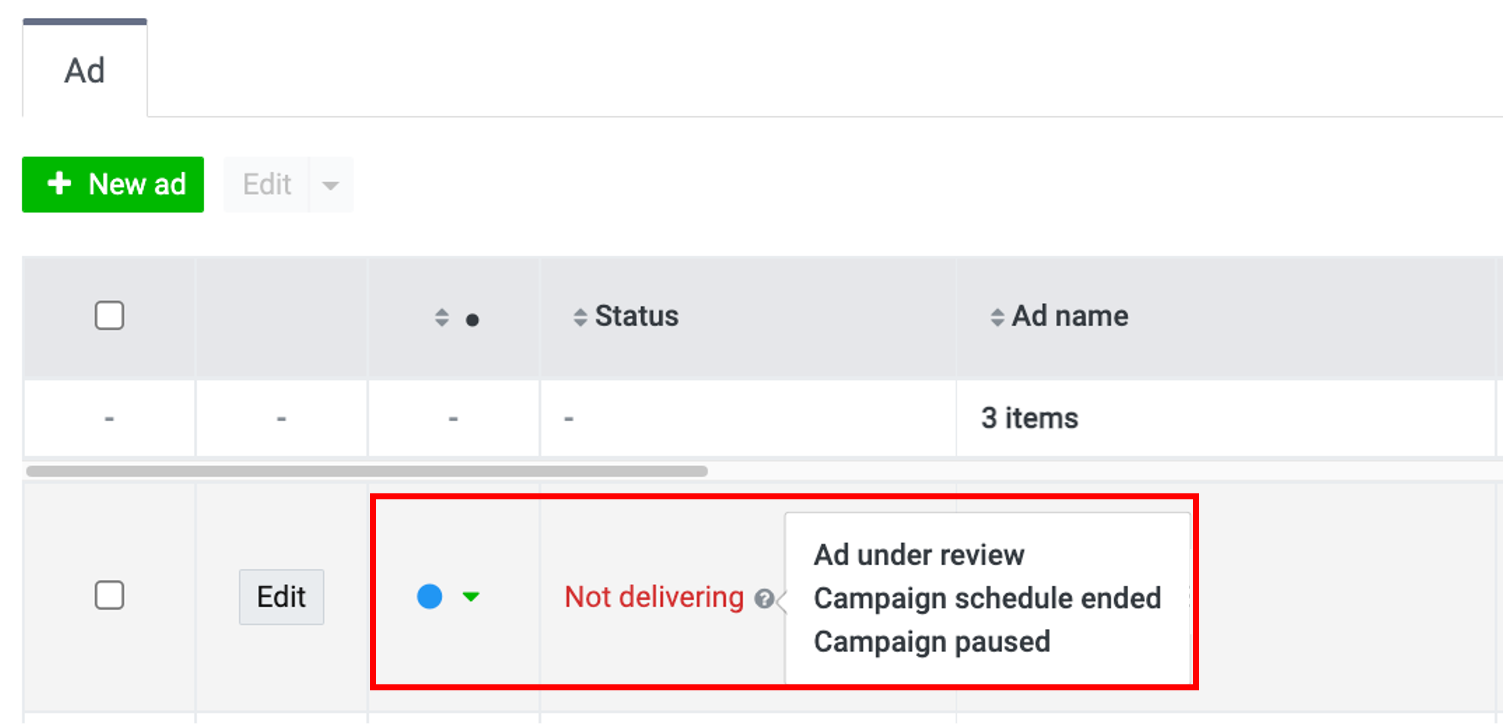
1. Click on the “Ad” tab on the Ad Manager page to see the full ad list.
2. Hover the mouse cursor over the icon in the “Status” field.
In the “Review status,” you will see each status type as follows:
Under review
This means your ad is still in the review process. You can create other ads but cannot deliver the ad that is currently under review.
Active
This means the review process is complete, and your ad is approved. You are able to deliver the ad once all the settings are completed.
Rejected
This means the review process is complete, but your ad is not approved. As a result, this ad cannot be delivered.You will see the reason your ad has been rejected when you hover the mouse cursor over the icon .
*Please create ad new with the adjustment of rejected detail.
Note:
- You can check ad status only in “Ad” tab
- Approved ad may or may not deliver, depending on your set up “Active” or “Paused”. For more information, click here.
- “Media” such as image and video files won't be reviewed if you haven't created any ads for it. Please create ad and check ad status.
(Last updated: December 8, 2021)
Status describes whether or not the campaign is running during that time. You can set status in 3 levels: campaign, ad group, and ad.
Active. The level you are checking is active and can deliver ads.
Paused. The level you are checking is not active. Ads are not delivered because you have paused them.
Steps to adjust status
Method 1 Select level, click on “Status Symbol”, and select status.
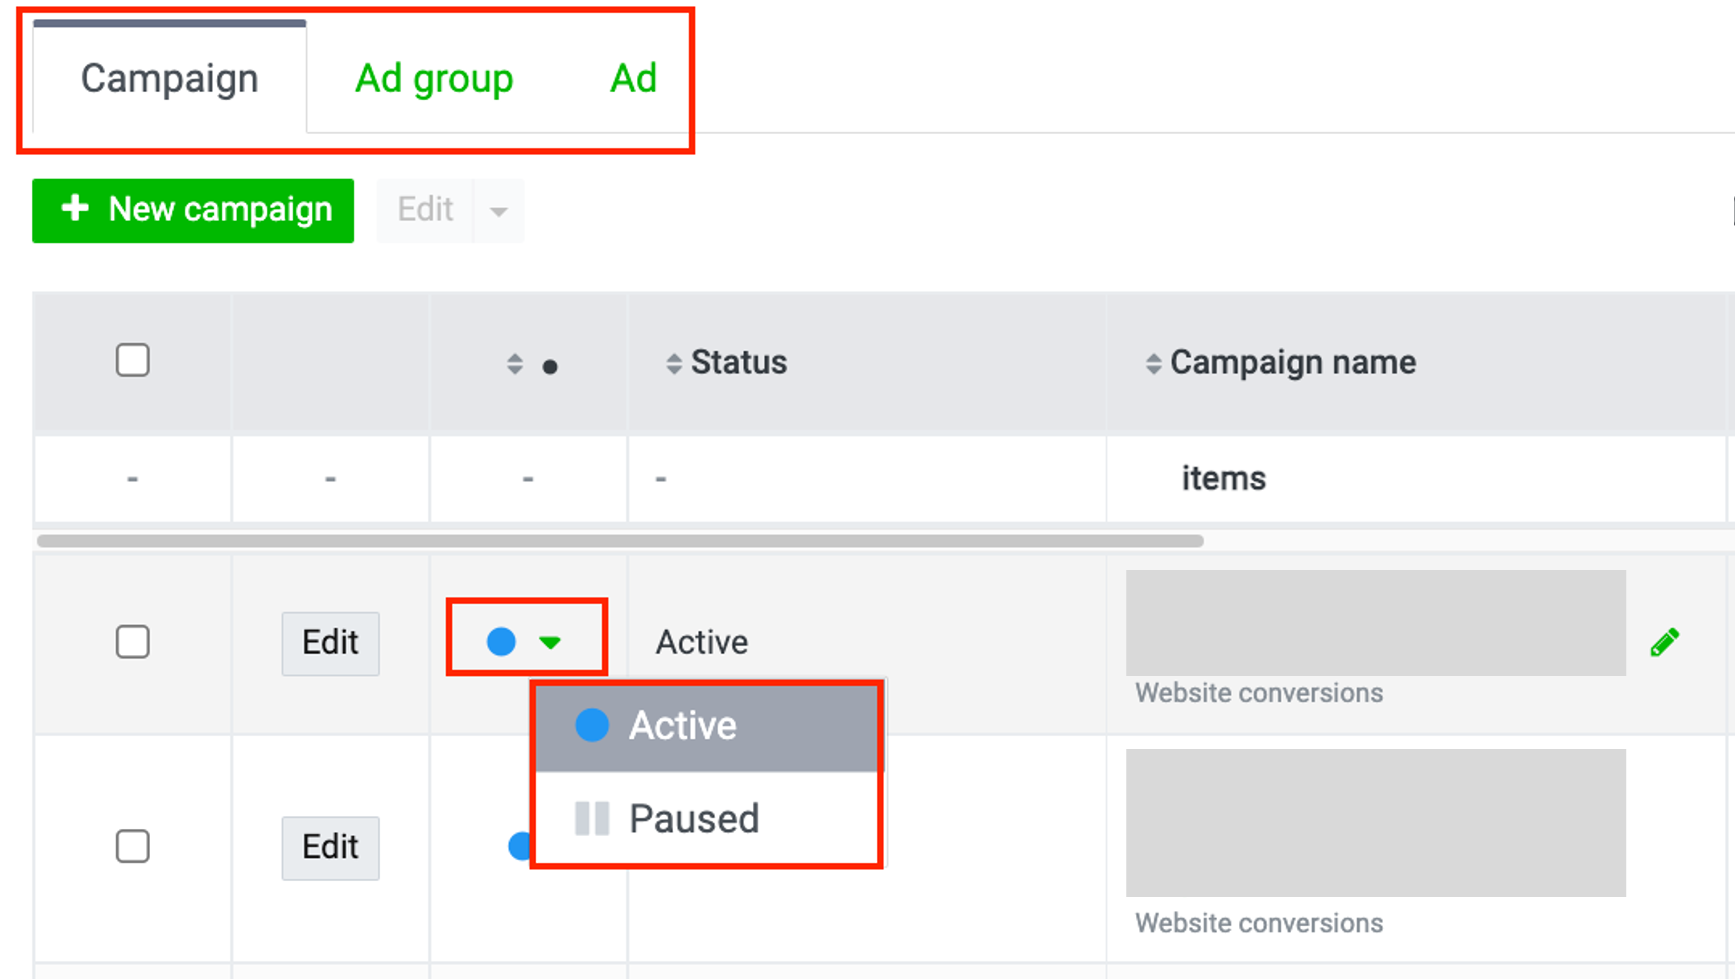
Method 2 Select level, click “Edit”, select the status, and click “Save”

You can adjust your status at any time. Please always check the status along with the description and question mark.
Please be aware of status in each level. In case you would like to run or resume ads, it is necessary to select “Active” status throughout all 3 levels. In case you would like to stop ads, please select “Paused” status.
(Last updated: August 1, 2021)
To measure ad performance through the LINE Ads, you have to insert LINE Tags on the page where you want to track conversions.
LINE Tags consist of 3 types of code: base code, conversion code, and custom event code.
.png)
LINE Tags can be obtained from the Admin panel of LINE Ads by following the steps below:
1. Click on the “Ad Account” tab on the homepage. > Select the account name where you want to track conversions.
2. Click on the “≡” icon in the upper left of the Ad Manager page. > Go to the “Reports and figures” menu. > Click “Tracking (LINE Tags).”

3. Check the codes that appear on the screen one by one.
You can insert the base code, custom event code, and conversion code on the advertiser’s website as desired.
Please refer to the followings to see how you can insert each type of code:
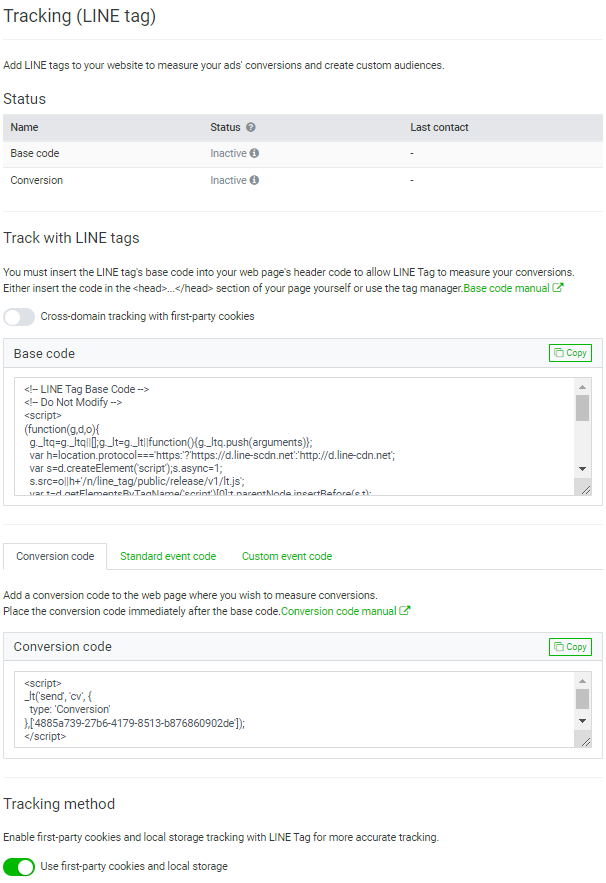
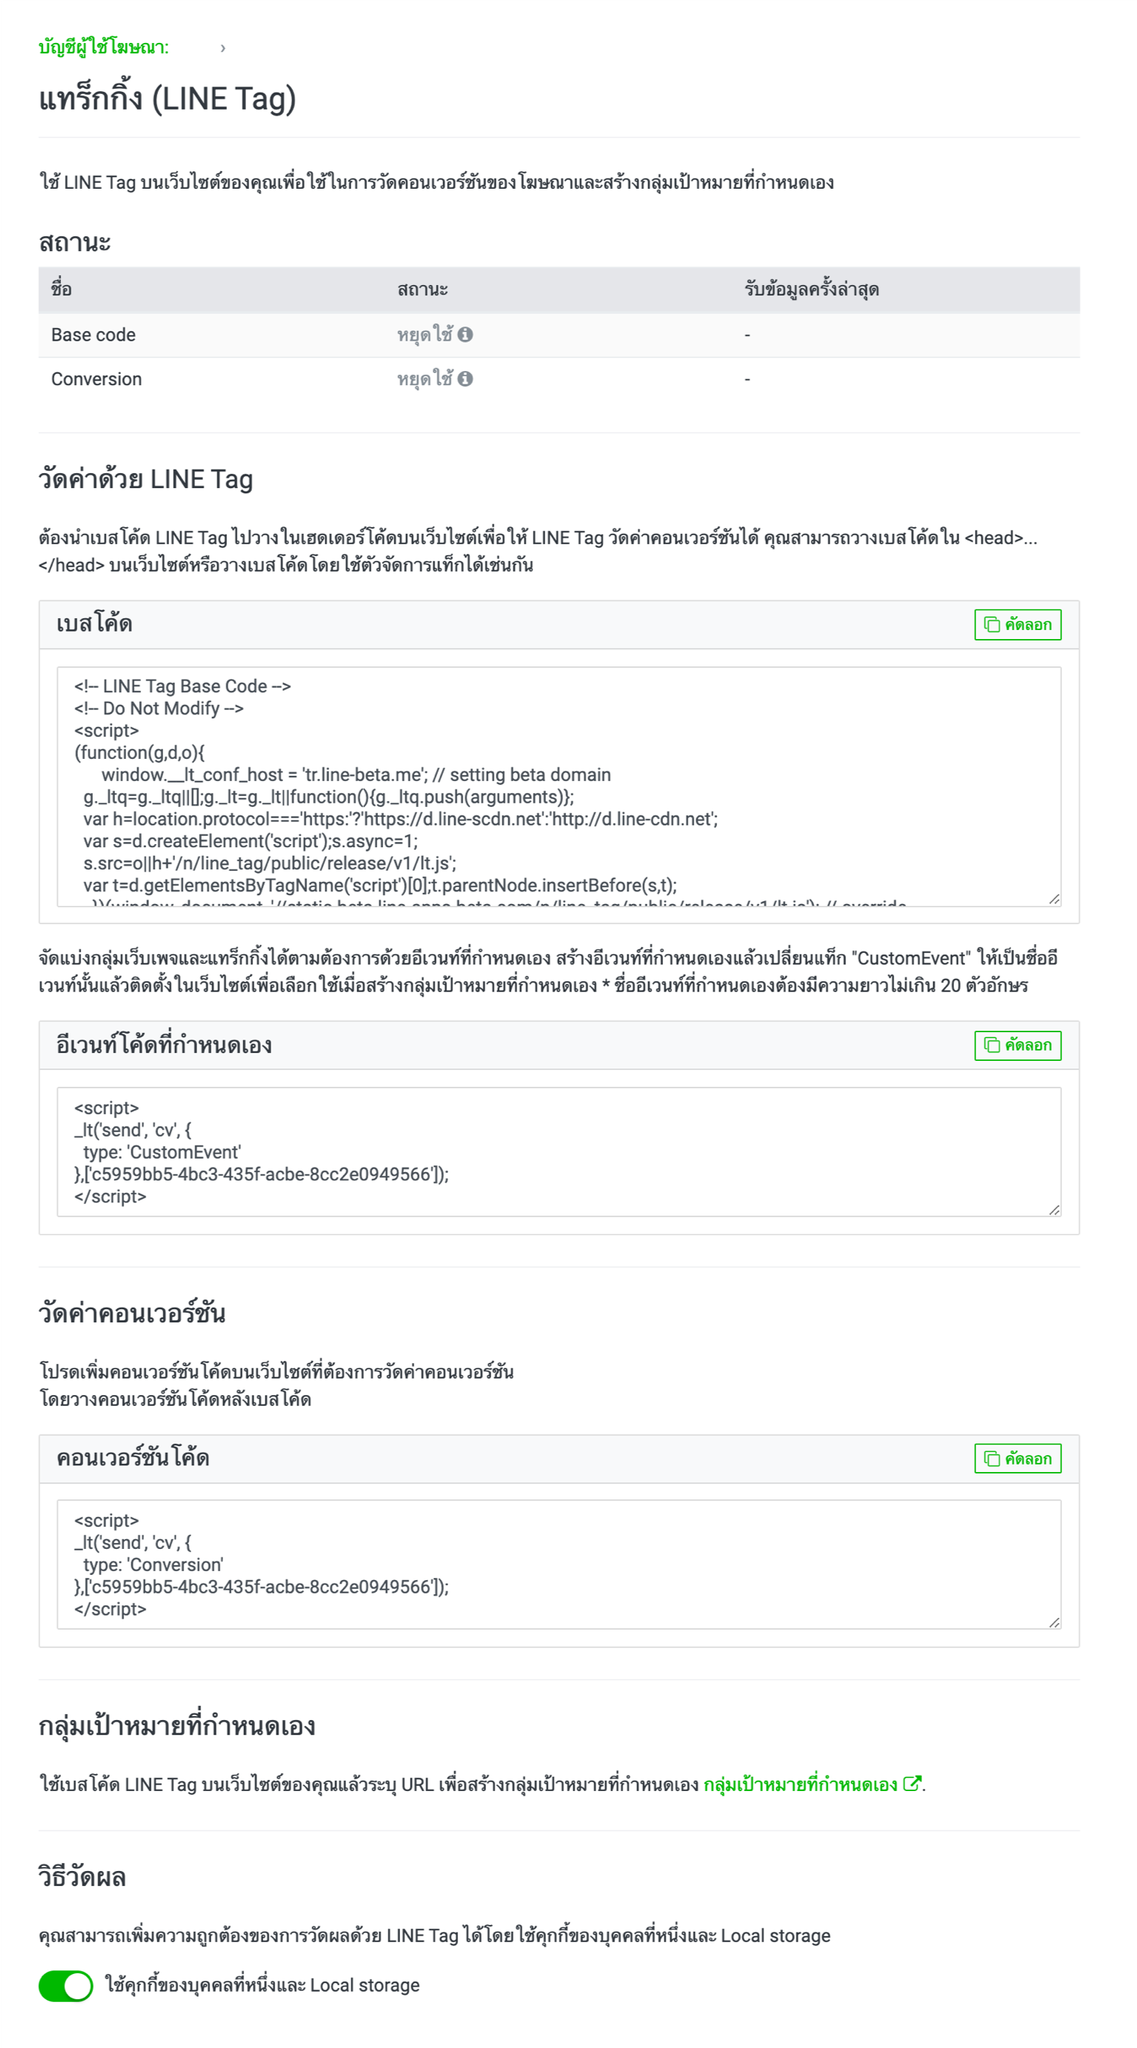
Tracking (LINE Tag) page description
- Status
You can check a tag status from here.
Name: This refers to tag name.
For the event code, the event name set earlier will appear when the tag is triggered.
Status: A tag’s functional status is displayed here.
If the tag is inserted properly, the system will display the status as “Active.”
If the tag remains inactive for 7 days, the status will read “Inactive.”
Last contact: This shows the date and time the tag was last triggered.
- Type of code
Please copy the code that best suits your purpose for use on the website.
- Custom audience
This will lead you to the audience creation page, where you can create an audience for retargeting and a lookalike audience; for example.
LINE Tags can gather audience data that can be of use for other purposes, such as ad retargeting.
- Tracking method
If a third-party cookie is unusable, you may use the first-party cookie or Local Storage instead.
Note:
- If the status still remains Inactive after a LINE Tag has been inserted, this may indicate failed insertion. Please recheck to confirm that the tag was inserted properly.
- Cross-domain tracking that uses first-party cookies requires additional adjustments to the base code. You can find further details here.
(Last updated: October 19, 2020)
Website conversion is a measure of conversions on a website.
You have to insert LINE Tags in order to track the conversions of your website.
* Please see how you can insert LINE Tags here.
There are 2 types of website conversion tracking: tracking by conversion codes and tracking by custom conversions.
Tracking by conversion code
You need to insert conversion codes at the conversion point.
* Please see how you can insert conversion codes here.
When users click on ads displayed on LINE Ads and then enter the website that has inserted conversion codes, the system will trigger LINE Tags to track the number of conversions.
The system will also examine the cookie data to see whether website visitors have clicked on the ad. If there is a click on the ad during the tracking period (30 days for conversion codes), it will be counted as a conversion.
* The result of conversion tracking will be updated in the CV column on the Ad Manager dashboard.
* You can set an attribution period for custom conversions from 1 to 180 days.
* The results may not always be accurate. This depends on device versions and sometimes on the expiration dates of cookie data.
Custom conversion tracking
Custom conversion works effectively for the following purposes:
- Inserting conversion codes somewhere other than the conversion point.
- Tracking conversions based on URLs or custom events.
- Flexibility in attribution period adjustments.
To create custom conversions step by step:
1. Click on the “Ad Account” tab on the homepage. > Select the account name for which you want to create custom conversions.
2. Click on the “≡” icon on the upper left of the Ad Manager page. > Go to “Reports and figures.” > Click “Custom conversions..”
![]()
3. Click “+ New custom
conversion” under the Custom Conversions menu. > Fill out each
item in the field, and finally, click “Save.”.png)
![]()
* The “Last contact” field shows the date and time of when the conversions were last tracked.
* You can set an attribution period from 1 to 180 days.
Specifying URLs:
You may specify single URL or keyword, or use the OR/AND rule to add multiple values.
(Broad keywords or URLs using an asterisk (*) wildcard to substitute certain characters in a string, or entering only the first character of the string, is not allowed.)
<Tracking by using conversion rules>
URL_A and URL_ B
- Using the OR rule: Able to track either URL_A or URL_B.
- Using the AND rule: Tracking is unachievable.
(Conversion rule cannot be set as “Track the number of users who visit both URL_A and URL_ B.”)
Keyword_A and keyword_ B
- Using the OR rule: Able to track URLs that contains either keyword_A or keyword_ B.
- Using the AND rule: Able to track URLs that contains both keyword_A and keyword_ B.
Event rules:
The system will display the names of any active event codes on the drop-down list (only when a custom event code has already been inserted).
Please select the event that you want to be counted as a conversion.
* The event rule “Conversion” refers to a conversion code.
Note:
- You can view tracking results for custom conversions in the performance report.
- Normally, conversions are valid for 30 days. If you want the validity period to last from 1 to 180 days, please select the “Conversion” option and then set the length of time you want.
- You can create up to 100 custom conversions. Once created, you cannot edit the conversion data except for the name and description of the conversions. These conversions cannot be deleted. If a conversion is no longer used, please update its status to “Pause.”
- Since the system does not show real-time updates, even if you have already changed the status to “Pause,” you will see that the status still reads “Active.”
(Last updated: October 19, 2020)
Creating an Audiences
You can create an audience by following the steps below:
1. Click on “Ad Account” on the homepage. > Select the account name for which you want to create an audience.
2. Click on the “≡” icon in the upper left of the Ad Manager page. > Go to “Shared library.” > Click “Audience.”
3. Click “+ New audience” above the list of your audiences.
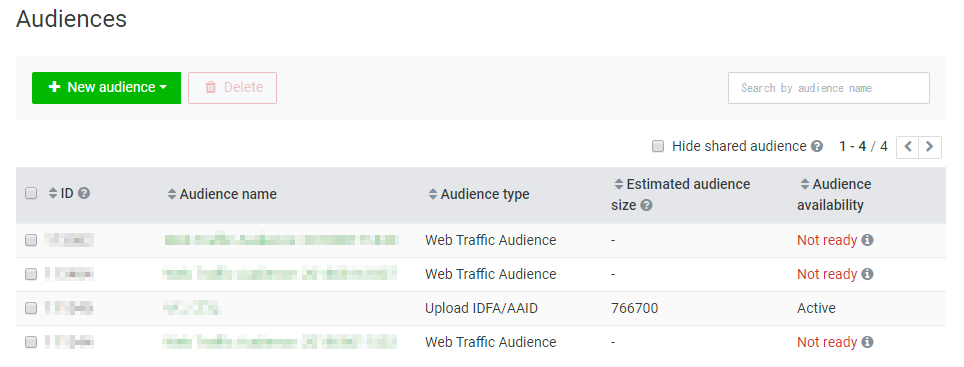
4. Select the type of audience you want to create. > Fill out each item in the field. > Click “Save.”
Please see below for information on the available settings for each type of audience.
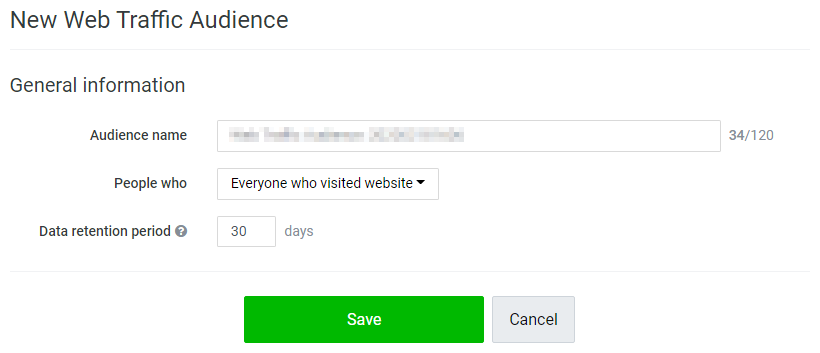
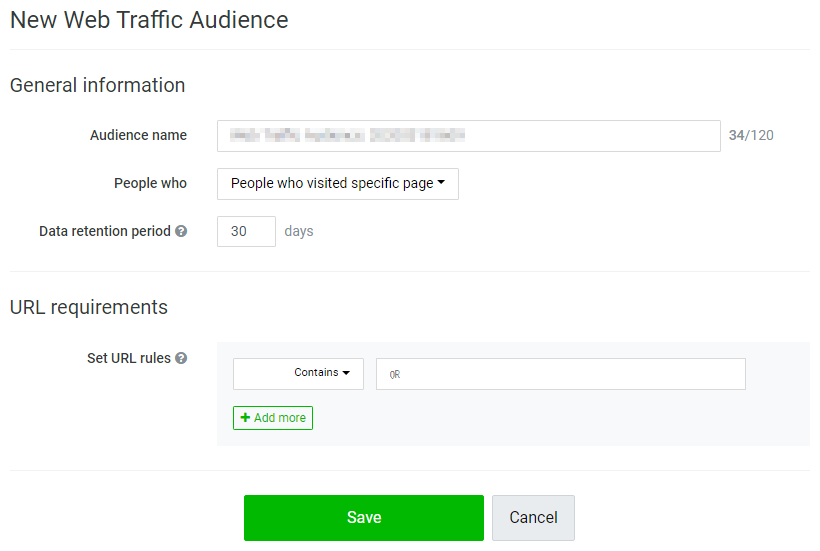
Web traffic audience
- Audience name
This is the name of the audience, which appears on your audience list.
You can set a name for your audience as desired (you can edit the audience name later).
- The ‘People who’ setting
Everyone who visited the website: This option refers to users who visited all website pages with LINE Tags inserted.
People who visited a specific page: This option refers to users who visited all pages that have LINE Tags inserted with a specific URL rule.
You can specify your target page by adding a single URL or keyword, or you may use the OR/AND rule to add multiple values.
* Broad keywords or URLs using an asterisk (*) wildcard to substitute certain characters in a string, or entering only the first character of the string, is not allowed.
<Specifying a target page using multiple rules>
URL_A and URL_ B
- Using the OR rule: Able to track users who followed either URL_A or URL_B.
- Using the AND rule: User tracking is unachievable.
(This rule cannot be set to “Track users who followed both URL_A and URL_ B.”)
Keyword_A and keyword_ B
- Using the OR rule: Able to track users who followed a URL that contains either keyword_A or keyword_ B.
- Using the AND rule: Able to track users who followed a URL that contains both keyword_A and keyword_ B.
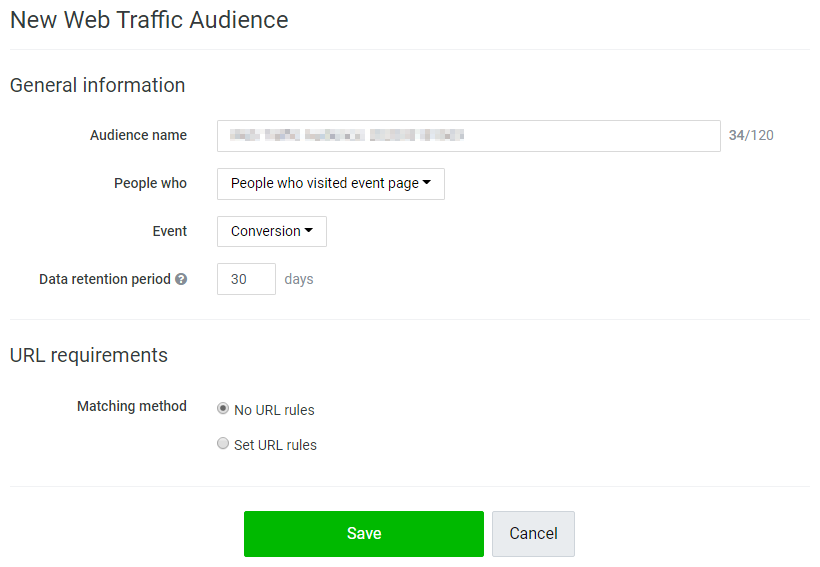
People who visited an event page: This option refers to users who visited pages that have LINE Tag custom event codes inserted.
Once the inserted event code has been triggered, you will be able to select that event from the drop-down list.
To specify a particular page from all pages that have custom event codes inserted, please set URL rules under the URL requirements setting.
This setting functions the same way as for the “People who visited a specific page” setting.
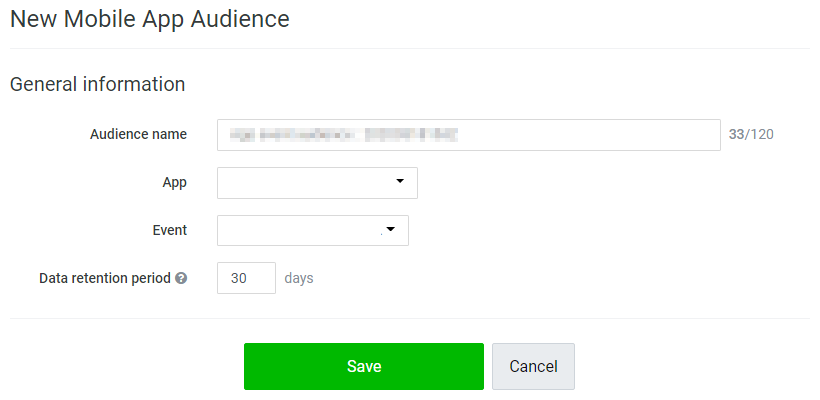
Mobile app audience
* Please click “Media” to register your application and link it to the SDK first.
Set an audience name as desired and select the application that you have already registered.
The event registered on the SDK will appear on the drop-down list. After that, select the event you want to set as your audience.
You can set different parameters based on each event.
Note:
- If an event has not been triggered, the system will not show it on the drop-down list. As a result, you cannot select that event.
- Once an event is triggered, the event name stays undeletable for 180 days, so please be careful when proceeding with this process.
- If an event still does not appear on the drop-down list even though you have already configured its settings on the SDK, it may mean that an error occurred in the linking process or that the event settings on the SDK side are incorrect.
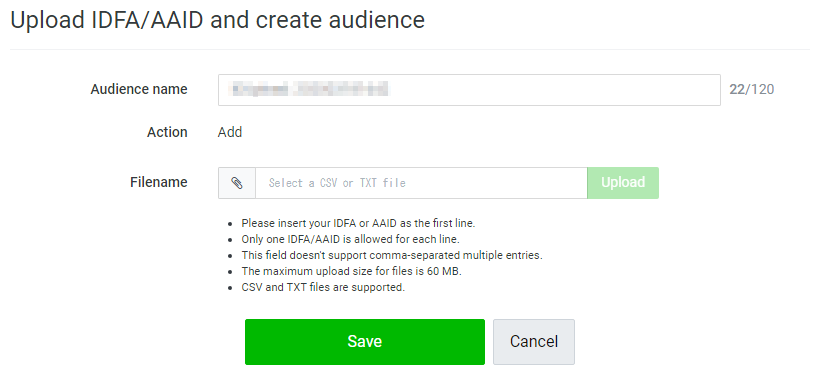
IDFA/AAID upload
You can upload your own IDFA / AAID to create an audience.
Please fill in each item to create an audience.
-Audience name
Display name in an audience list. You can set audience name as desired. (Can be edited afterwards)
-File name
Please select and upload file
File upload requirements
- Be sure to insert the IDFA/AAID as the first line, not the header name.
(You can upload IDFA/AAID using the same file.)
- Only 1 IDFA/AAID is allowed for each line.
- Multiple IDFA/AAID entries separated by delimiters such as comma (,) are not allowed.
- The maximum file upload size is 60 MB.
- The system only supports CSV and TXT file formats.
Add audience method
You can add or overwrite audience data with the following steps.
“Add” refers to the upload of new set of audience
“Overwrite” refers to the replace of existing audience with new version of audience.
In case you use automatic bidding configuration, the overwrite of audience may affect the system learning phase.
Method: Go to Audience > + New audience > Upload IDFA/ AAID > Upload file in accordance to the steps above
Or go to Audience > Click existing audience > Click “Overwrite” and upload file in accordance to the steps above
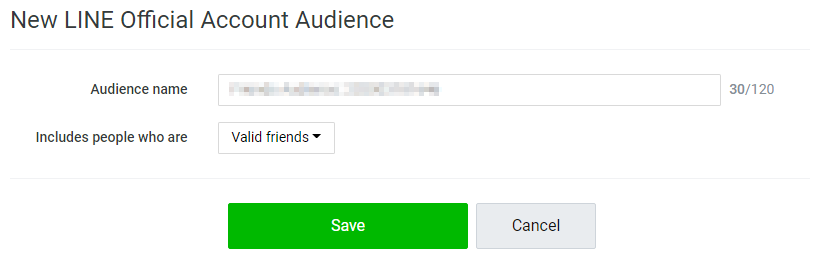
LINE Official Account audience
You can create this type of audience by setting a name for your audience as desired and then select the “Valid friends” or “Friends blocking the account” option.
* Valid friends will include your Target Reach.
* You can create the audience from LINE IDs that link to your account only.
* The number of users in the audience will not match your account's total number of friends because the system does not include users who have deleted your account from their friends list and users in the audience who have not logged in to LINE for a long period of time.
* It may take around 2-3 days before you can put the LINE Official Account audience to use.
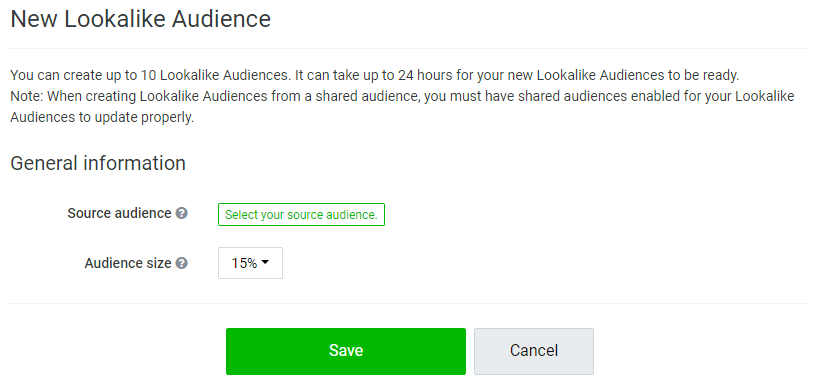
Lookalike audience
Please select a source audience and audience size (from 1-15%).
* It may take around 24 hours before you can put the Lookalike audience to use.
* Lookalike audiences do not include the source audience.
* You can create up to 10 Lookalike audiences.
Video view audience
You can create an audience from the users viewing a particular video by selecting users’ video interaction rate.
· People who clicked the video
· People who viewed the video
· Viewed more than 3 seconds
· Viewed 25% of the video
· Viewed 50% of the video
· Viewed 75% of the video
· Viewed 95% of the video
· Viewed the video to the end
Note:
· You can set up to 30 days validity period. In case the selected video has been paused longer than validity period, audience status will become not ready.
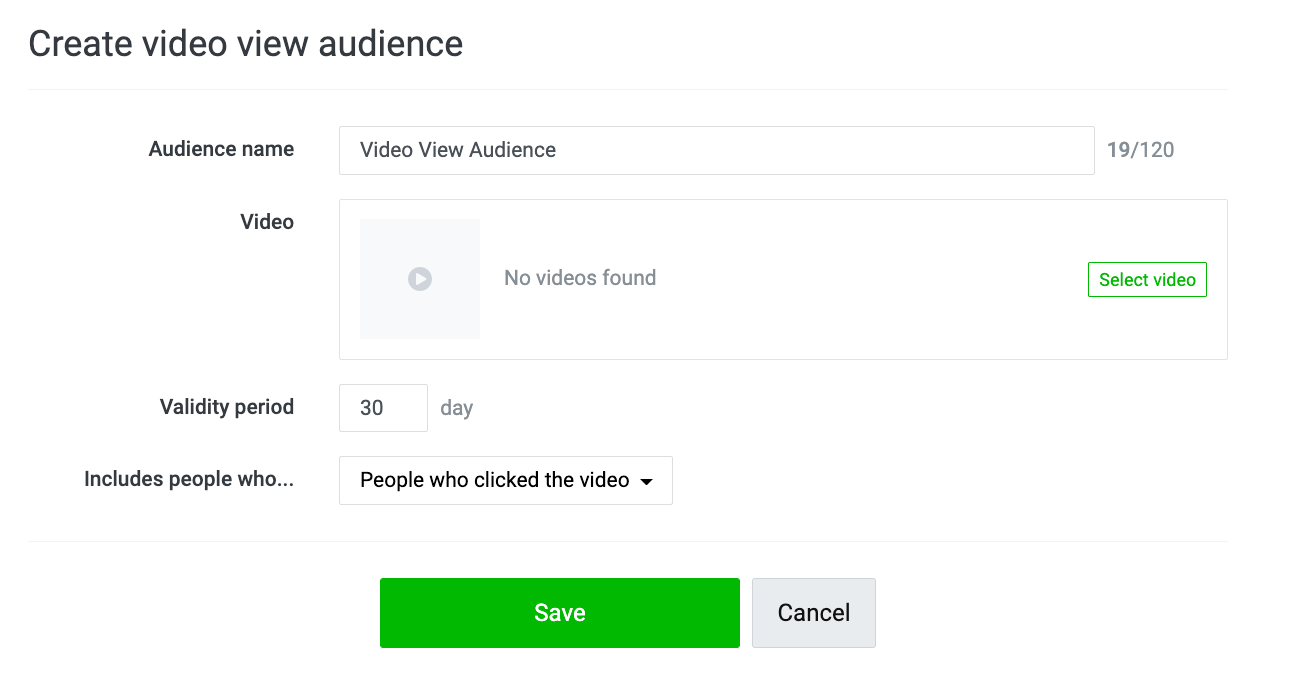
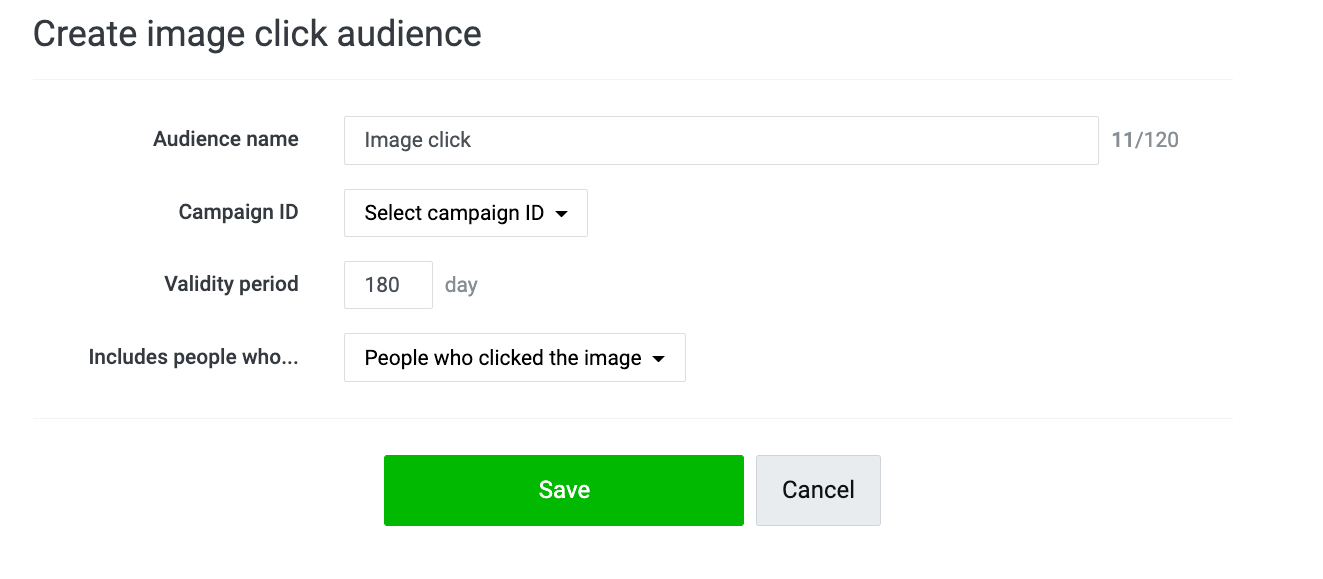
Image click audience
You can create an audience from selecting campaign ID.
Note:
· You can create audience from audience who click image ad format creatives under selected campaign ID. This excludes video ad format creatives.
(Last updated: December 8, 2021)
The learning process requires approximately 40 events (for example, clicks/conversions) per ad group to be complete. The number of events has a greater influence on performance improvement than the ad distribution period. The status will change from “Learning” to “Stable” when learning process is complete.
In cases where the learning status remains unchanging or shows only slight progress, you can increase the occurrence probability of events by configuring the basic settings as follows:
1. Increase the audience size.
2. Increase the bidding amount and/or change bidding amount configuration strategy
3. Increase the number of ads per ad group.
Note:
- Resuming a paused ad group may result in relearning.
(Last updated: October 1, 2021)
Optimization tips for effective campaign
1. Determine the appropriate budget and period that align with your campaign goals and system’s learning
2. Structure your campaign for results comparison and analysis. For example, you can layer a targeting option per ad group.
3. Optimize your campaign.
- Allocate more budget to ad groups and ads that are performing well by yourself or utilize Campaign optimization budget feature. For more information on CBO, click here.
- Continue to adjust settings for low performing ad groups and ads. You may consider pausing particular ad group and ads if the result does not improve.
- Nonetheless, the setting should not be adjusted too frequently such as every hour or every day
4. Make use of your custom audience and cross-targeting audience from LINE Official Account.
5. Regularly monitor the performance.
Improve your impression and budget spend
1. Expand your audience size per ad group or create several ad groups to compare results.
2. Choose “Event cost cap” bidding strategy. This strategy has chance to use a slightly higher bid than your bid amount to maximize as many results as possible.
3. Increase bid amount
4. Increase number of active ads. Pause ads with low performance or low click through rate (CTR) and launch new ads.
(Last updated: October 1, 2021)
You can make payments through credit card or coupon only.
Available credit cards must be issued by either of the following companies:
- VISA
- Mastercard
- JCB
- TPN
* Payment through a prepaid card is not accepted.
Please see below for the credit card registration method and timing for payments:
(Last updated: March 31, 2021)
LINE Ads self-serve has 2 main payment methods available.
1. Automatic payment
2. Manual payment
Payment method 1: automatic payment
After your ads run, LINE Ads automatically charges you based on 2 criteria of ad usage: whenever your account reaches a certain amount or a fixed period, whichever reaches first.
1.1 Threshold amount. LINE Ads automatically charges you whenever your account reaches a certain threshold amount, starting from 1,000, 5,000, 10,000 to 15,000 THB. Threshold amount will be updated to another level when successful automatic payment by threshold amount is achieved. With the fourth successful payment, you will continue to be charged at the fourth threshold level or 15,000 THB.
1.2 Fixed period. LINE Ads automatically charges you 20 days after your first ad launch or after your last payment.
*You can check your ending balance at "Billing and Payment"
*If the discount coupon is active, payment will be proceeded with coupon first, before your credit card.
* Your account may be charged several times a day, depending on ad usage.
* If more than 1 credit card is registered, payment will be proceeded with your selected primary card first.
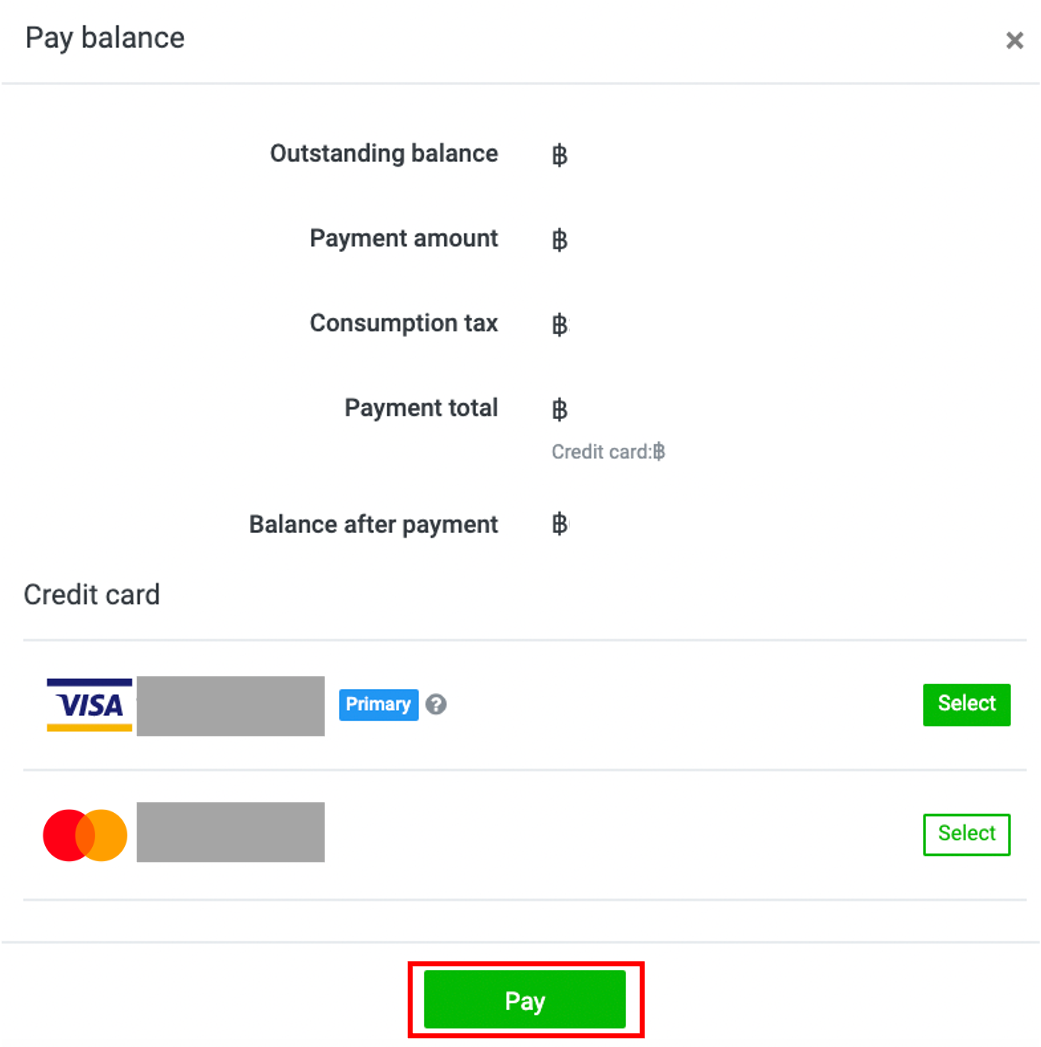
Payment method 2: manual payment
You can make a manual payment anytime by following the steps below.
1. Click on the “Ad account” tab on the homepage. > Select the ad account linked to the payer info that you want to use for making a manual payment.
2. Click on the “≡” icon on the upper left of the Ad Manager screen. > Go to “Settings.” > Select “Billing and payments.”

3. Click on the payer name for which you want to make a manual payment.

4. Click on the “Pay now” button in the center of the screen.
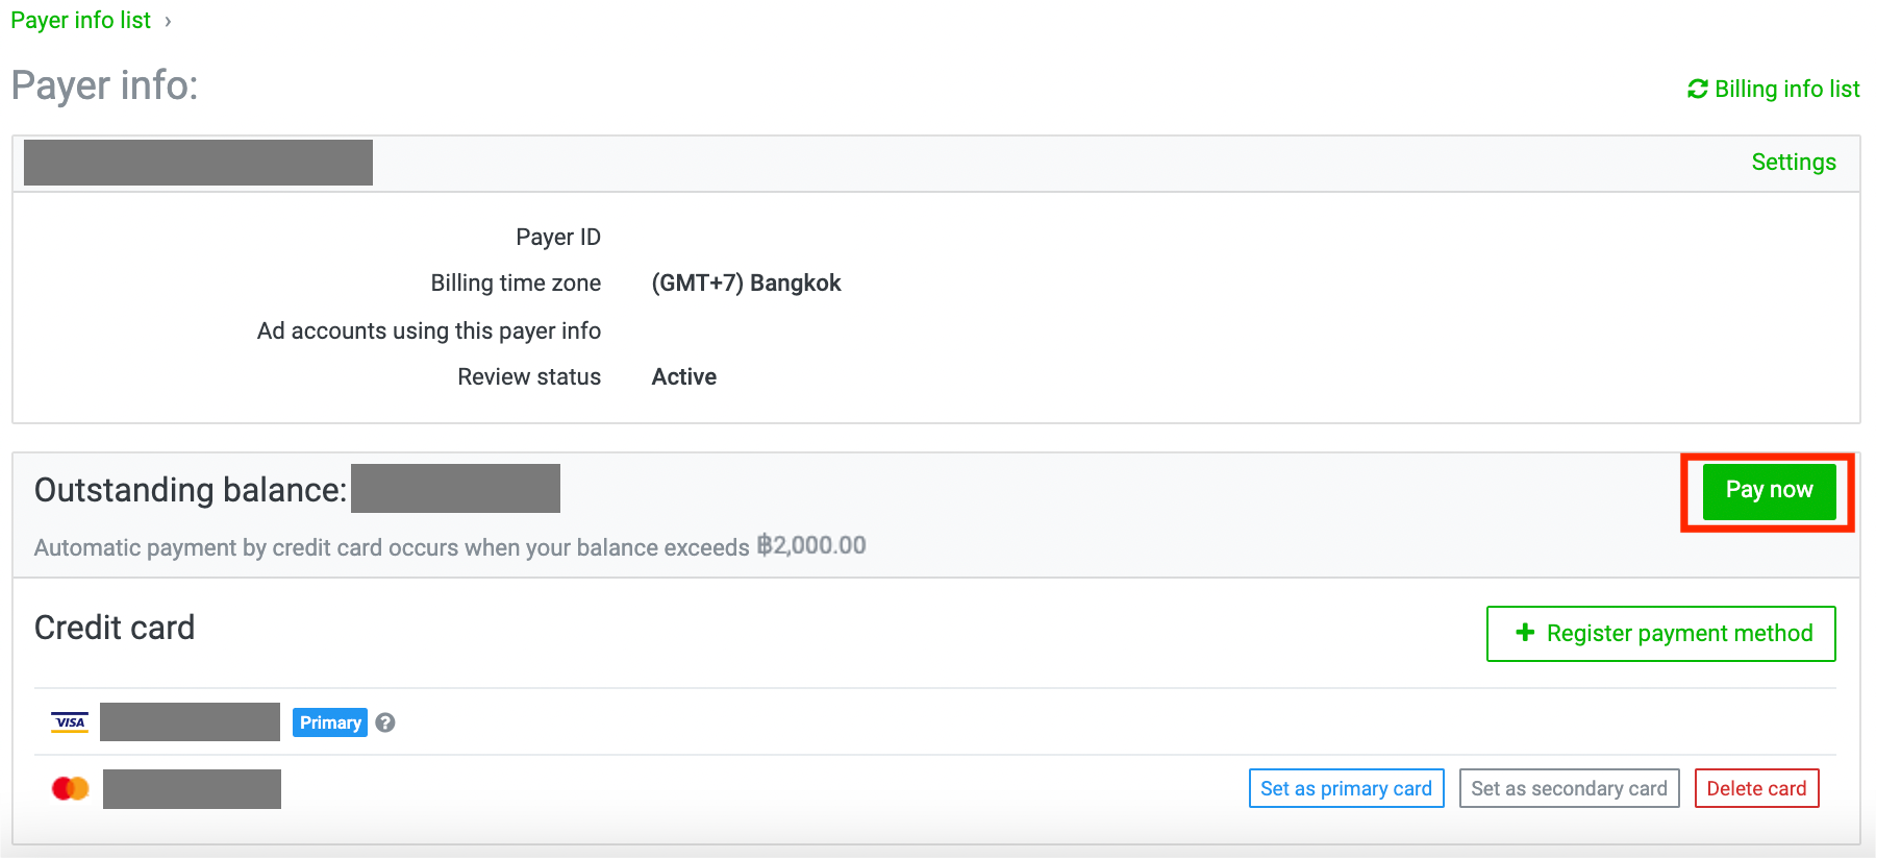
5. Select the credit card for your payment and then click “Pay.” Your credit card will then be charged in full according to the outstanding balance
(Last updated: August 25, 2021)
Starting balance describes unpaid balance of previous months. Although, your campaign is not active in the occurring month, the unpaid balance will be charged as usual when the payment threshold is reached.
Ending balance summarizes the unpaid balance for each month.
You can check your starting balance and payment information any time at "Billing and payments"
Example 1
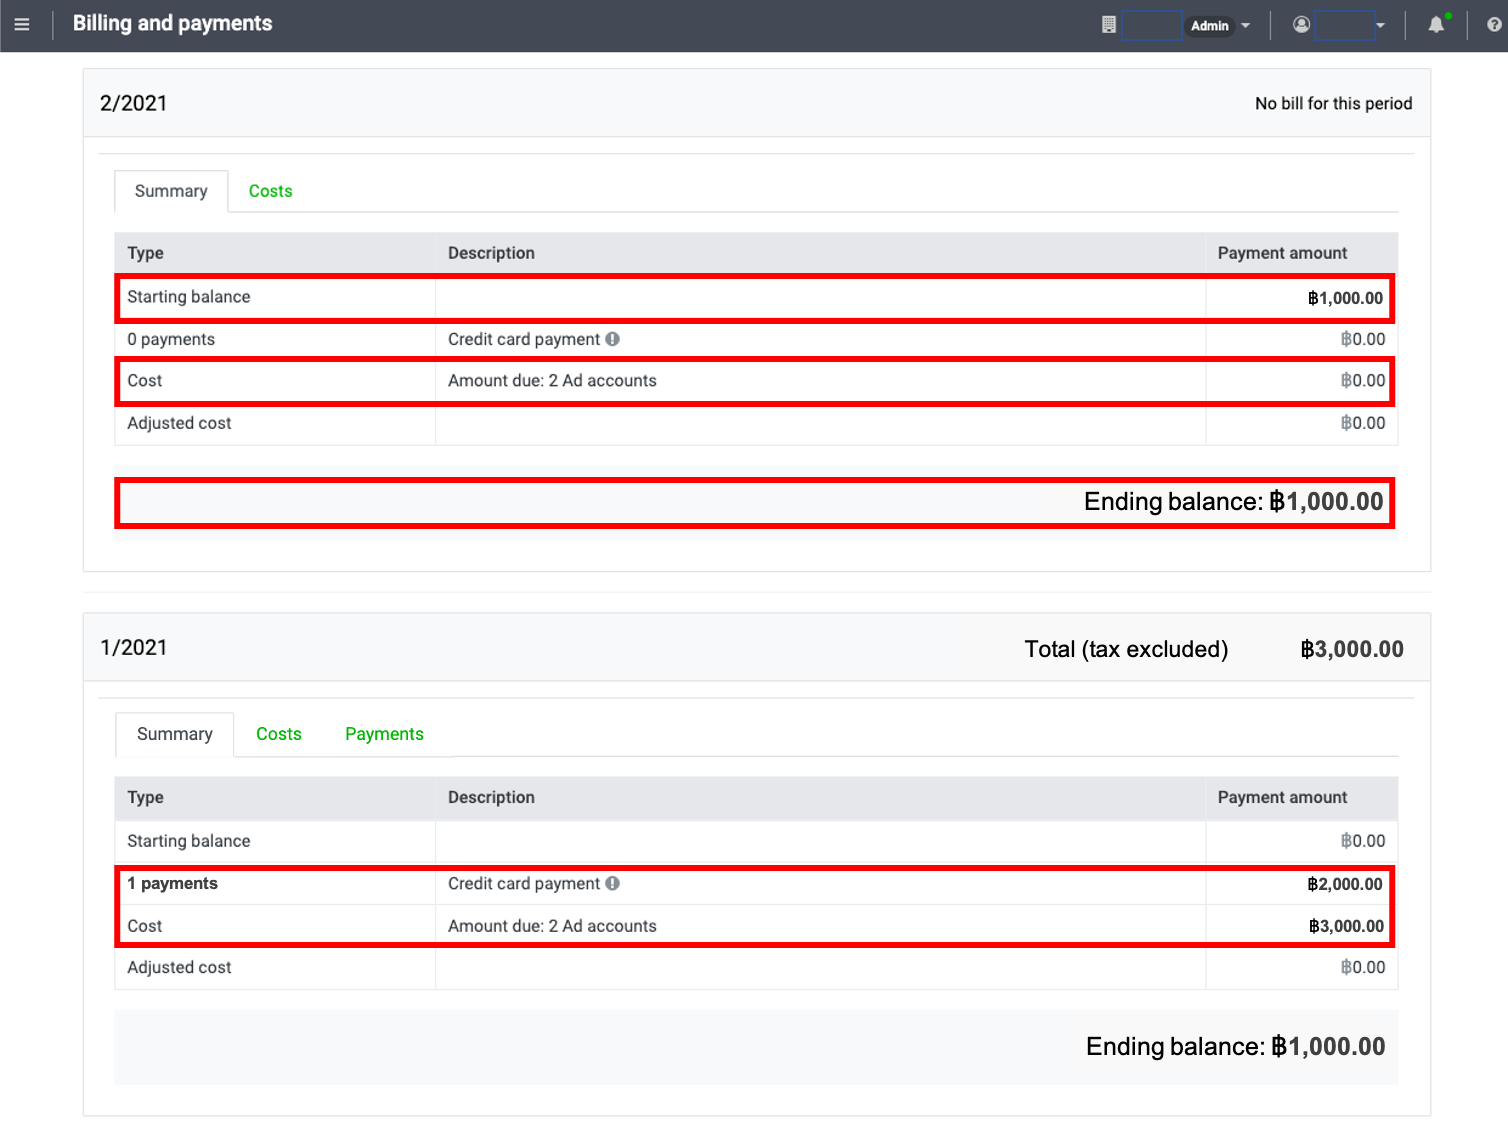
Month 1/2021:
Ad cost is 3,000 THB. 2,000 THB has been paid. Therefore, your ending balance is 1,000 THB.
Month 2/2021:
There is 0 THB cost. There is a starting balance record (or the unpaid balance of the previous months) of 1,000 THB, resulting in the ending balance (or monthly unpaid summary) of 1,000 THB.
*In the first example, there is no ad delivery, and so no cost in the second month. Once all of the unpaid balance is successfully paid, your ending balance will be updated to 0 THB.
Example 2
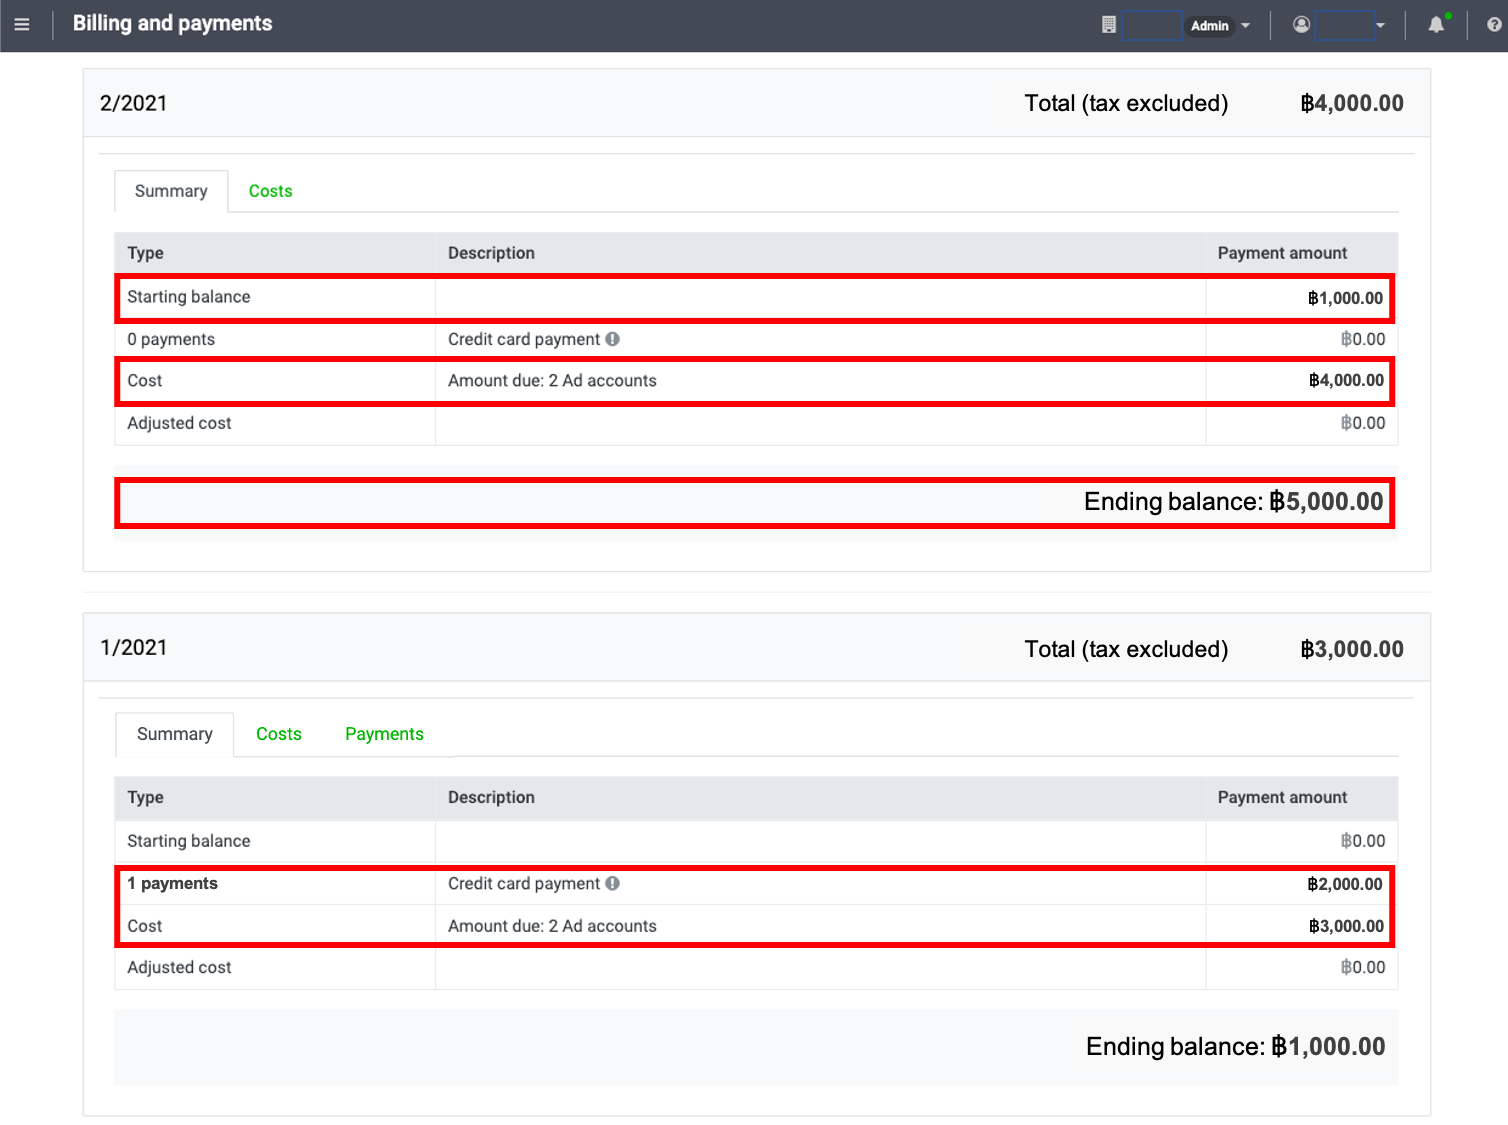
Month 1/2021:
Ad cost is 3,000 THB. 2,000 THB has been paid. Therefore, your ending balance is 1,000 THB.
Month 2/2021:
Ad cost is 4,000 THB. There is a starting balance record (or the unpaid balance of the previous months) of 1,000 THB, resulting in the total ending balance (or monthly unpaid summary) of 5,000 THB.
*In the second example, unpaid balance of the previous months is now combined with the new cost of the most recent month.
For more detail on payment timing, please click here
For more detail on overall payment information, please click here
(Last updated: August 1, 2021)
You can check all the details of your costs and request payment receipts by following the steps below:
1. Click on the “Ad account” tab on the homepage. > Select the ad account that has been linked to the billing info for which you want to check the details.
2. Click on the “≡” icon on the upper left of the Ad Manager screen. > Go to “Settings.” > Select “Billing and payments.”
.png)
3. Click on the Payer name for which you want to check the details.
.png)
4. Click “Payments.”
5. Click on the item under the “Description,” and you will be able to download the receipts for payments made during each billing cycle.
.png)
(Last updated: March 1, 2021)
As receipt/ tax invoices for “sole proprietor” business type contains personal data, you can grant downloading receipt/ tax invoice access to 1 user per 1 payer info to keep your personal data private and secure.
For “new ad accounts” created after 26 January 2022, you can set finance permission setting by the following steps.
1. Fill in your Payer info detail, and grant downloading receipt/ tax invoice access by entering user email address at “Finance permission”.

2. After creating a payer info, you can check how to register a credit card here
3. User with finance permission role can check more detail on downloading receipt/ tax invoices here
Note:
· For new ad account, payer info creator will have finance permission by default.
For “existing ad accounts created before 26 January 2022” and “ad accounts that would like to edit finance permission”, you can check and set your finance permission by following the steps.
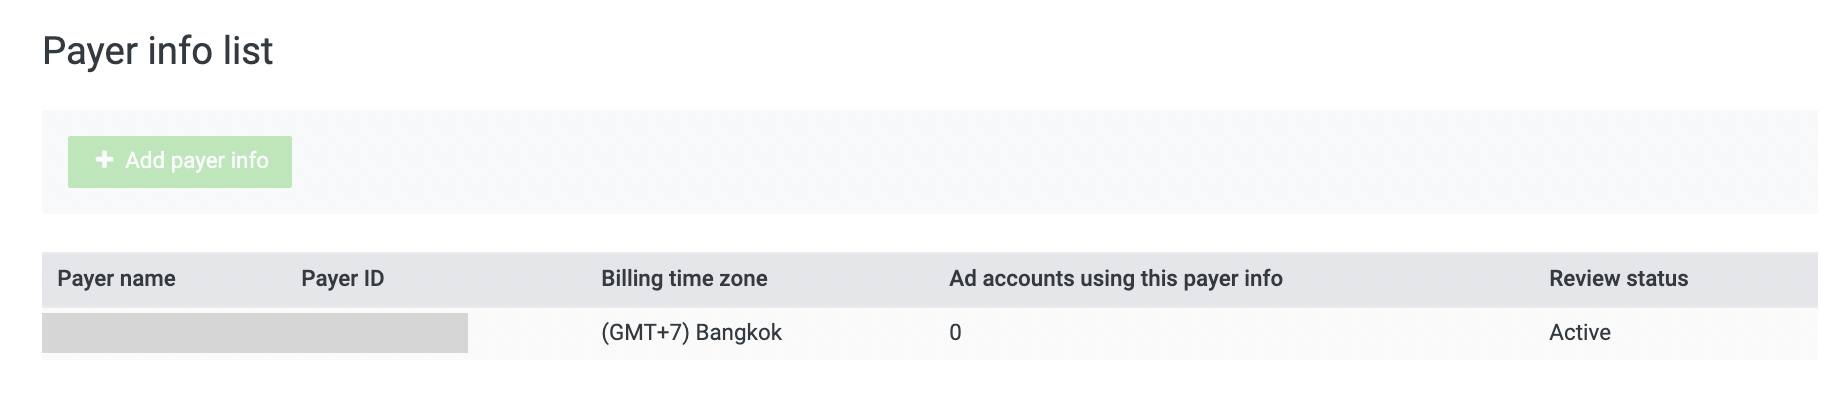
1. Click on the “≡” icon in the upper left of the Ad Manager screen. > Go to “Settings.” > Select “Billing and payments.”

2. Click the payer name that you want to check
3. Click “Settings” on the upper right side of the screen.
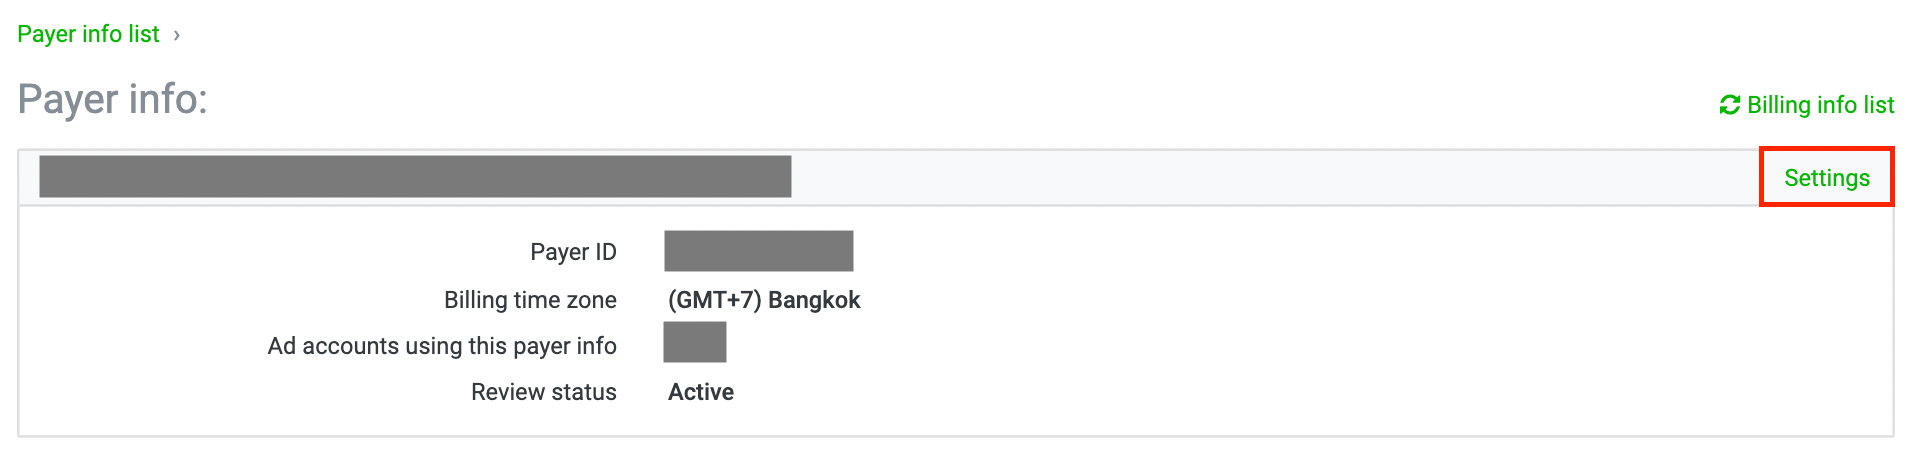
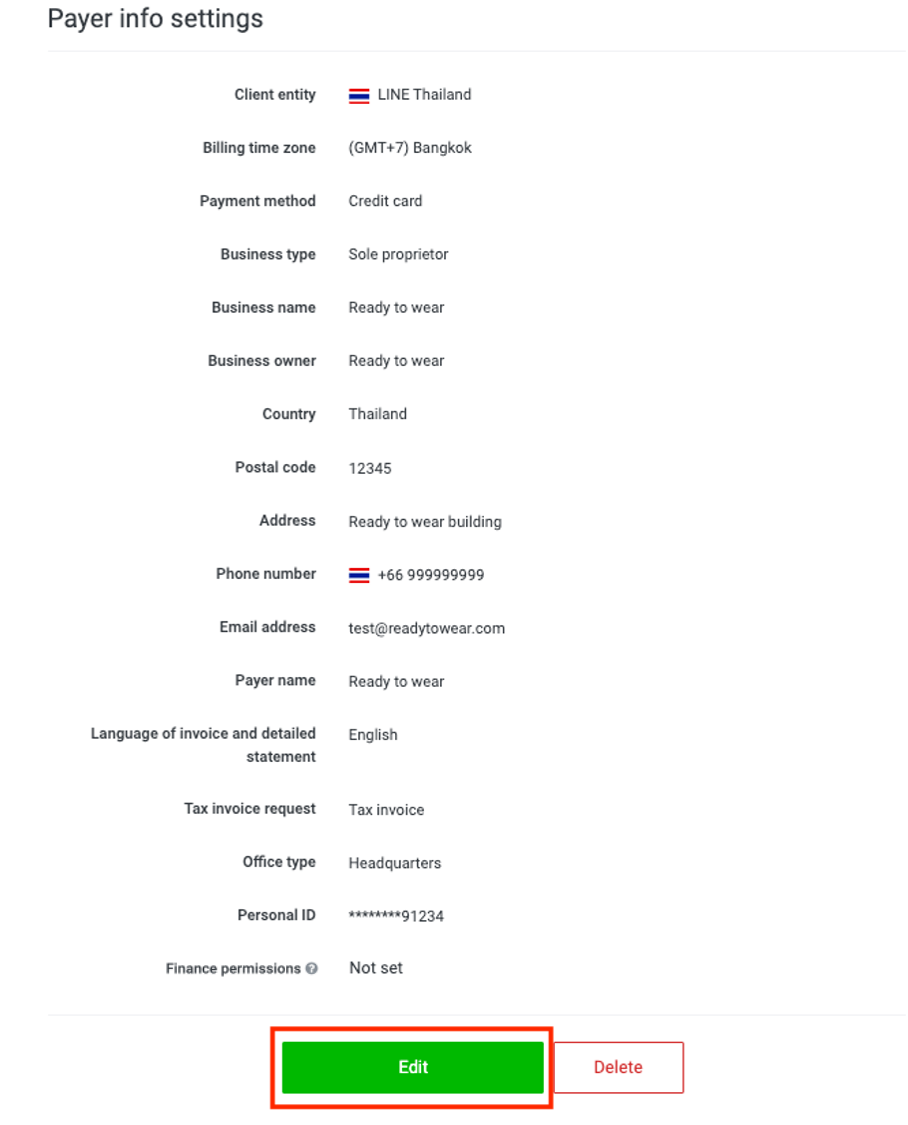
4. The payer info that you have registered will then appear on the screen. Click “Edit”.
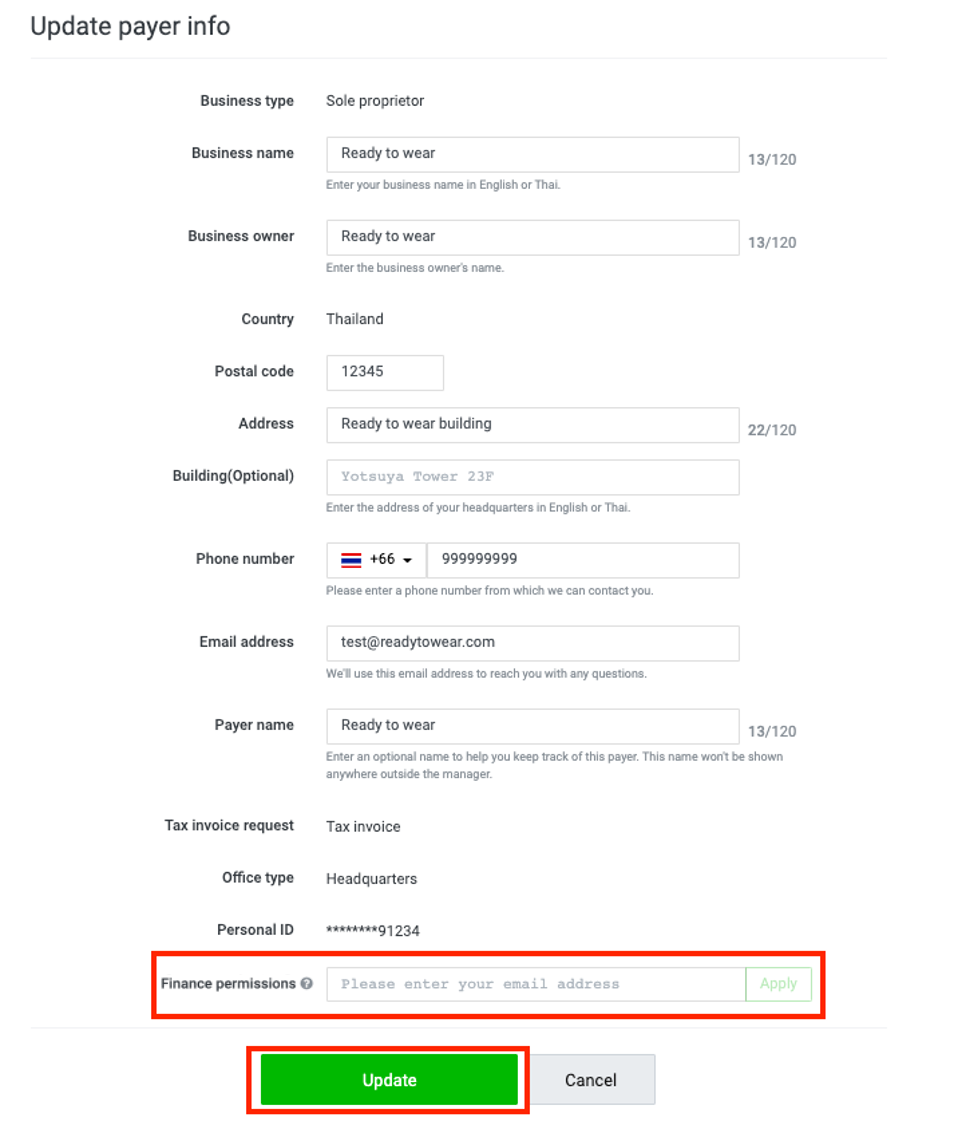
5. Enter email address for finance permission, click “Apply” and “Update”
6. User with finance permission role can check more detail on downloading receipt/ tax invoices here
Note:
· You will not be able to download receipt in case finance permission setting is not set. However, this will not affect ad setting and delivery.
· User with finance permission is the only person who can download receipt, and transfer finance permission to another user in “Billing and payments” tab.
· You can grant finance permission to yourself or another user who have “Admin” role only.
· An error will occur in case of granting finance permission to user who does not have the admin role.
· You can grant users with “Admin” role in “Manage permission” tab prior to finance permission setting by following the steps here
(Last updated: January 26, 2022)
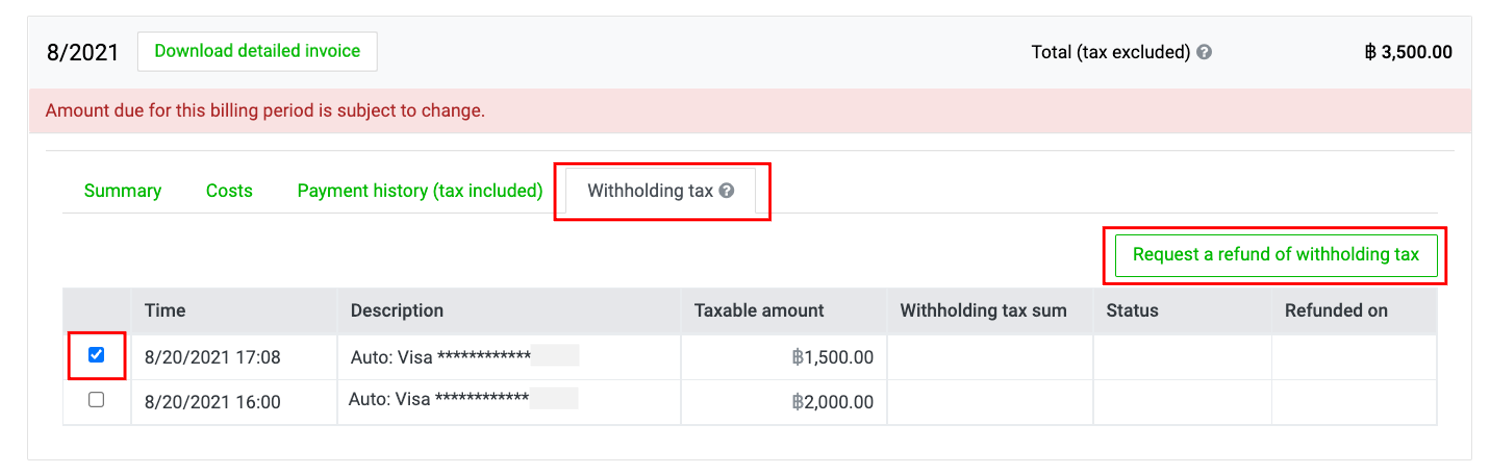
You can request a withholding tax refund by following the steps below:
1. Click on the “Ad account” tab on the homepage. > Select the ad account that has been linked to the billing info for which you want to check the details.
2. Click on the “≡” icon on the upper left of the Ad Manager screen. > Go to “Settings.” > Select “Billing and payments.”
.png)
3. Click on the Payer name for which you want to check the details.
.png)
4. Click on the “Withholding tax” tab.
5. Select the “checkbox” in front of the desired item and then click on the “Request a withholding tax refund” tab
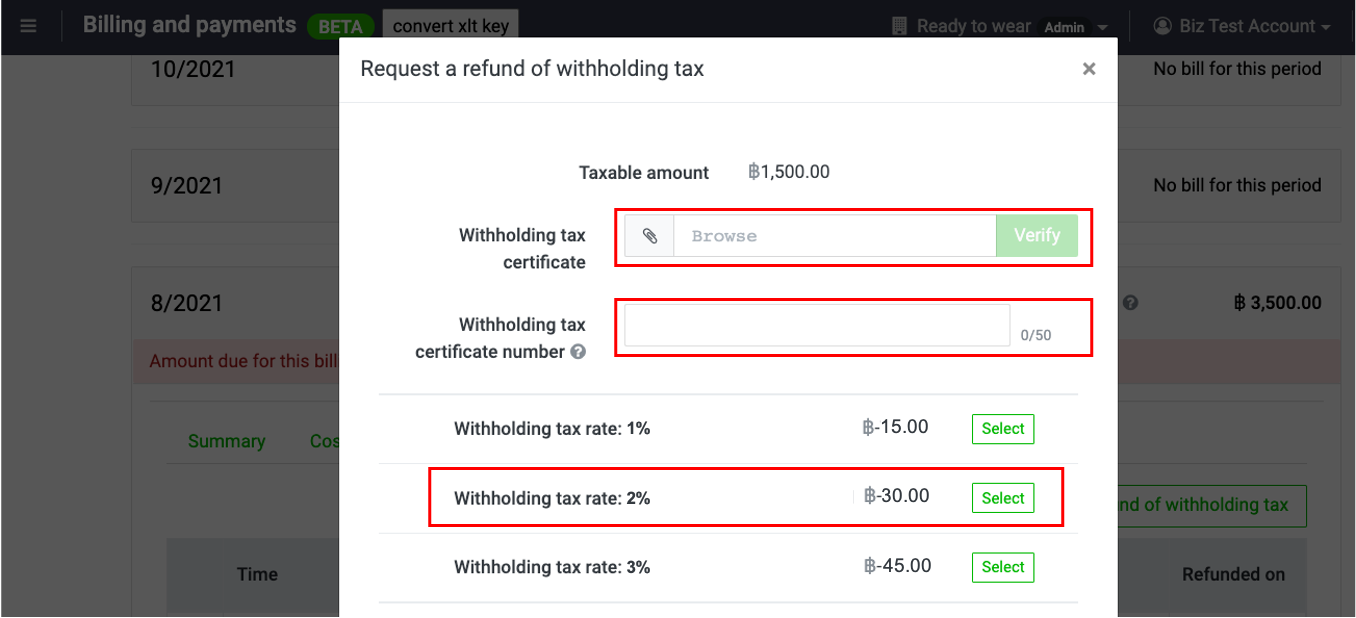
6. Upload your withholding tax certificate into the system. Select the “Withholding tax rate: 2%” option for LINE Ads (LINE Ads) advertising cost, and then click “Submit request”
7. Please send the original withholding tax certificate to the following address:
LINE Company (Thailand) Limited
AR Team
127 Gaysorn Tower, 17th-18th Floor, Ratchadamri Road, Lumphini Subdistrict, Pathumwan District, Bangkok 10330
Note:
- Send a request with a scanned image attachment of your withholding tax certificate within 60 days of the date of payment.
- When your application status reads "Pending documents," please mail the physical withholding tax certificate to the address below within 30 days of your request submission.
- If you wish to request a withholding tax refund, you have to submit requests depending on the payments made for each billing cycle. For example, If you have settled payments through a credit card for 3 billing cycles in January, you have to submit your requests for a withholding tax refund 3 times using the “Request a withholding tax refund” button, together with the file uploads of the required documents, and also send the original documents to LINE Company (Thailand) Limited for every request.
- Withholding tax request can be made from “Corporation” and “Foreign corporation” business types with “Tax invoice” request only.
- Once LINE receives your documents through the postal service, it takes 7 days for the review process to be completed. If your request is approved, the appropriate tax amount will be deducted from your next LINE Ads bill. You can check your withholding tax refund under 2 menus at “Payment amount” on the billing and payment page.
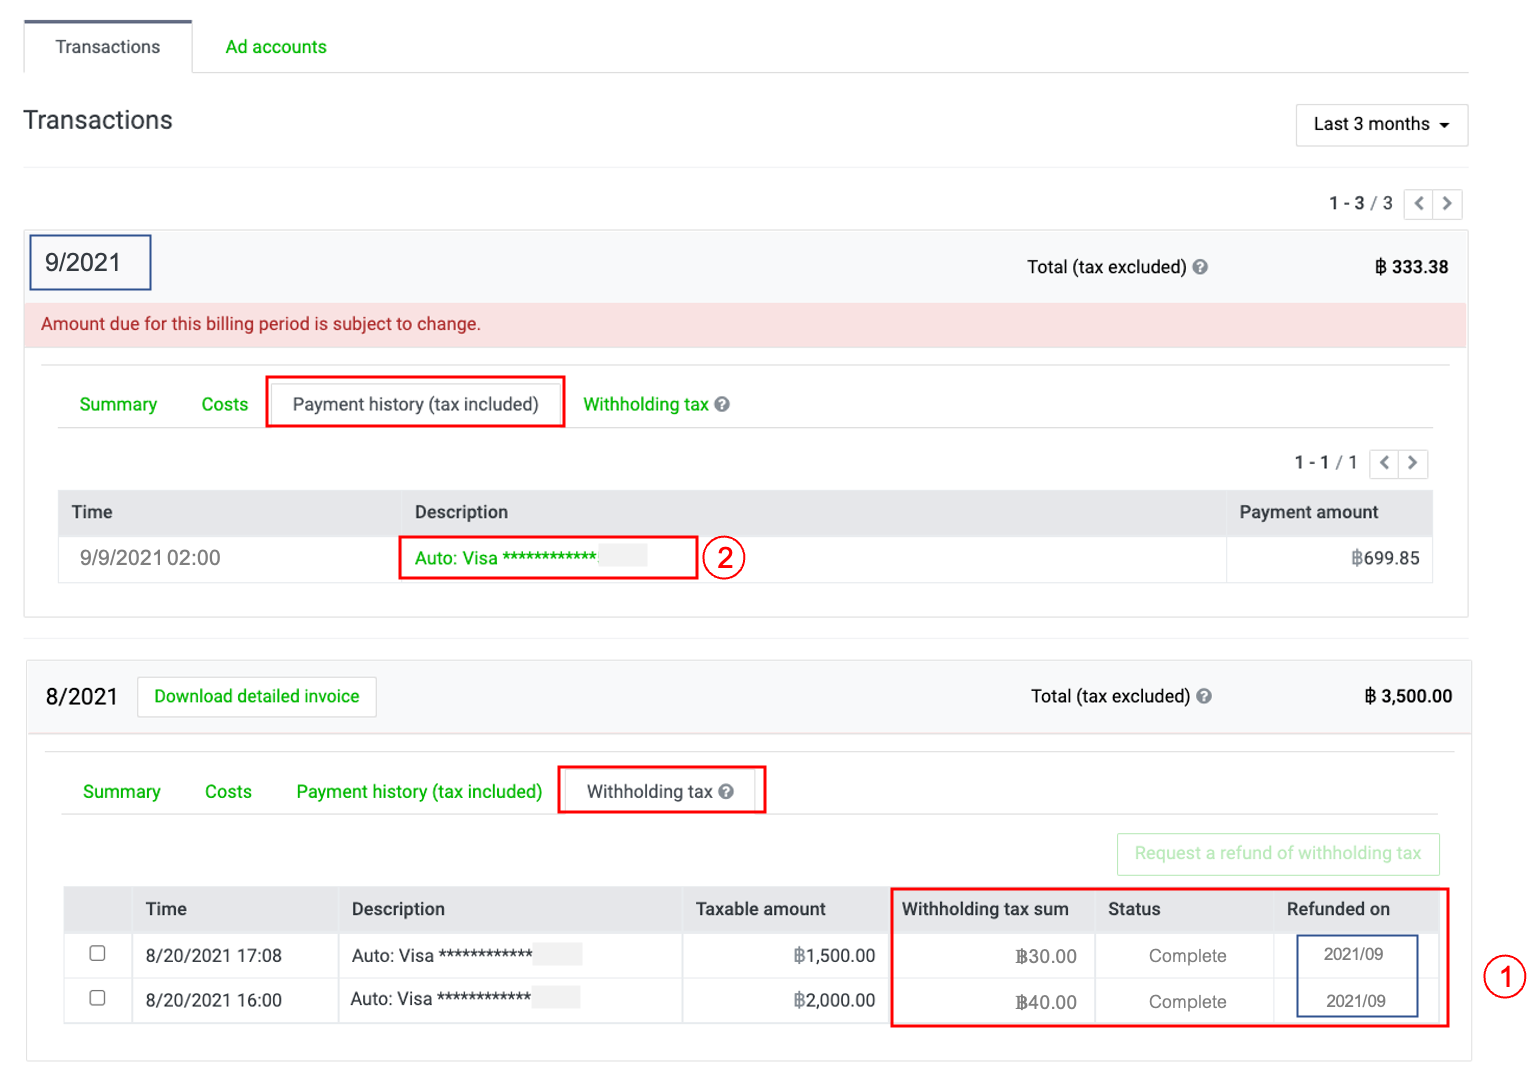
1. Check withholding tax status at “Withholding tax” tab.
2. In case the status is completed and dashboard shows the refunded is proceeded in which month (for example, 2021/09), check the deducted withholding tax amount in the advertisement billing by downloading receipt/ tax invoice at “Payments” tab.
(Last updated: December 8, 2021)
Contact us